
# Usage Guide (SaaS)
FinClip SaaS Edition is an online platform tailored for developer users, allowing them to enjoy most software features for free. In the SaaS version, we provide core capabilities required for Mini-Program development, meeting the needs of small teams, project groups, and small businesses in their daily work with Mini-Programs.
The FinClip Cloud version is a completely restructured version, with comprehensive upgrades and optimizations to the underlying architecture and product logic, enhancing the experience for developers building or managing their own Mini-Program ecosystems.
After registering on FinClip.com, you will receive 10,000 free calls per month, 1GB of free code package download traffic, and 500MB of log upload traffic. For more details, please visit https://super-apps.ai/contact (opens new window).
# 1. Product Usage Process
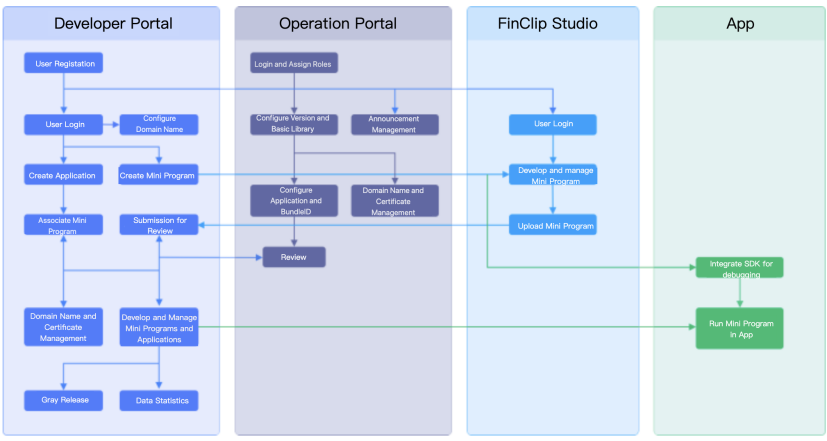
The FinClip Cloud Mini-Program Open Platform is divided into two parts: "Developer Center" and "Digital Center." The Developer Center helps Mini-Program or Host-App developers manage their Mini-Programs or App applications, while the Digital Center assists Mini-Program ecosystem operators in managing all Mini-Programs and Host-Apps on the platform globally.
The Digital Center is only available to users in private environments. In the SaaS environment, developers can only log in to the Developer Center, with the management and operation of the Digital Center provided by the platform.
Below is the product usage flowchart for FinClip for your reference:
# 2. New User Registration
In the FinClip Cloud environment, new users can complete the registration process independently. After registration, they can log in to the Developer Center of the Mini-Program Open Platform to perform related operations for Mini-Program development and management.
# 2.1 Registering a New User
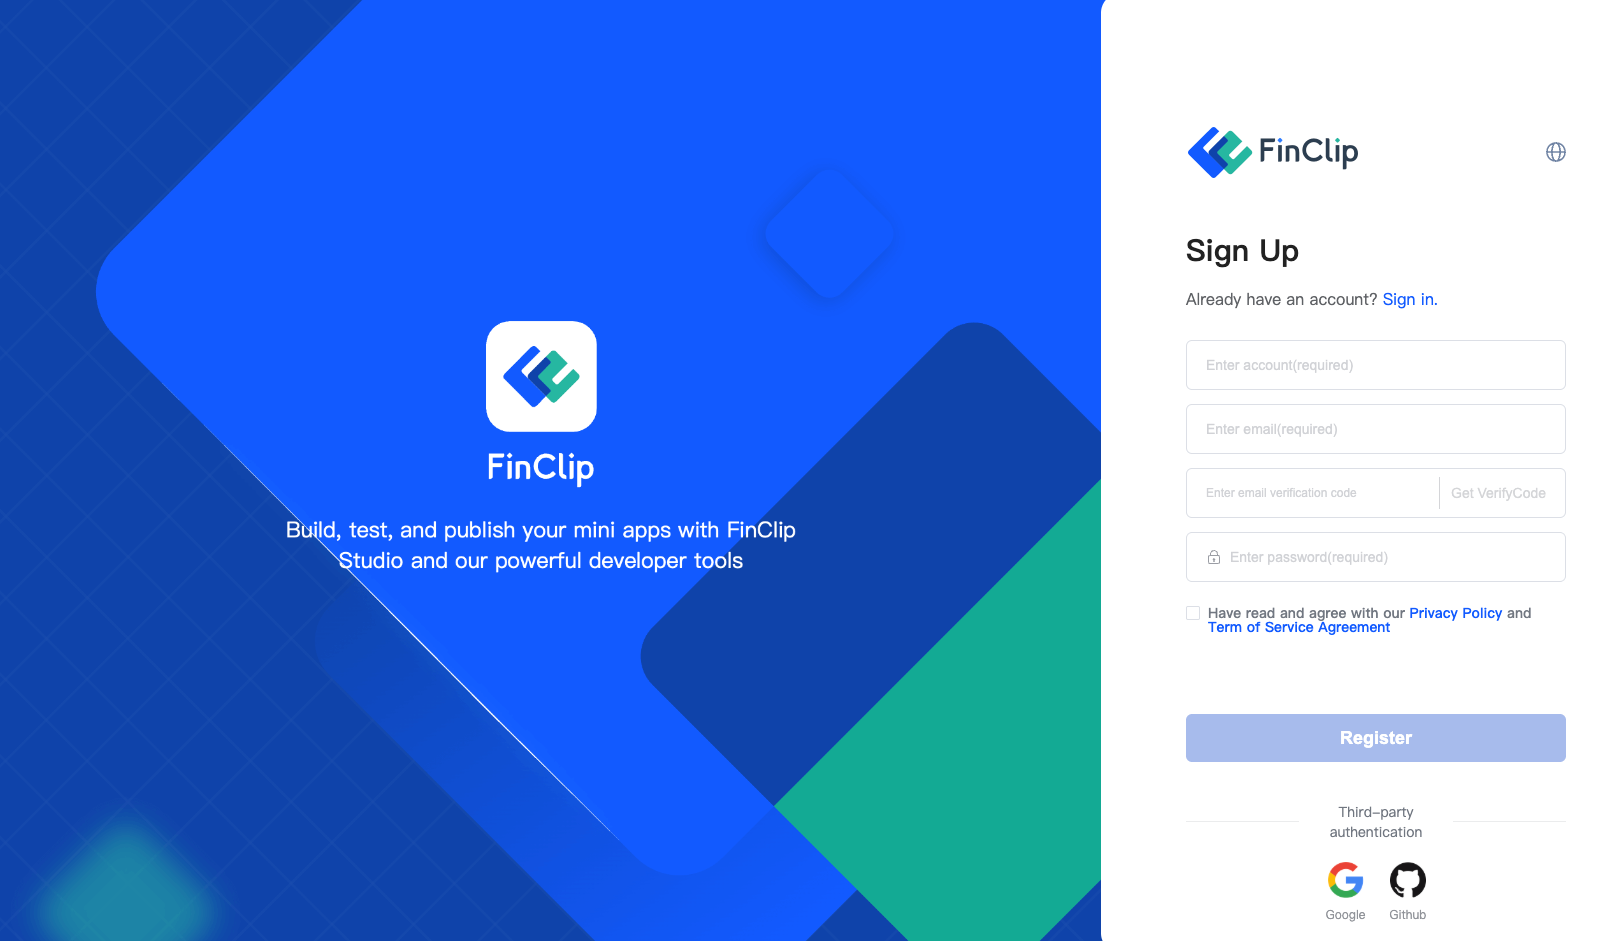
After logging into the FinClip Mini-Program Open Platform, click the "Login/Register" entry in the upper right corner, and then click the create account button to open the account creation page. On the newly opened page, fill in the username, registration phone number, and user password, and click the finish button to complete the new user registration process.
# 2.2 Upgrading the Current Team to an Enterprise Type
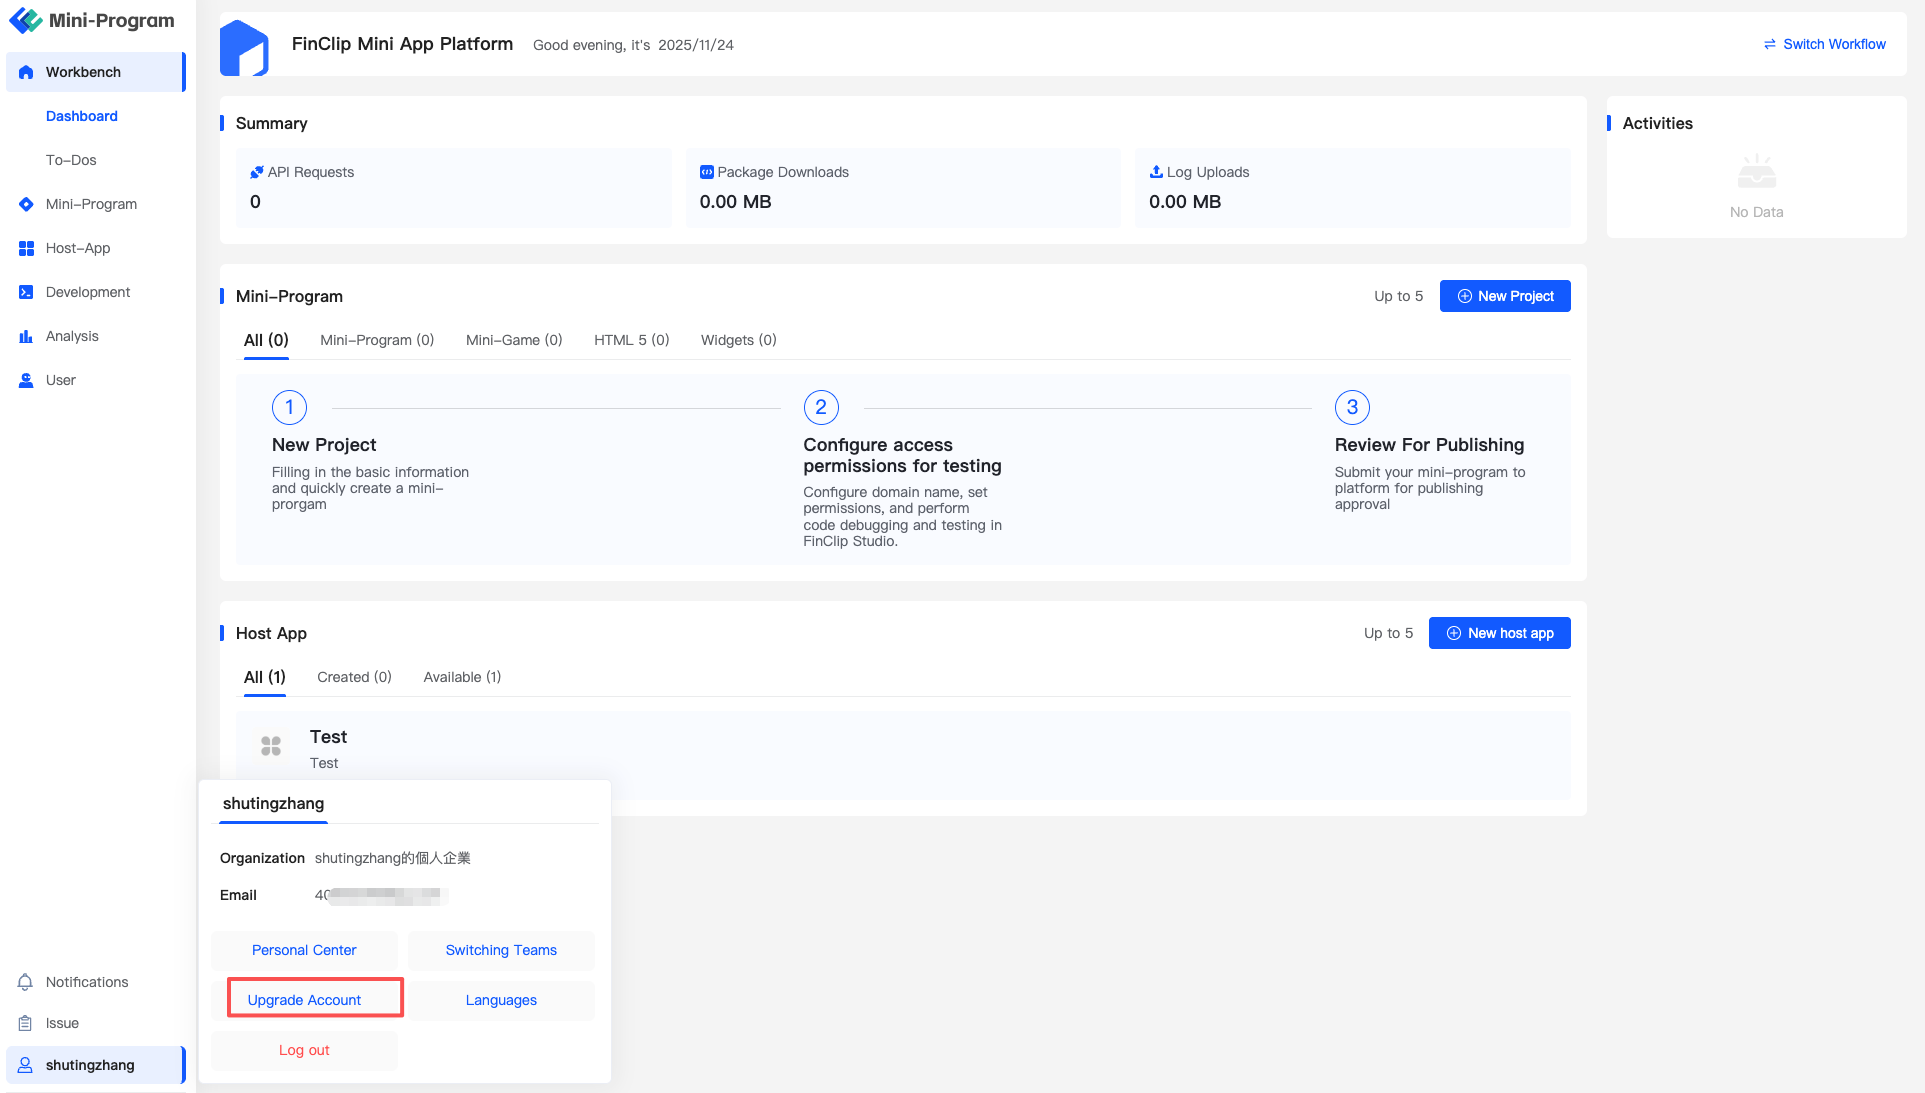
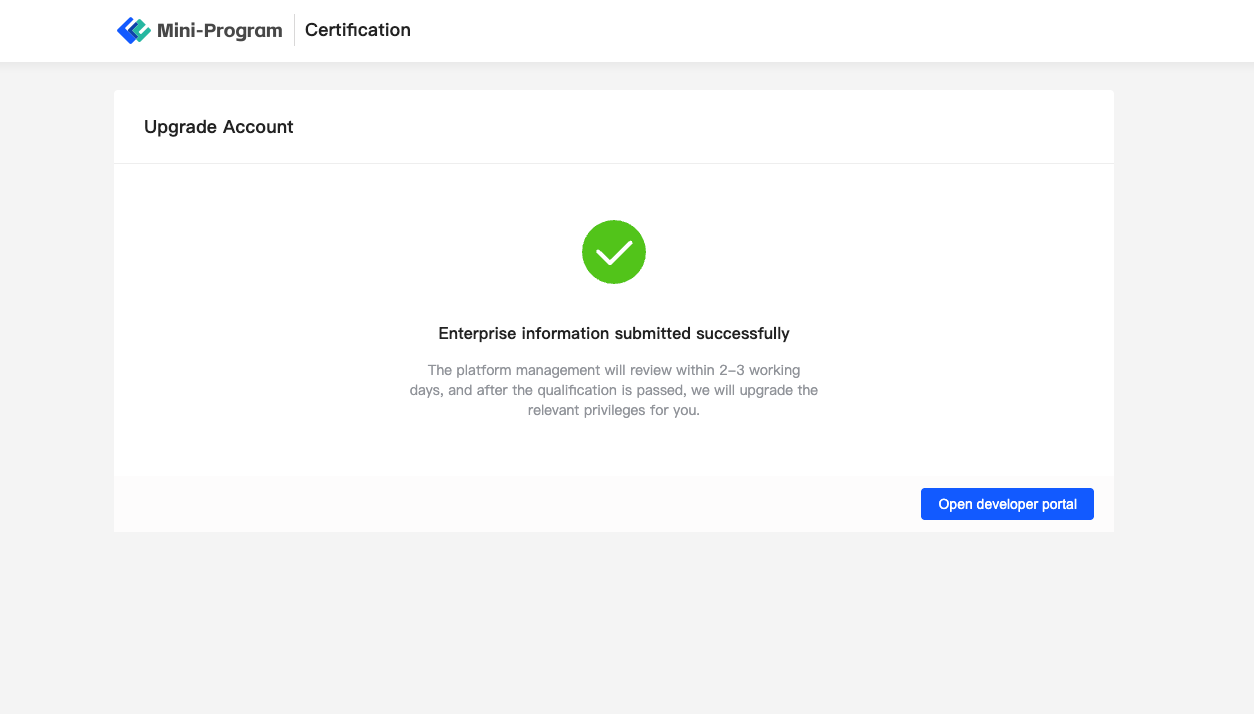
Newly registered teams are personal teams. If you wish to upgrade the current team to an enterprise type, click the personal name in the lower left corner, and then click the "Change to Enterprise Account" button in the subsequent menu. On the new page, fill in the relevant enterprise information.
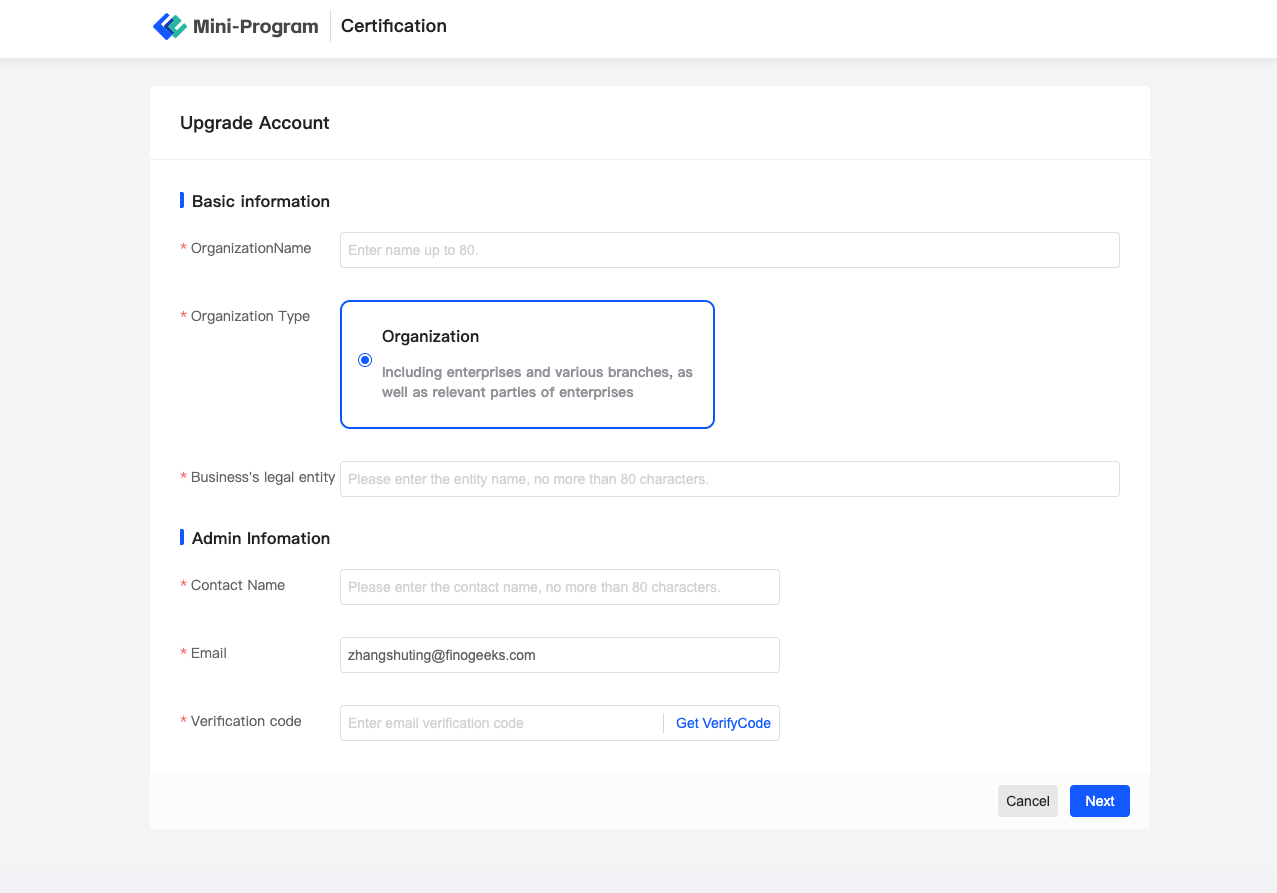
After submitting the enterprise-related information, wait for the enterprise information to pass the review, and the current team will be upgraded to an enterprise team.
# 3. Configuring Team Members and Roles
After logging into the FinClip Mini-Program Open Platform Management System, you can configure the members and roles of your current team. Member management is mainly used to configure personnel involved in collaborative development and operation within the current team, while role management can set roles, permissions, and approval processes based on personnel's division of labor.
# 3.1 Configuring Team Members
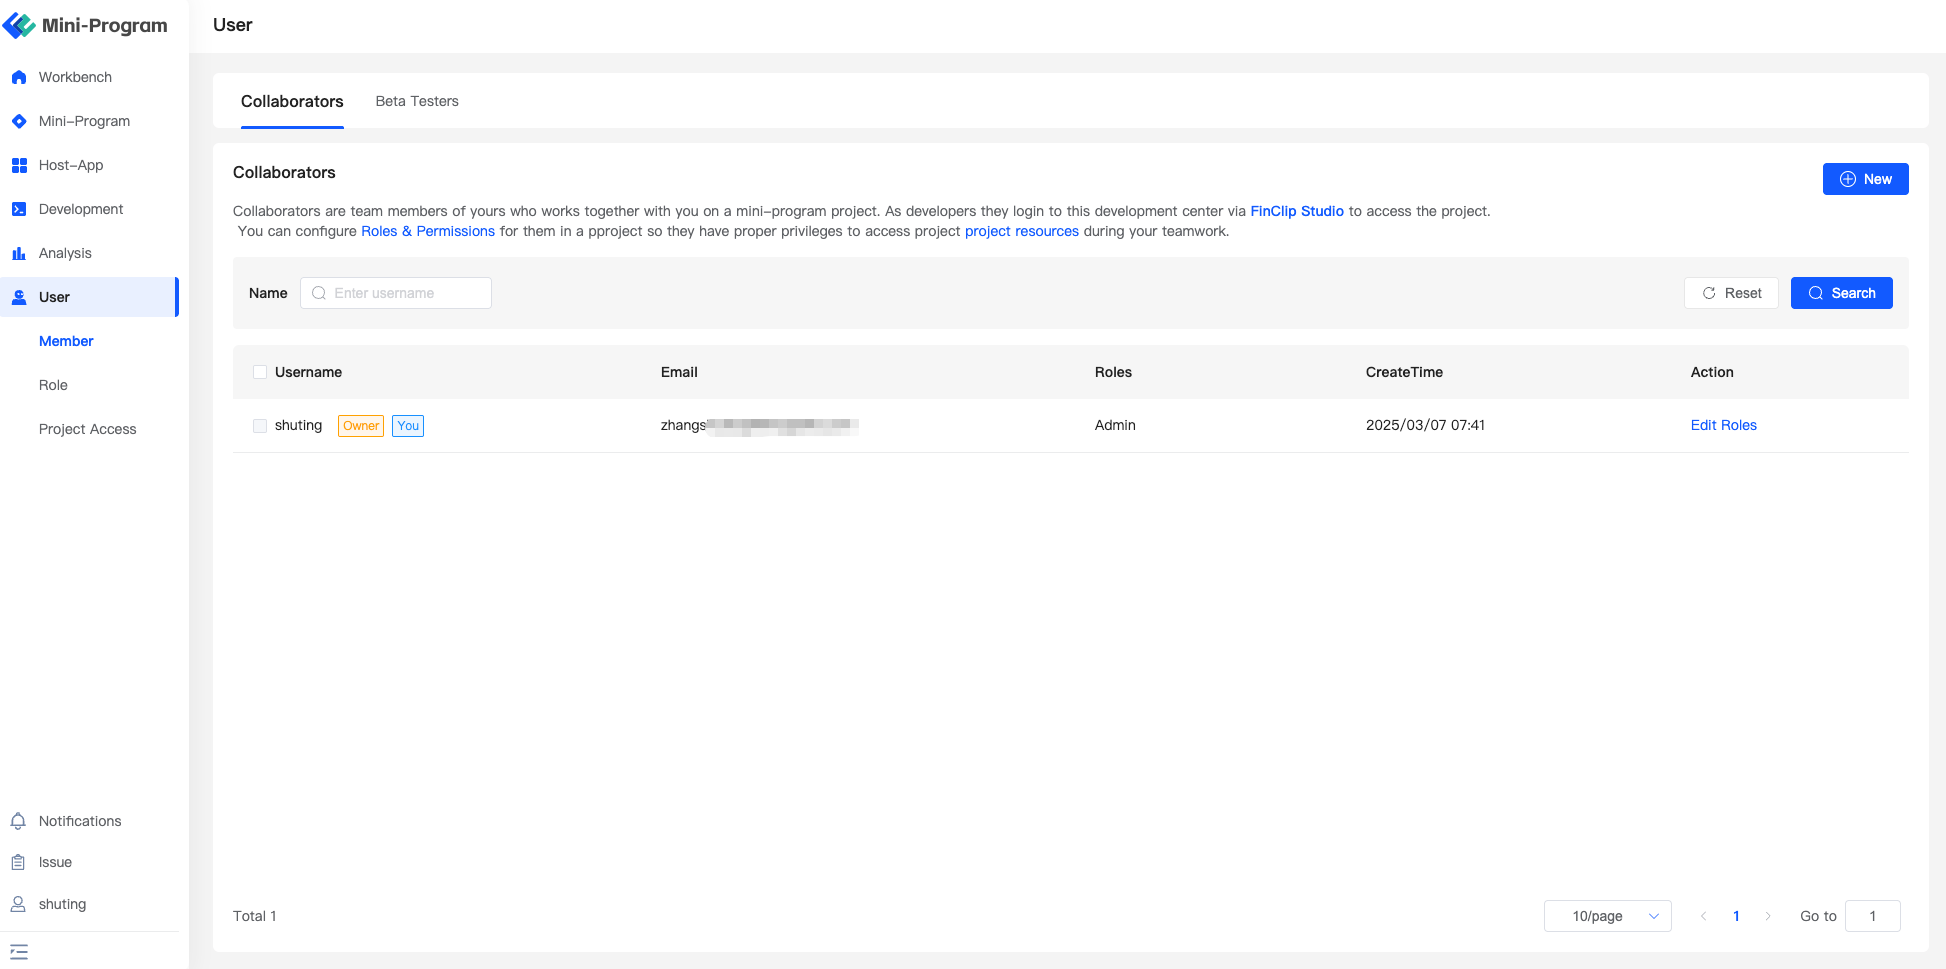
There are two types of members in the Developer Center: Collaborative Members and Experience Members:
- Collaborative Members: These individuals can use Developer Tools, log in to the Developer Center, and view and manage Mini-Programs.
- Experience Members: These individuals can preview the development version or experience version of the Mini-Programs of the organization via APP scanning.
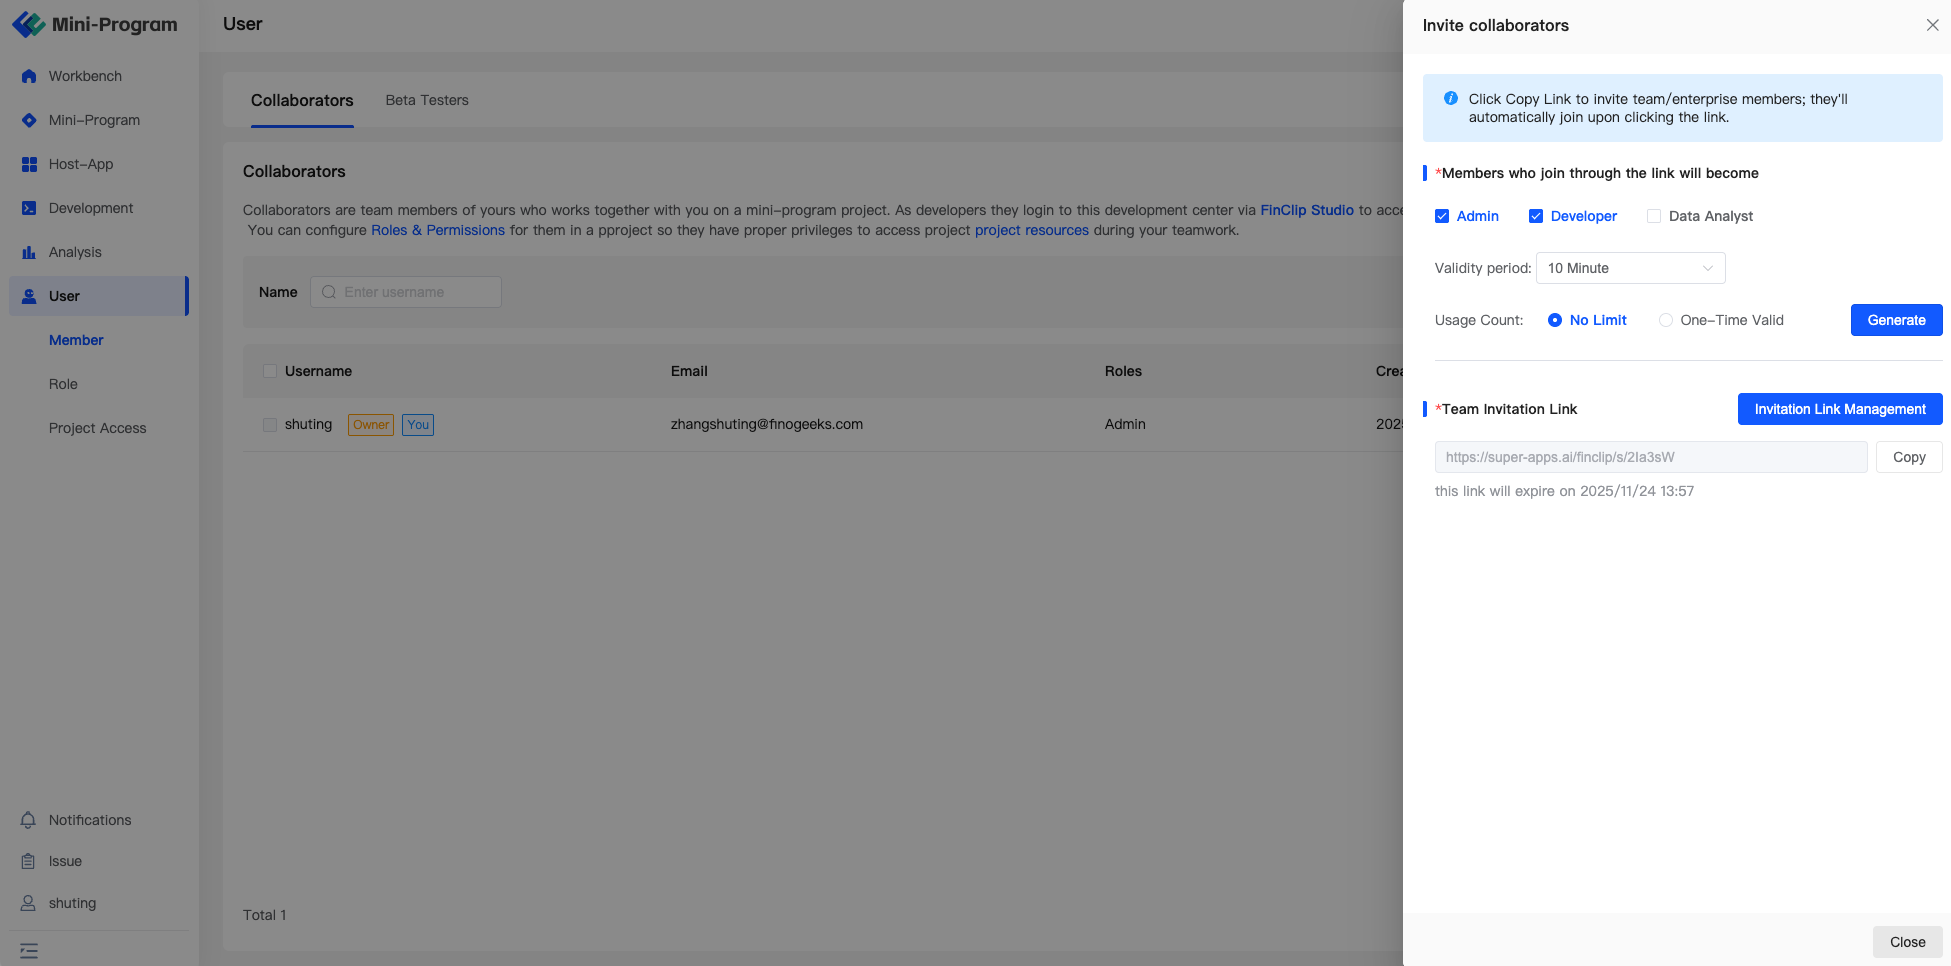
Adding Collaborative Members: Click the "Invite" button in the upper right corner of the Collaborative Members card, select the role of the new user in the pop-up window, and then generate an invitation link to share with the invited member. After the new collaborative member clicks the invitation link and completes the registration, they will automatically become a team collaborative member.
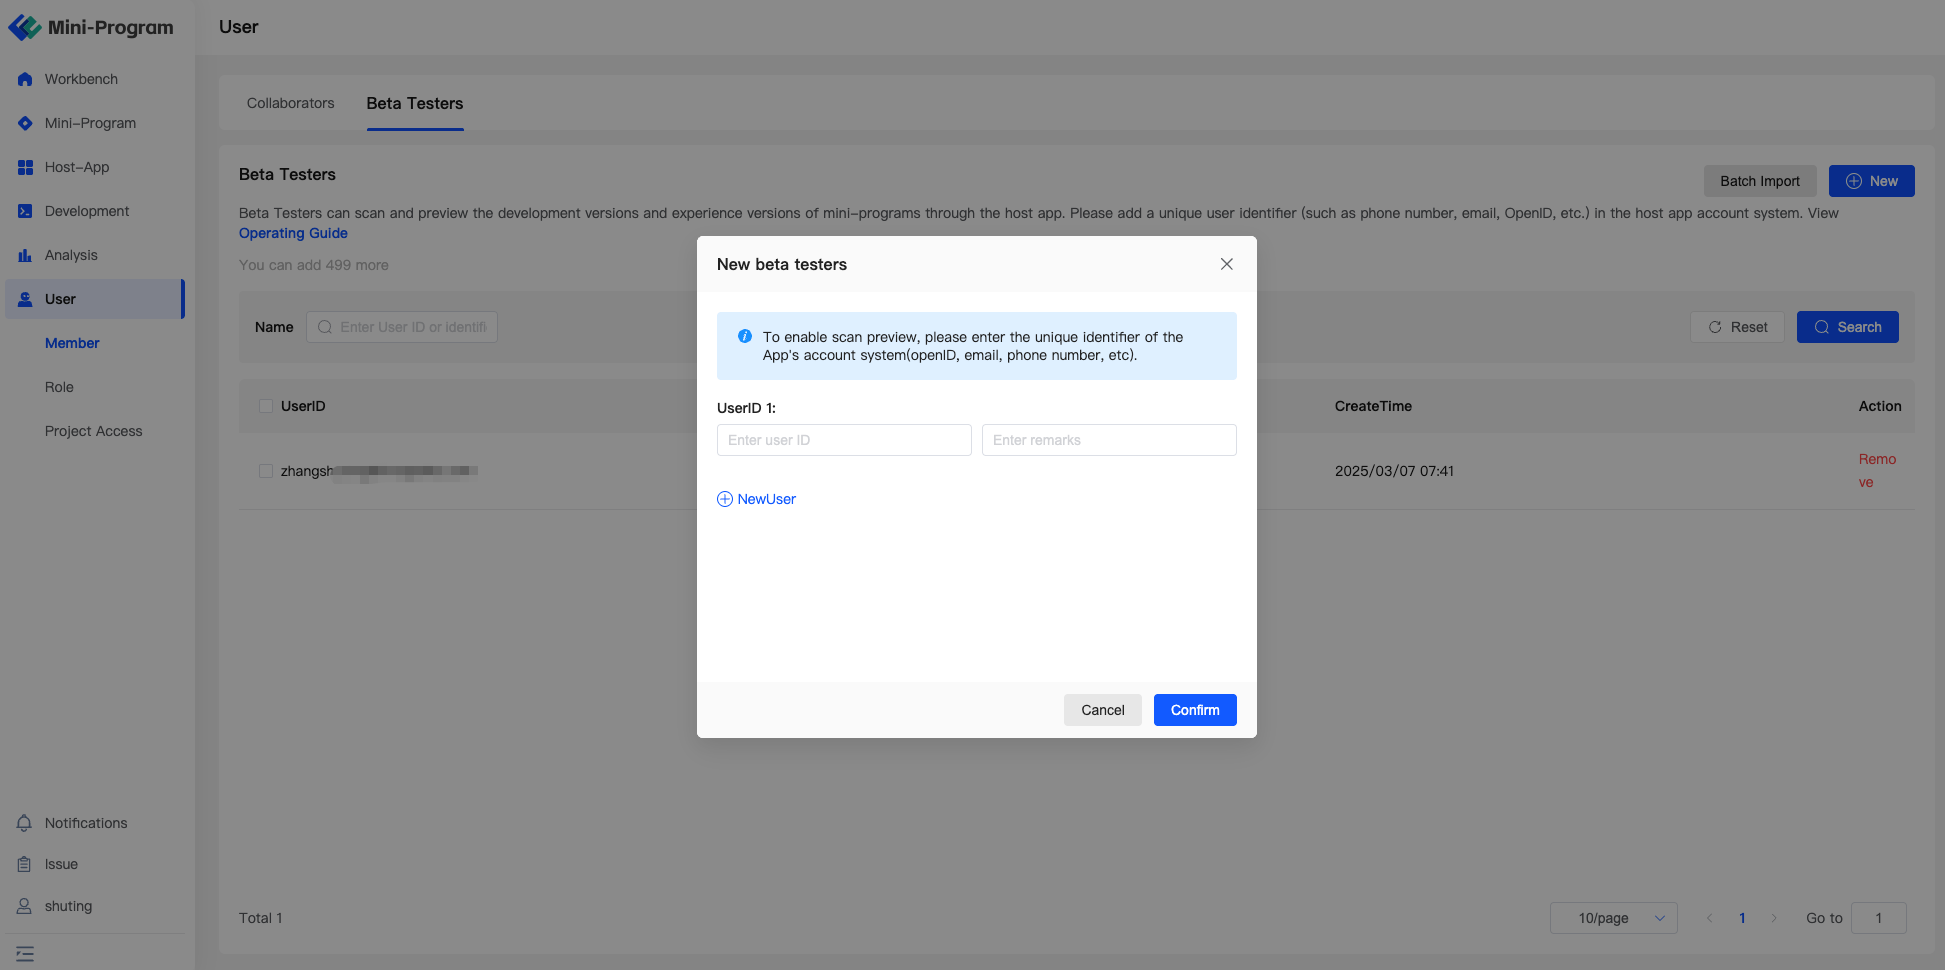
Adding Experience Members: Unlike collaborative members, adding experience members requires entering the unique user identifier in the Mini-Program account system (such as phone number, email, openID, etc.). Click the "Add" button in the upper right corner of the Experience Members card, enter the user's unique ID in the pop-up window, and click confirm. After configuring the experience members, users using the specified ID can open the experience version of the Mini-Program.
# 3.2 Configuring Team Roles
The Developer Center allows users to configure roles according to existing workflows and customize permissions flexibly based on roles, enabling more flexible configuration of the approval process within the current organization.
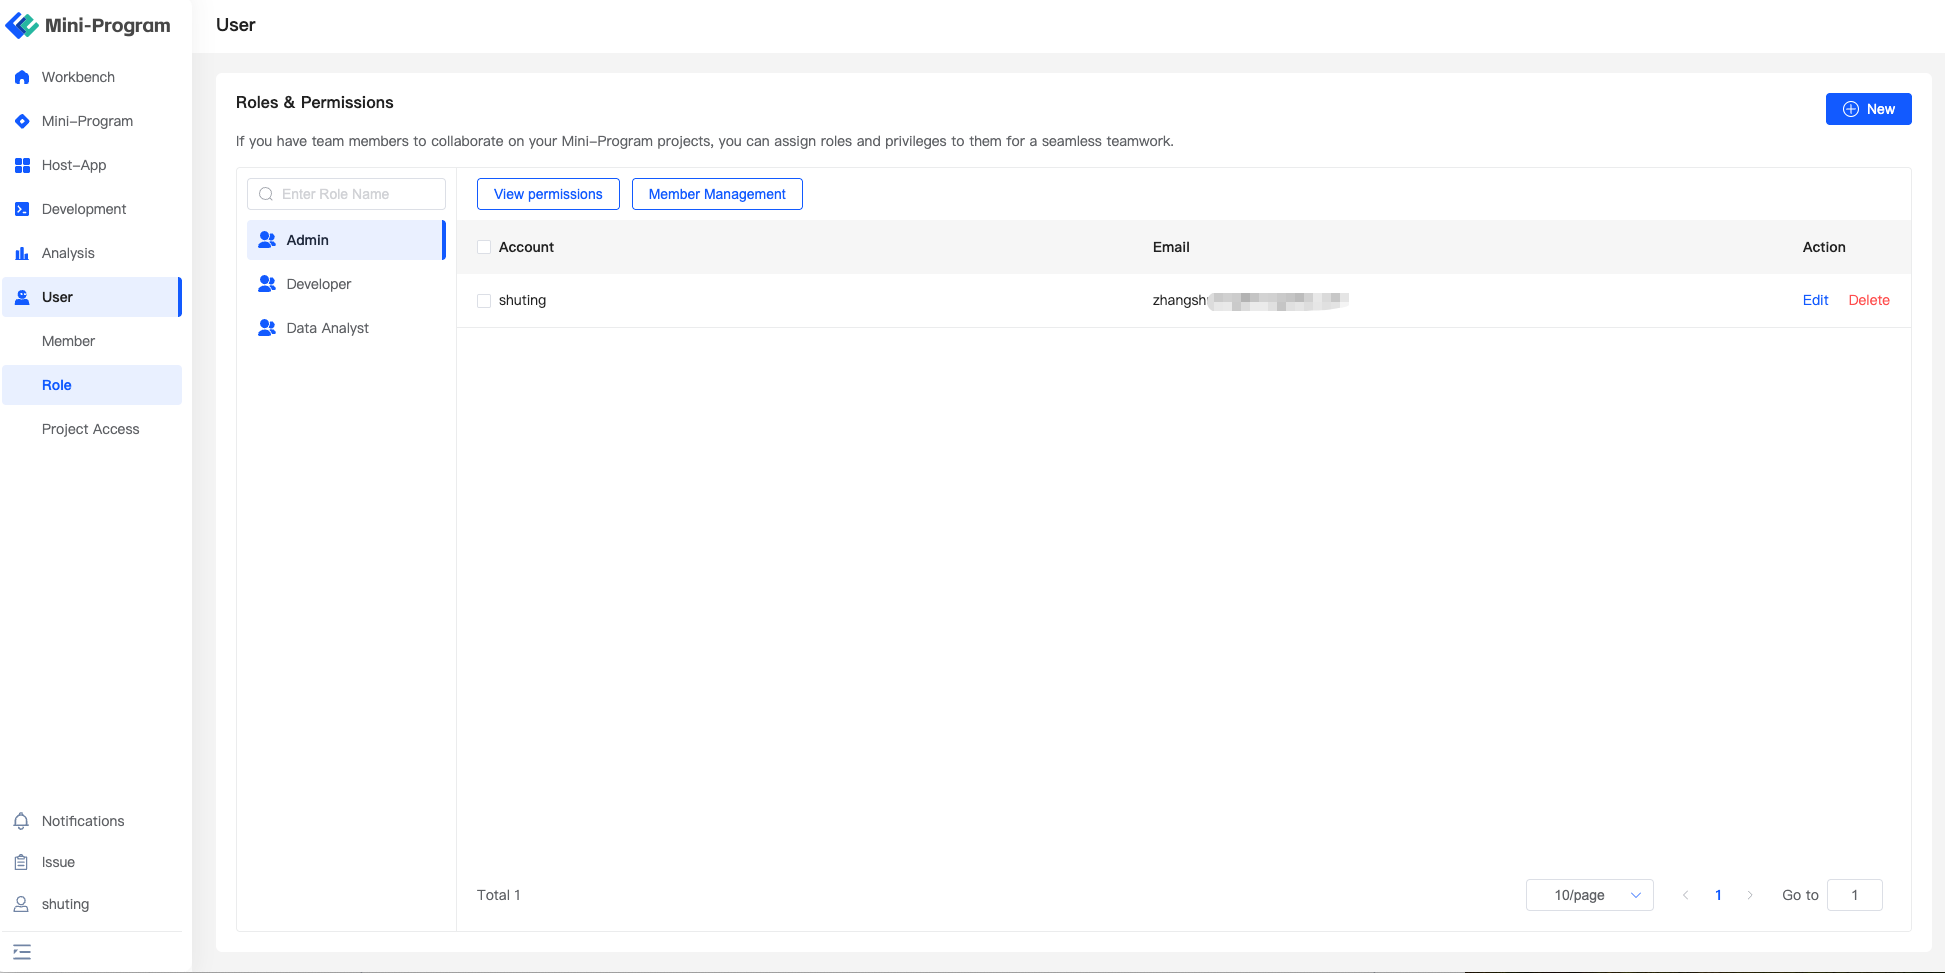
On the "Role Management" page, you can click the edit role or manage members button on the page to configure roles flexibly.
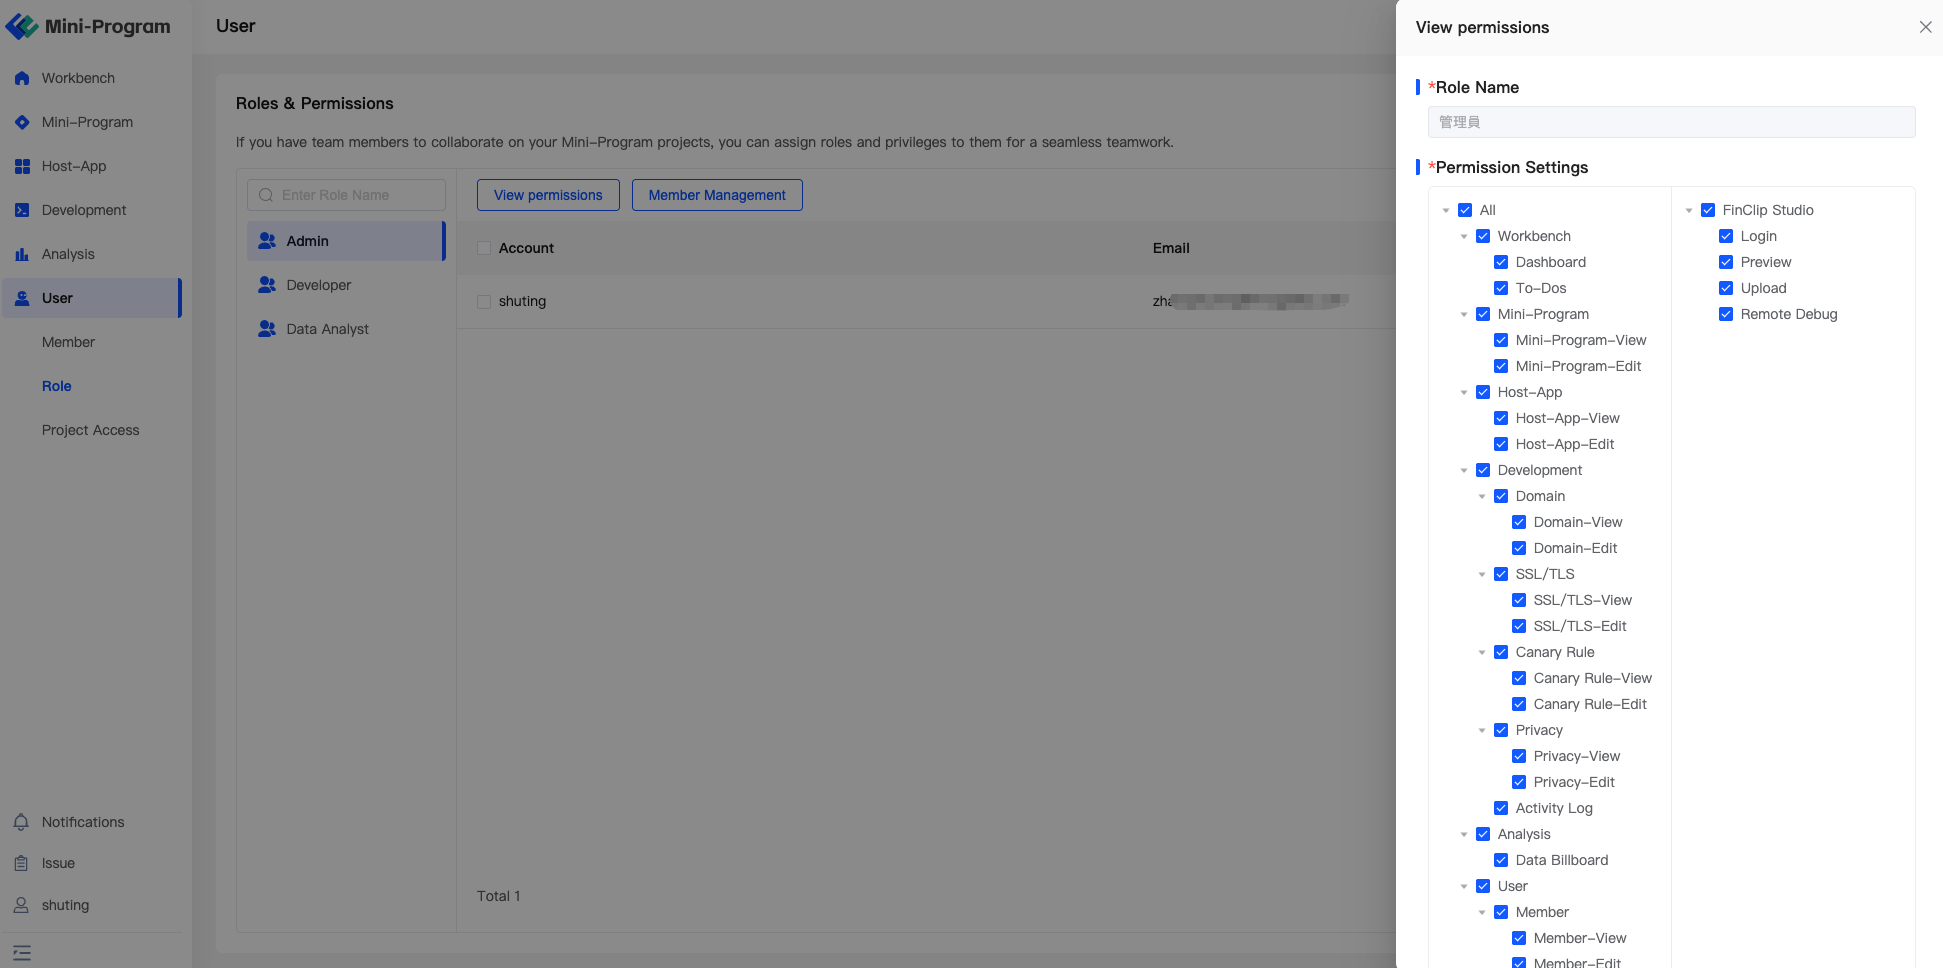
On the "Add Role" page, you can configure the operable permissions of the specified role according to the management console and Developer Tools.
# 3.3 Inviting New Members to Join the Team, Switching Teams
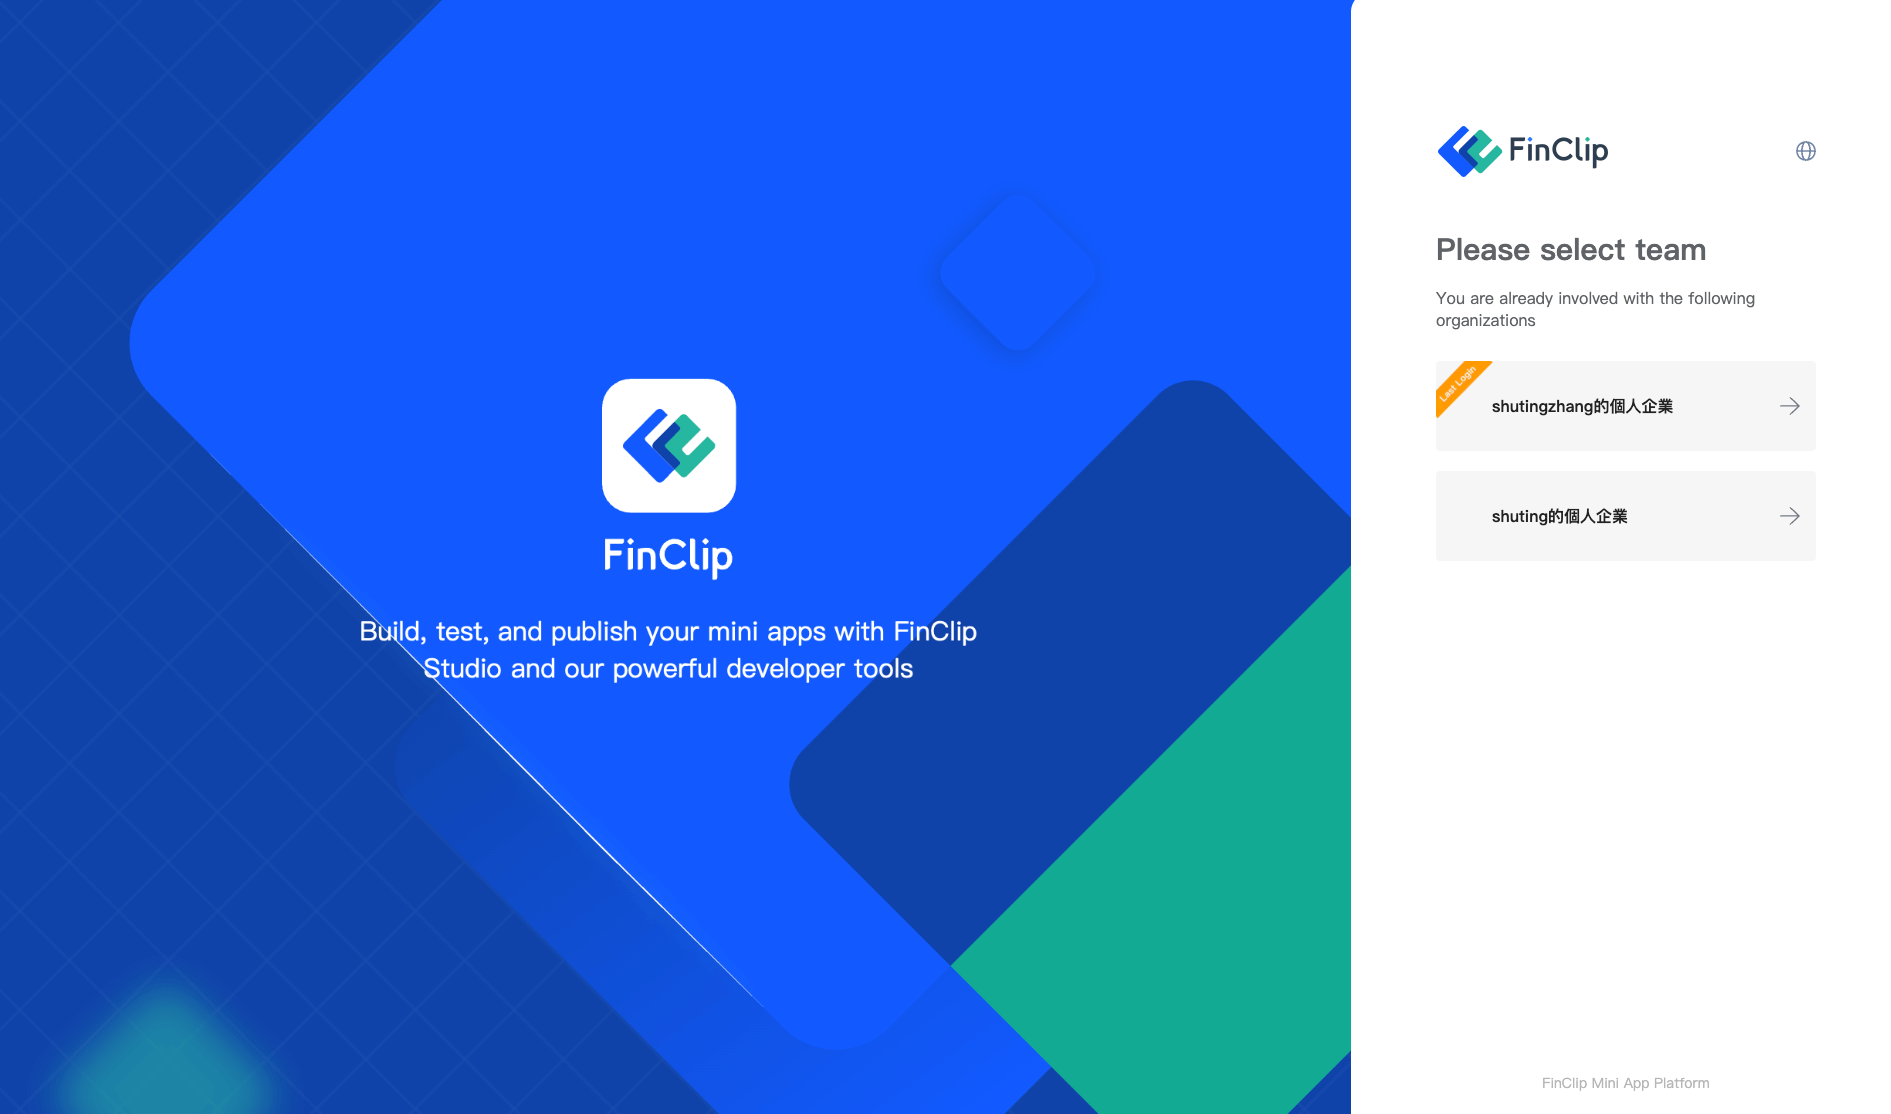
When the same user joins multiple teams, they can click the user name in the lower left corner of the page and click the "Switch Team" button to switch to different teams.
# 3.4 Resource Group Permission Configuration
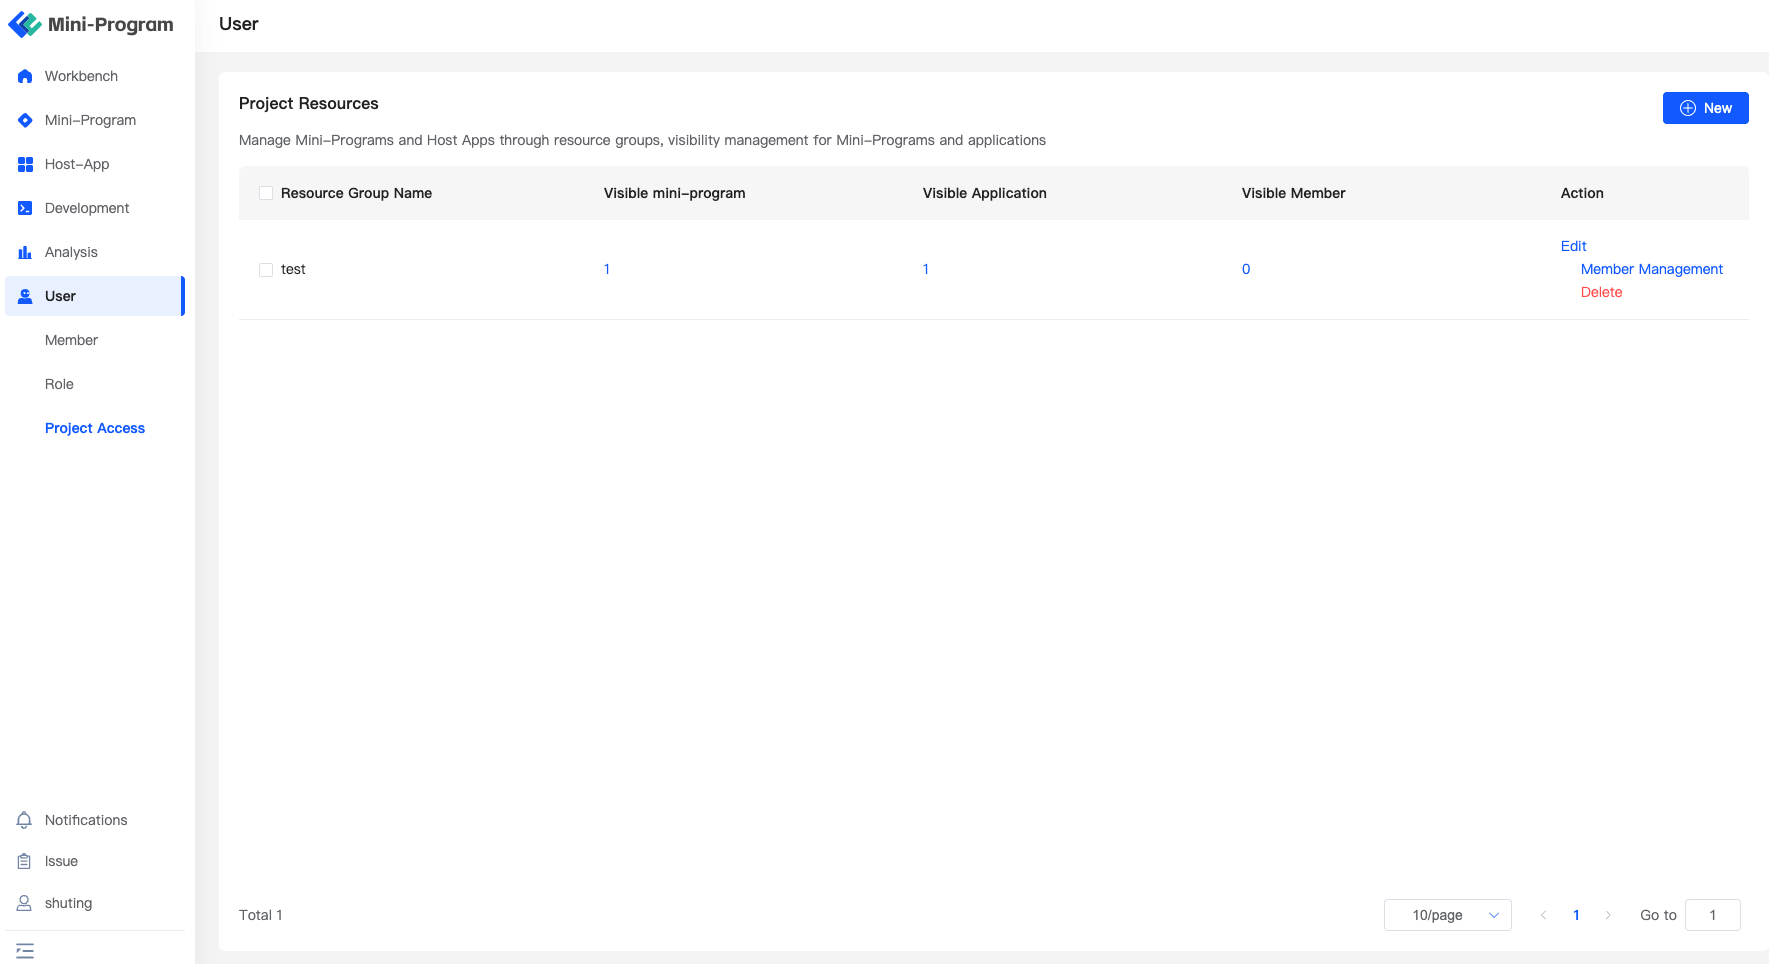
On the "Resource Group Management" page, you can configure the visibility settings of Mini-Programs and different applications, such as allowing specified users in the same organization to see Mini-Program A, Mini-Program B, and Mini-Program C respectively.
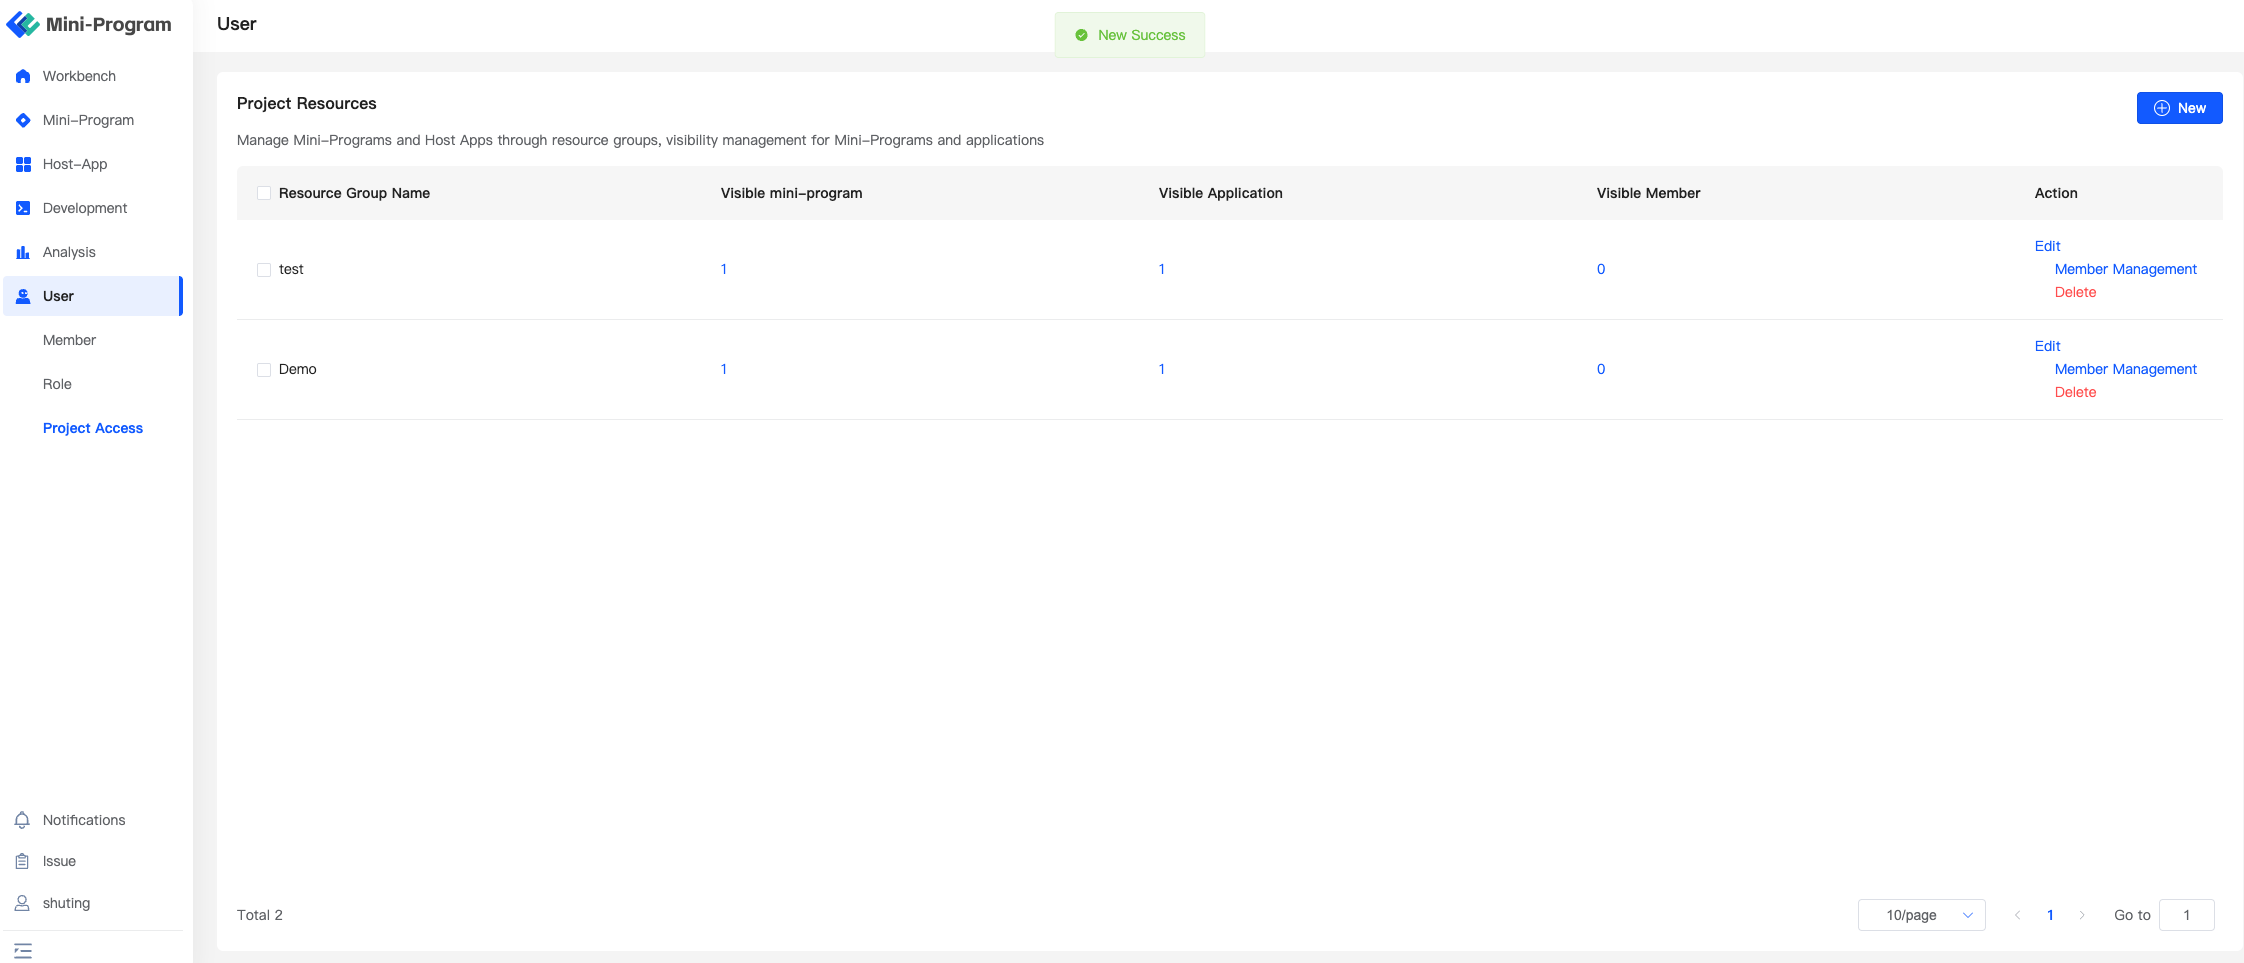
After entering the resource group name on the "Resource Group Management" page, select the visible Mini-Programs and visible application names respectively to complete the creation of the resource group. Only users in the specified resource group can see the Mini-Programs and Host-Apps in the resource group.
# 4. Creating a Mini-Program
The core function of the FinClip Mini-Program Open Platform is to develop or manage your own Mini-Programs based on the platform and make them run smoothly in your own App. In this step, we will complete the creation of a new Mini-Program.
# 4.1 Creating a New Mini-Program
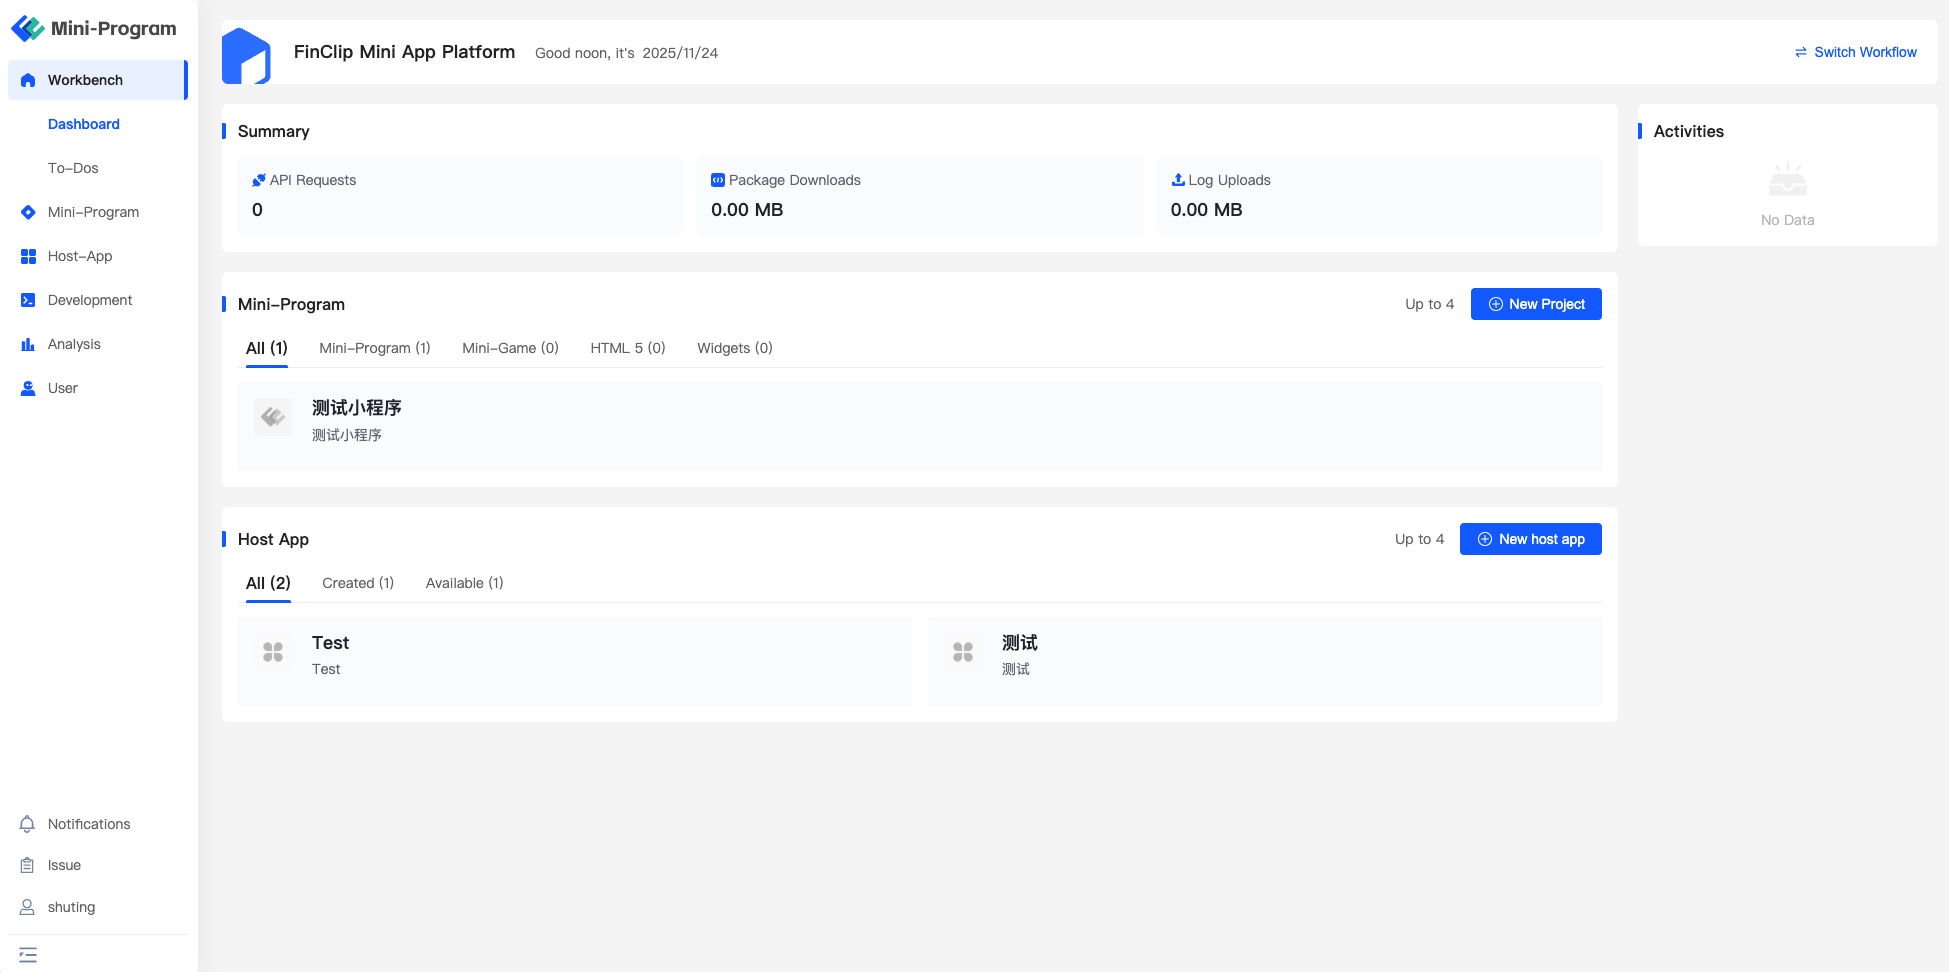
If you are logging into the FinClip Mini-Program Open Platform for the first time, you can click the "Add" button from the homepage or the Mini-Program page to start creating a Mini-Program.
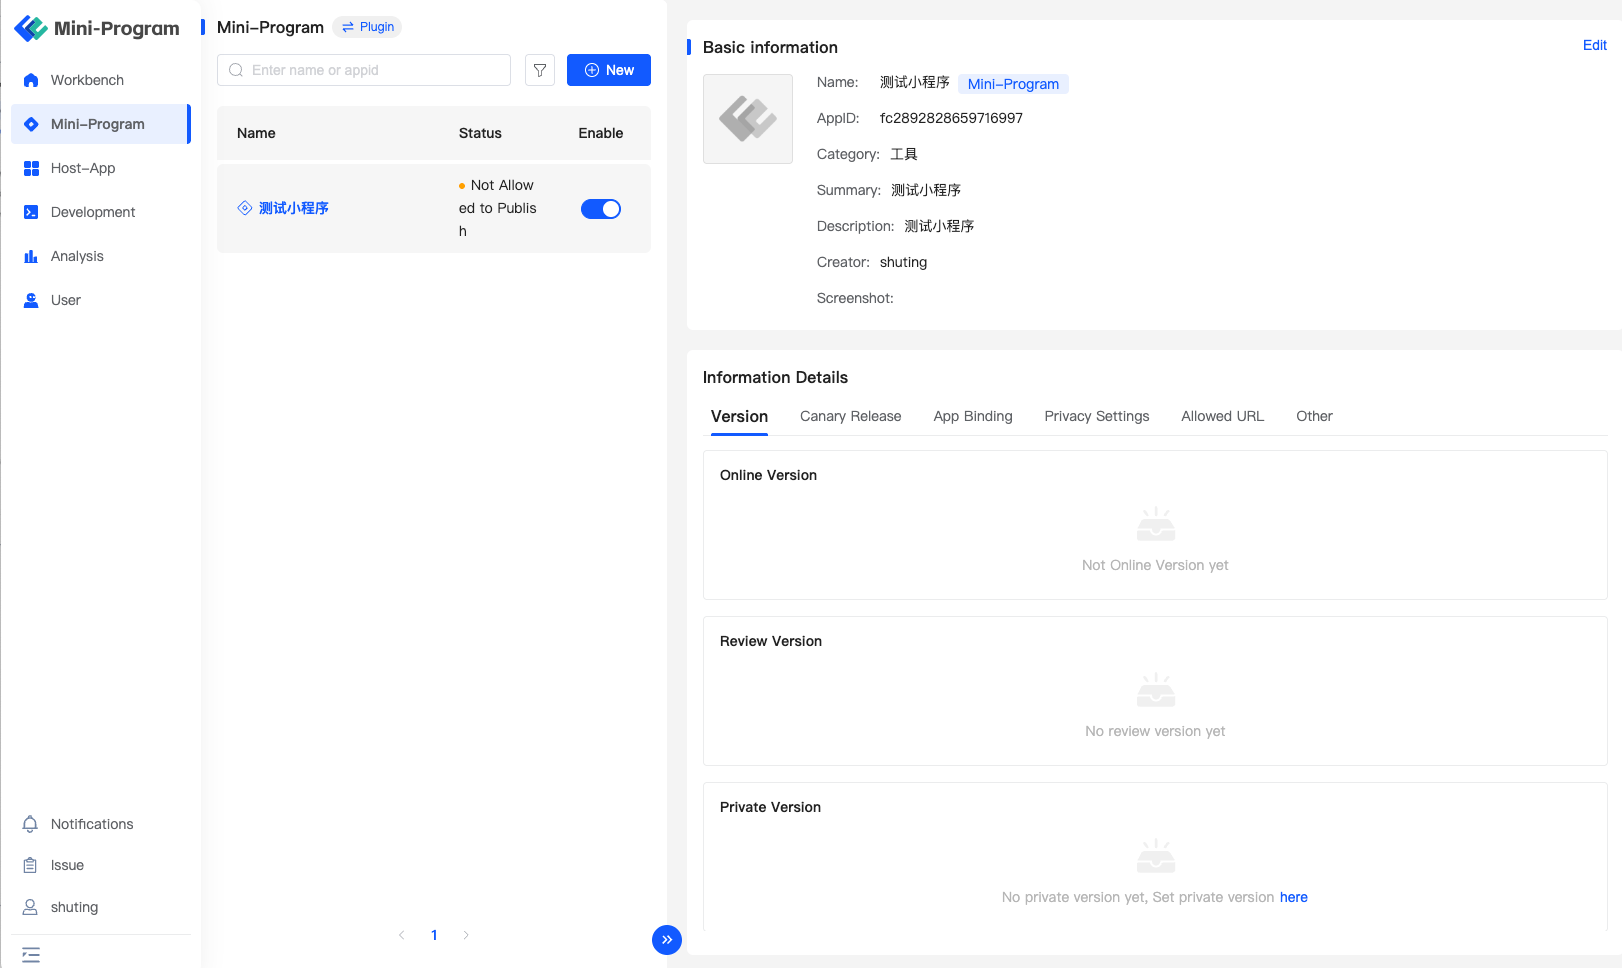
You can also complete the addition operation on the Mini-Program page.
# 4.2 Supplementing Basic Information of the Mini-Program
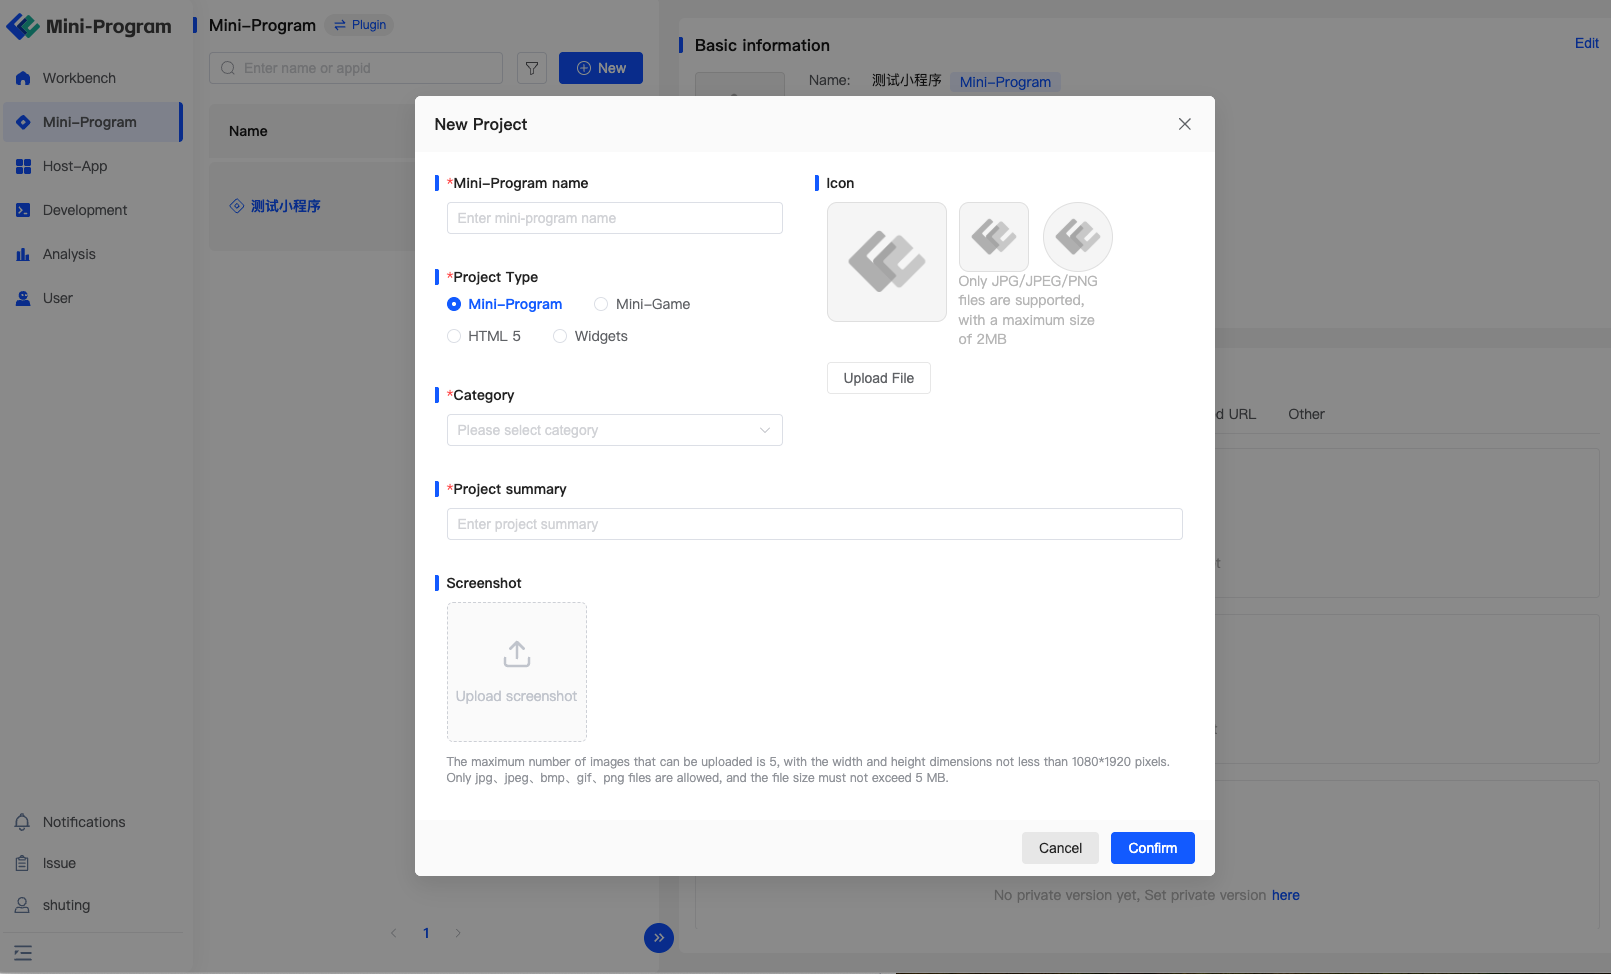
When creating a new Mini-Program, you need to configure the name, type, category, icon, introduction, and detailed description information of the Mini-Program respectively.
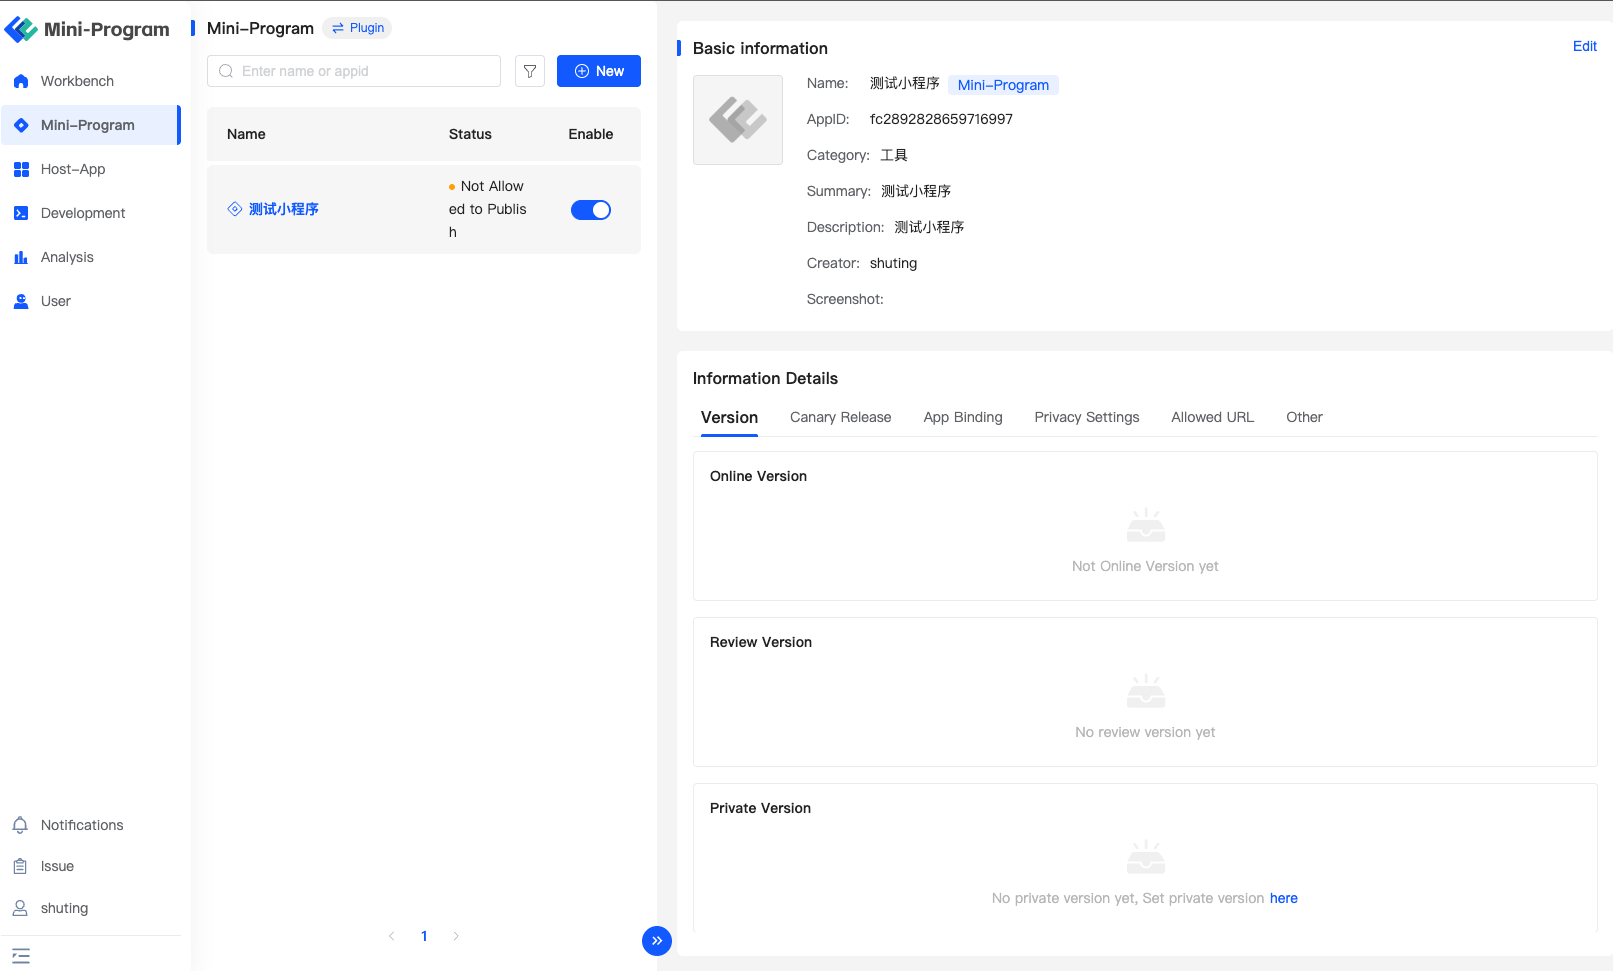
After completing the creation of the Mini-Program, you can edit it on the Mini-Program details page (the basic information of the Mini-Program and the corresponding AppID will be displayed on the Mini-Program details page, where only the AppID cannot be edited).
# 4.3 Supplementing Privacy Information of the Mini-Program
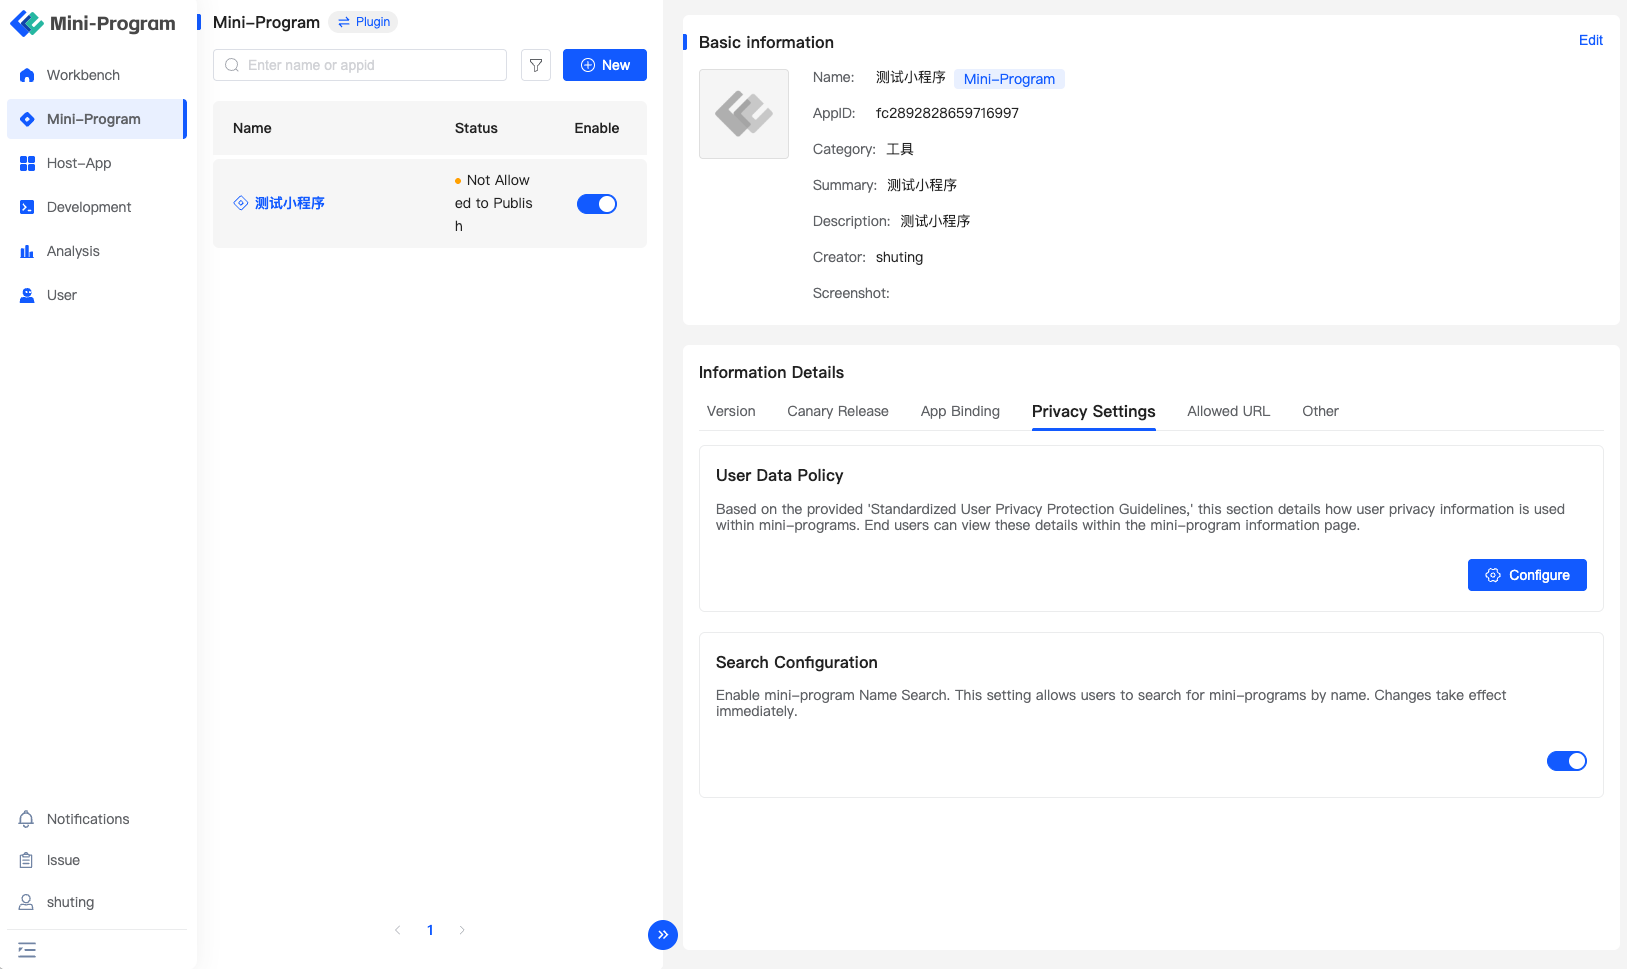
Due to the Personal Information Protection Law and related regulations, all Mini-Programs developed by developers need to configure privacy protection guidelines. After completing the Mini-Program code development and debugging, please submit the Mini-Program privacy statement through "Mini-Program Details - Privacy Settings - User Privacy Protection Guidelines."
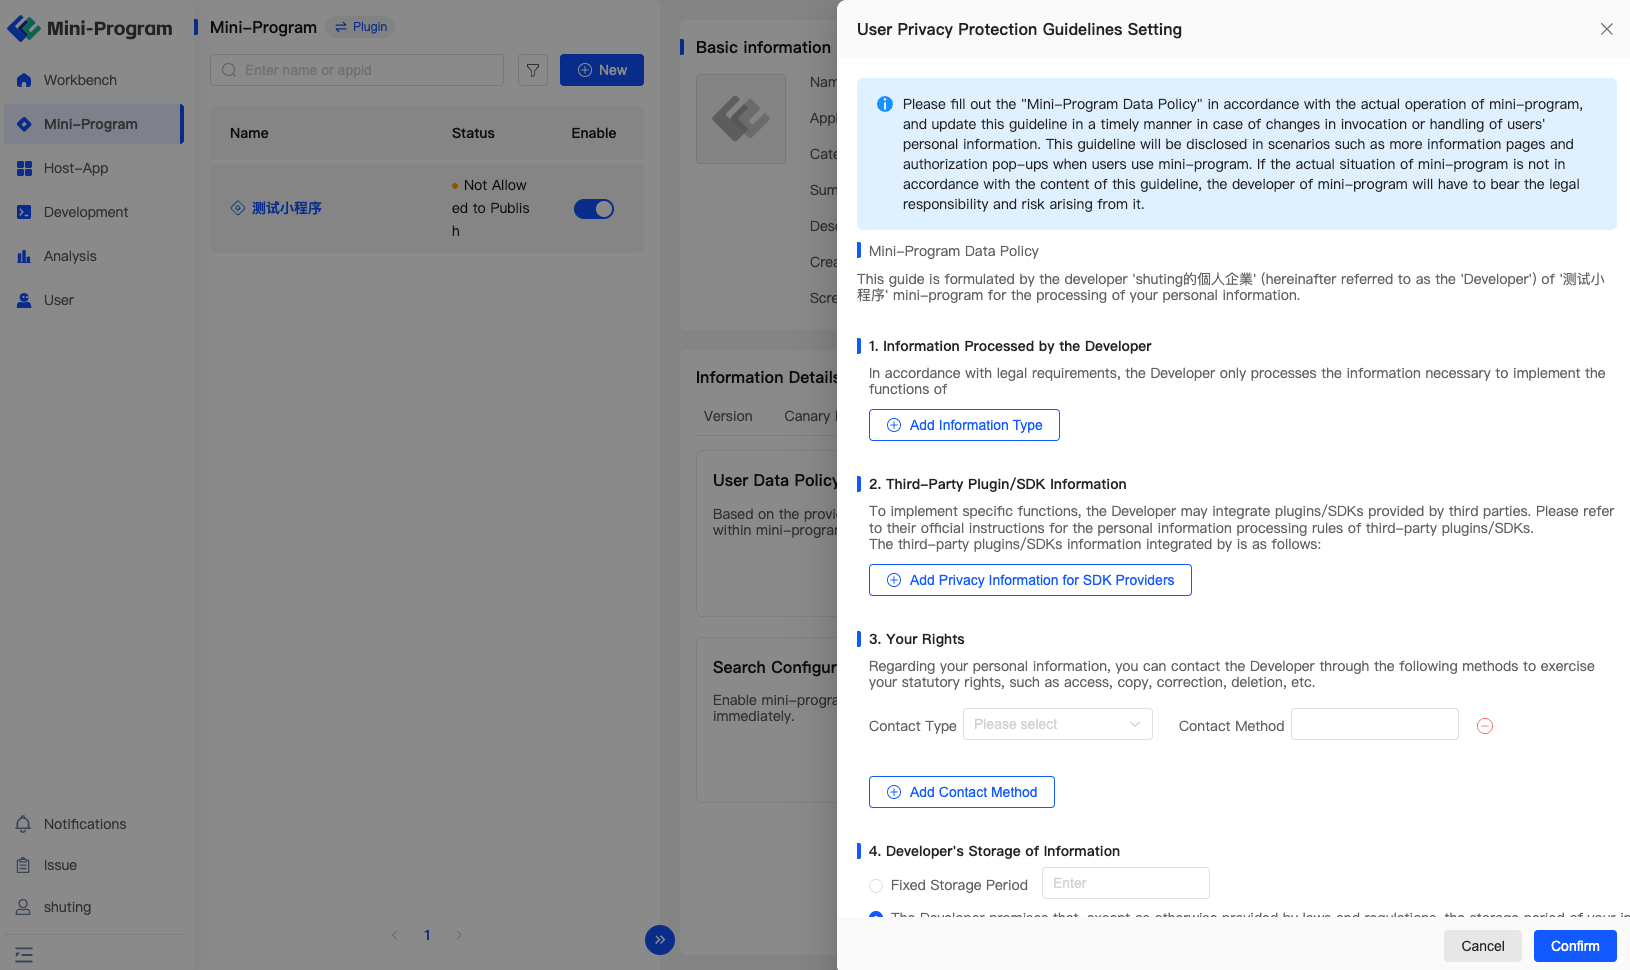
The relevant fields in the Mini-Program user privacy protection guidelines setting include "how developers handle information, third-party plugins and SDK information integrated in the Mini-Program, how the Mini-Program handles users' personal information," and other related fields. Please fill them out properly according to the actual usage situation.
# 5. Developing a Mini-Program
- This platform's Mini-Programs are compatible with multiple platforms. Developers are recommended to use Developer Tools (opens new window) or WeChat Developer Tools (opens new window) for development;
- Before development, it is recommended to read the Mini-Program Development Guide (opens new window). Due to the high compatibility of this platform with WeChat Mini-Programs, you can also refer to the WeChat Mini-Program Development Documentation (opens new window) for development;
- If you need to use a third-party framework, it is recommended to use Taro, mpvue, Vant, iView frameworks.
# 5.1 Configuring Mini-Program Development Domains
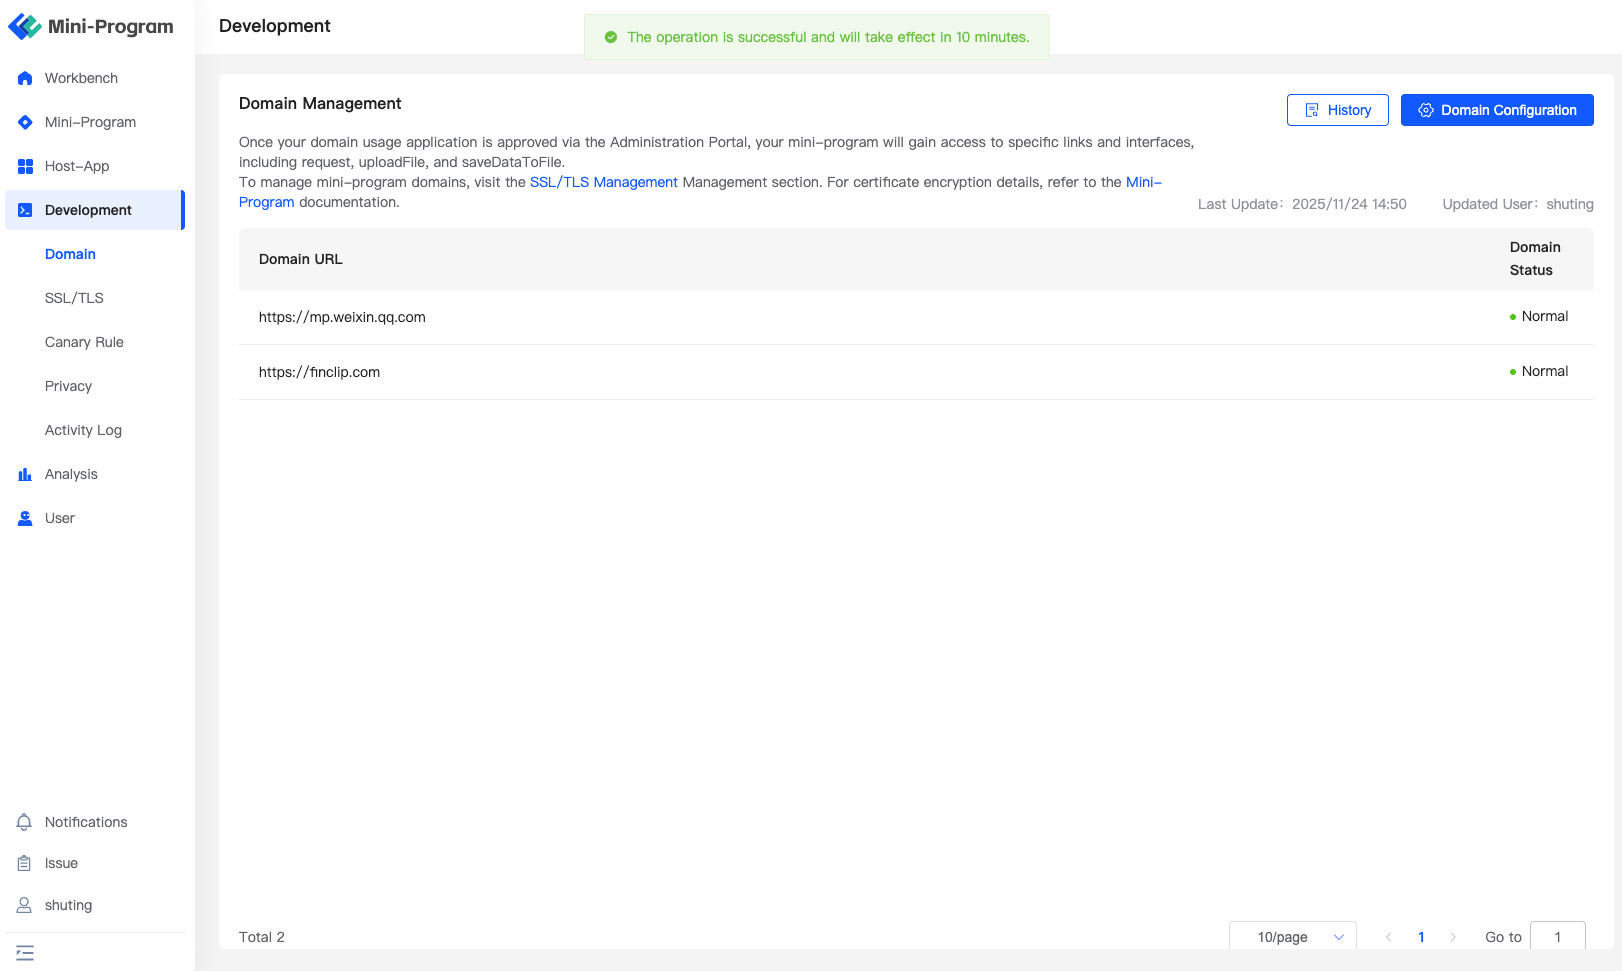
To ensure sufficient security guarantees in the Mini-Program application, all network request domains in the Mini-Program need to be configured beforehand, and only after configuration can they be accessed normally.
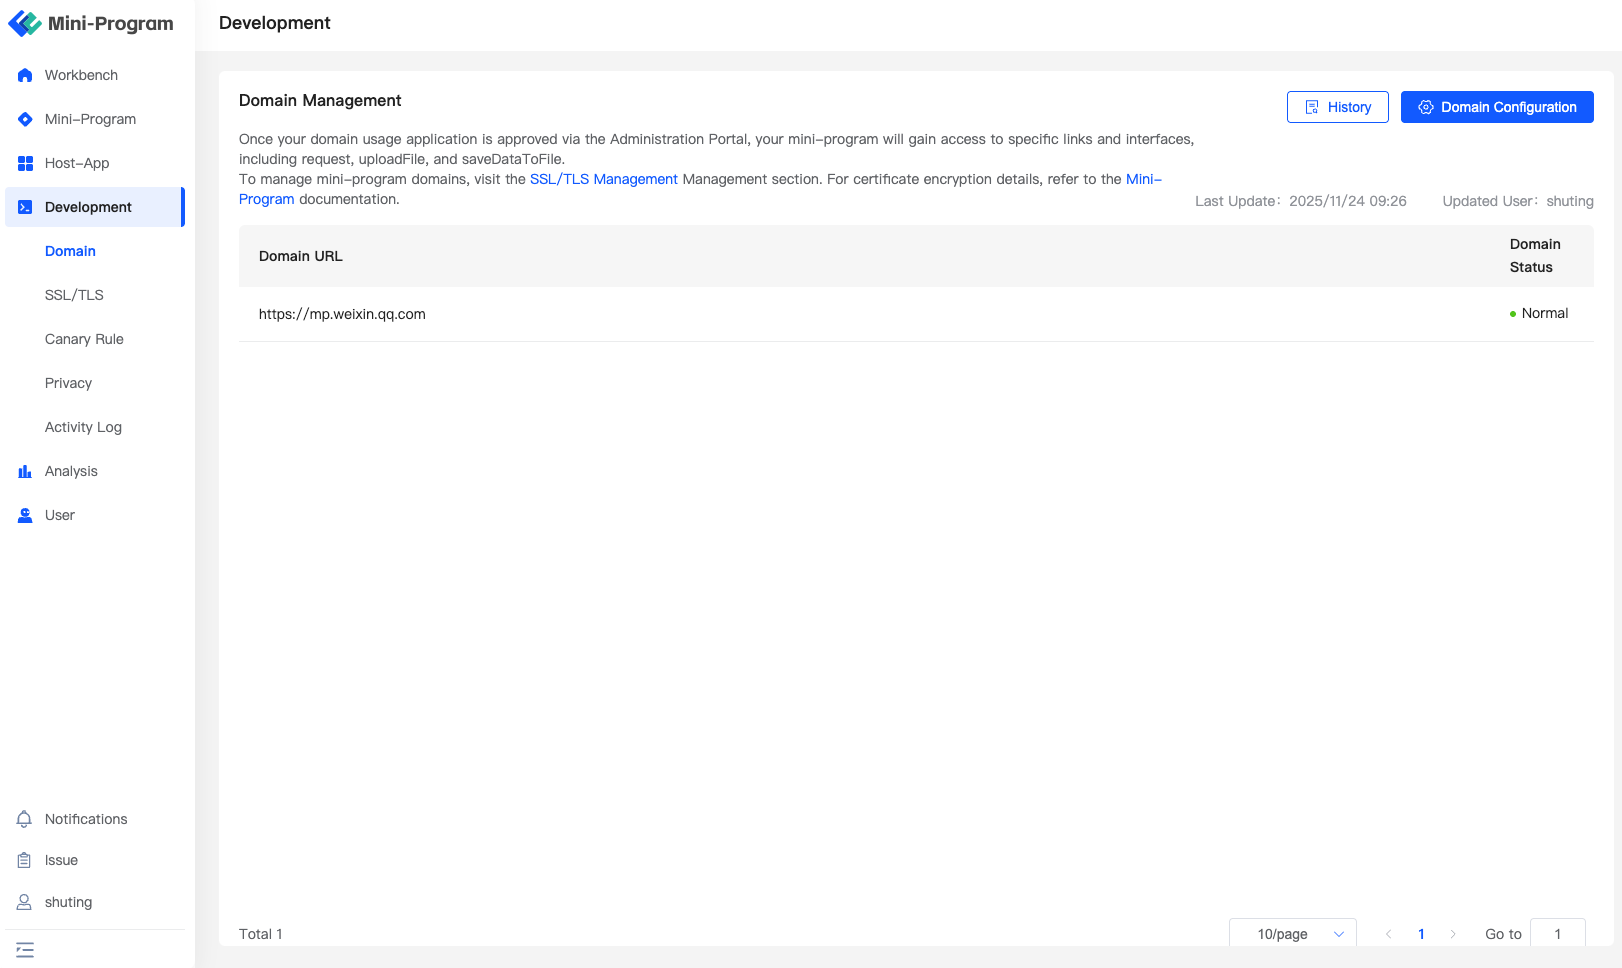
On the "Development - Domain Management" page, you can manage all the Mini-Program domains that the current team can use (i.e., once configured, all Mini-Programs take effect simultaneously). Enter all domain addresses used by the current team in the domain configuration section, distinguish them with "Enter key line breaks," and save.
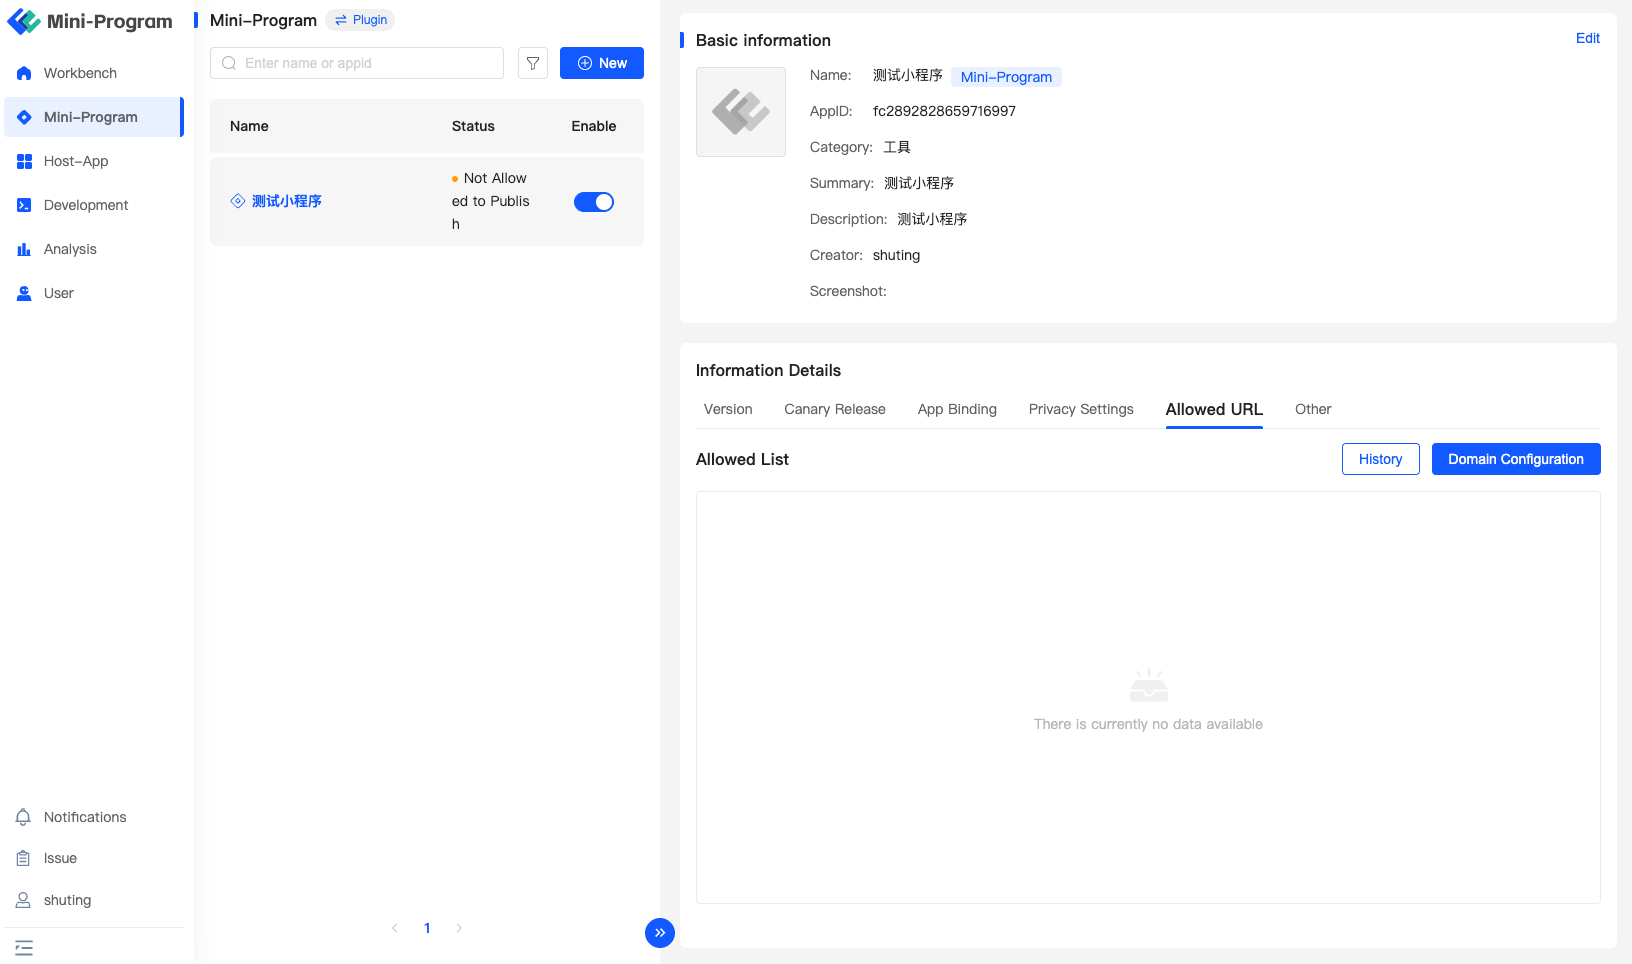
If the domain you need to configure only needs to take effect in a specific Mini-Program, you can configure it on the Mini-Program details page. The domain configured on the Mini-Program details page only takes effect for the current Mini-Program.
# 5.2 Using Studio to Develop and Debug Mini-Programs
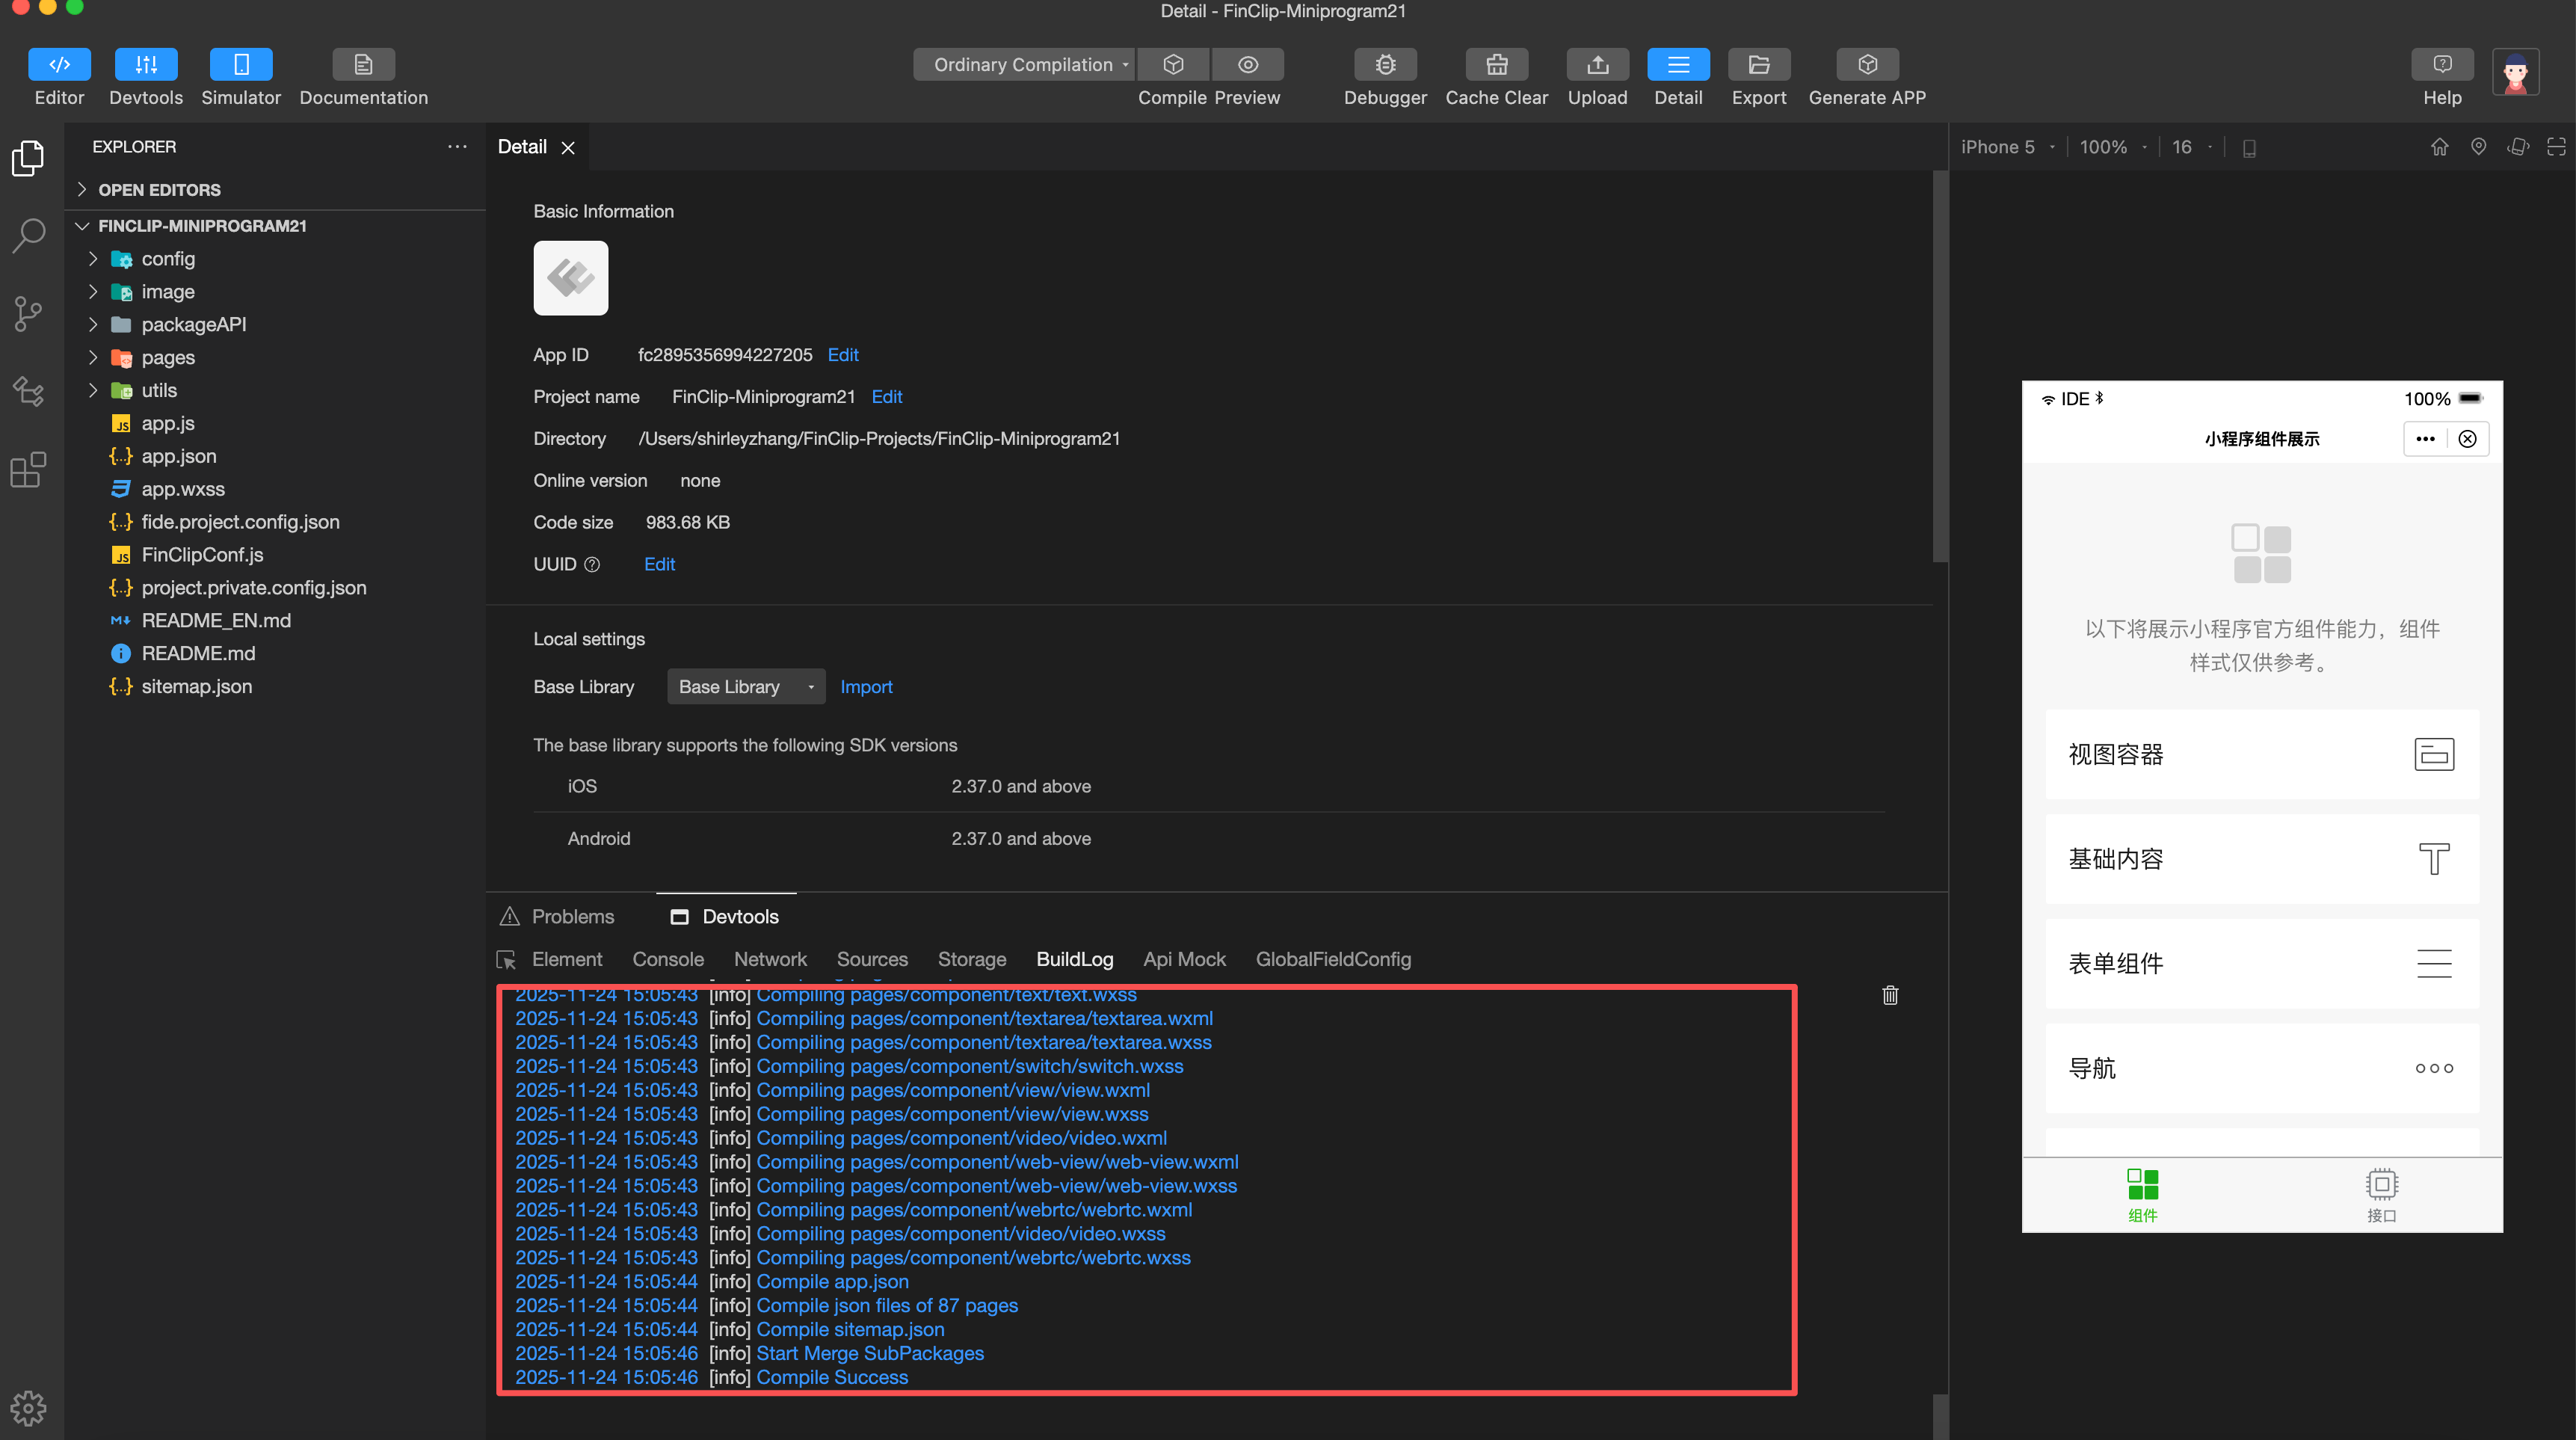
You can preview and debug in real-time through Developer Tools, or set the Mini-Program as an experience version for debugging.
Method One: Debugging Through Developer Tools
There are corresponding debugging tools in the Developer Tools to help you debug the code.
Method Two: Debugging Through the Experience Version
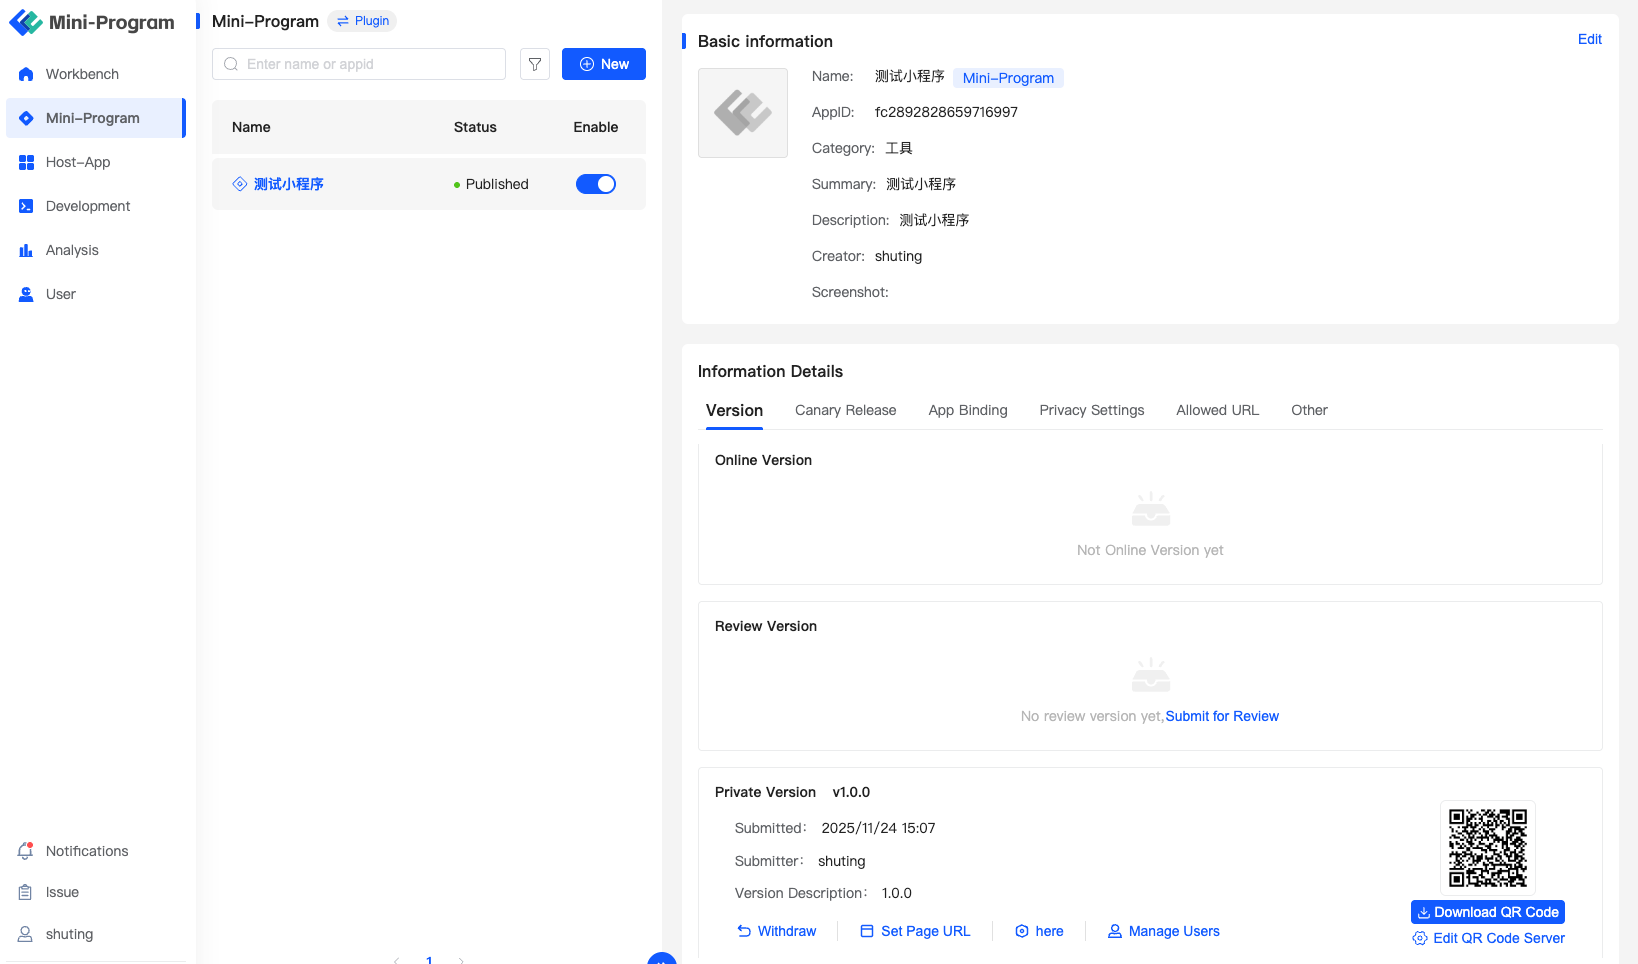
After successfully uploading the code package, you can click "Configure Experience Version" on the "Mini-Program - Mini-Program - Details - Version Management" page to set the corresponding version of the Mini-Program as the experience version.
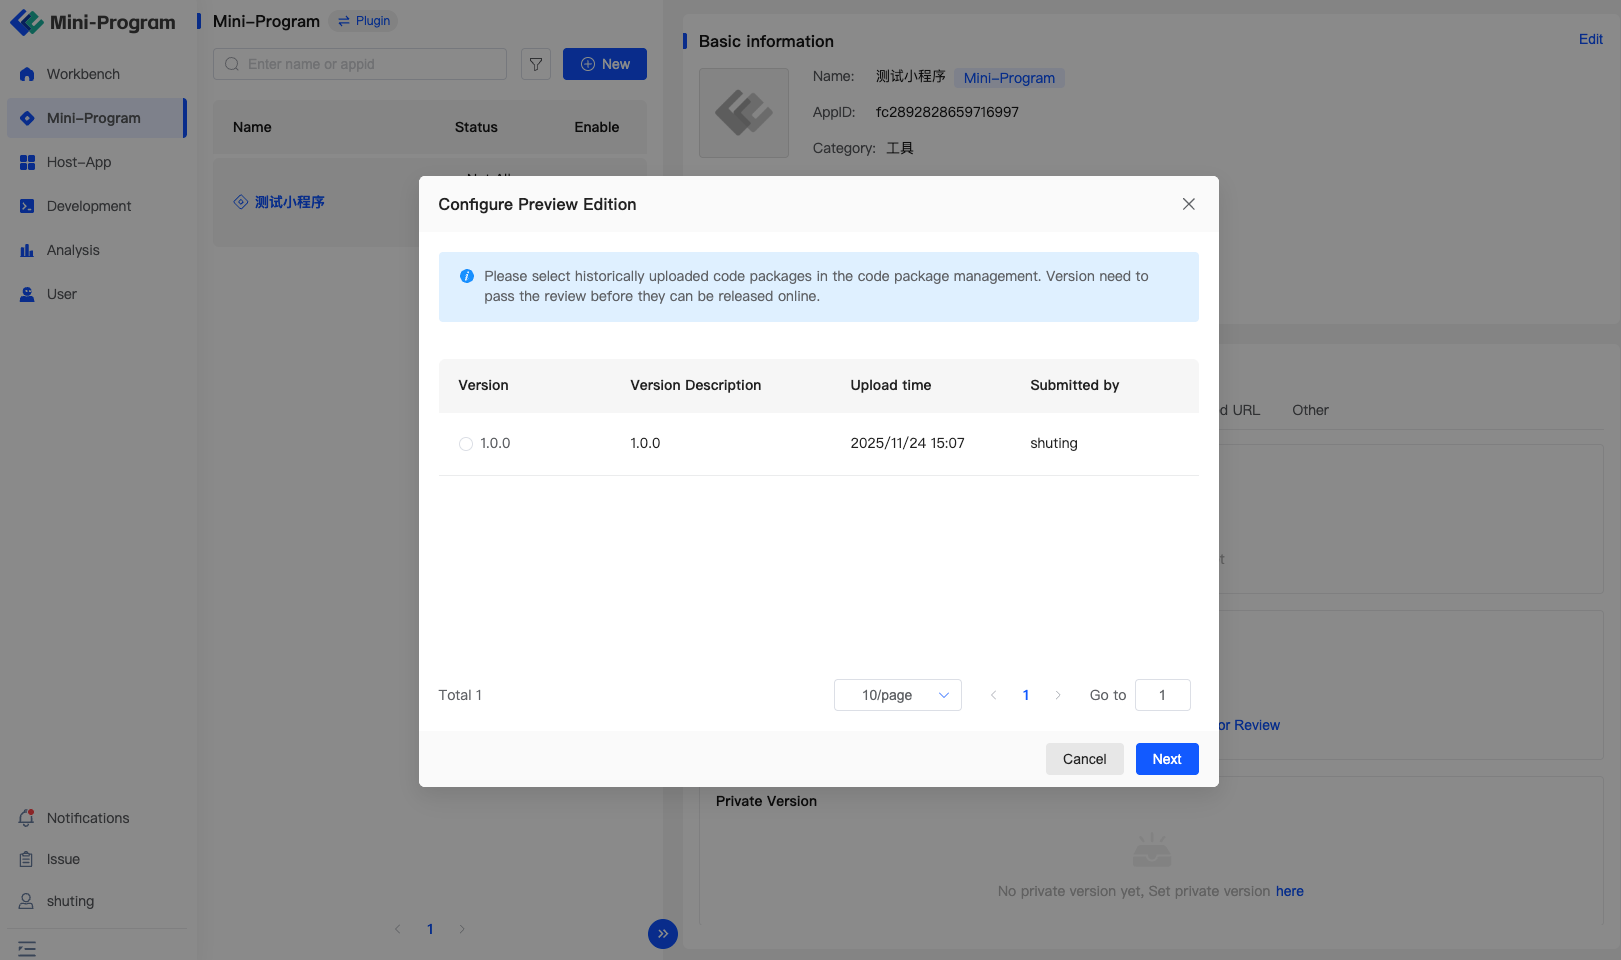
After configuration, use the FinClip APP to scan the QR code (for the use of FinClip APP, please refer to: FinClip APP Common Issues (opens new window)) to preview and test.
# 5.3 Uploading Mini-Program Code Package
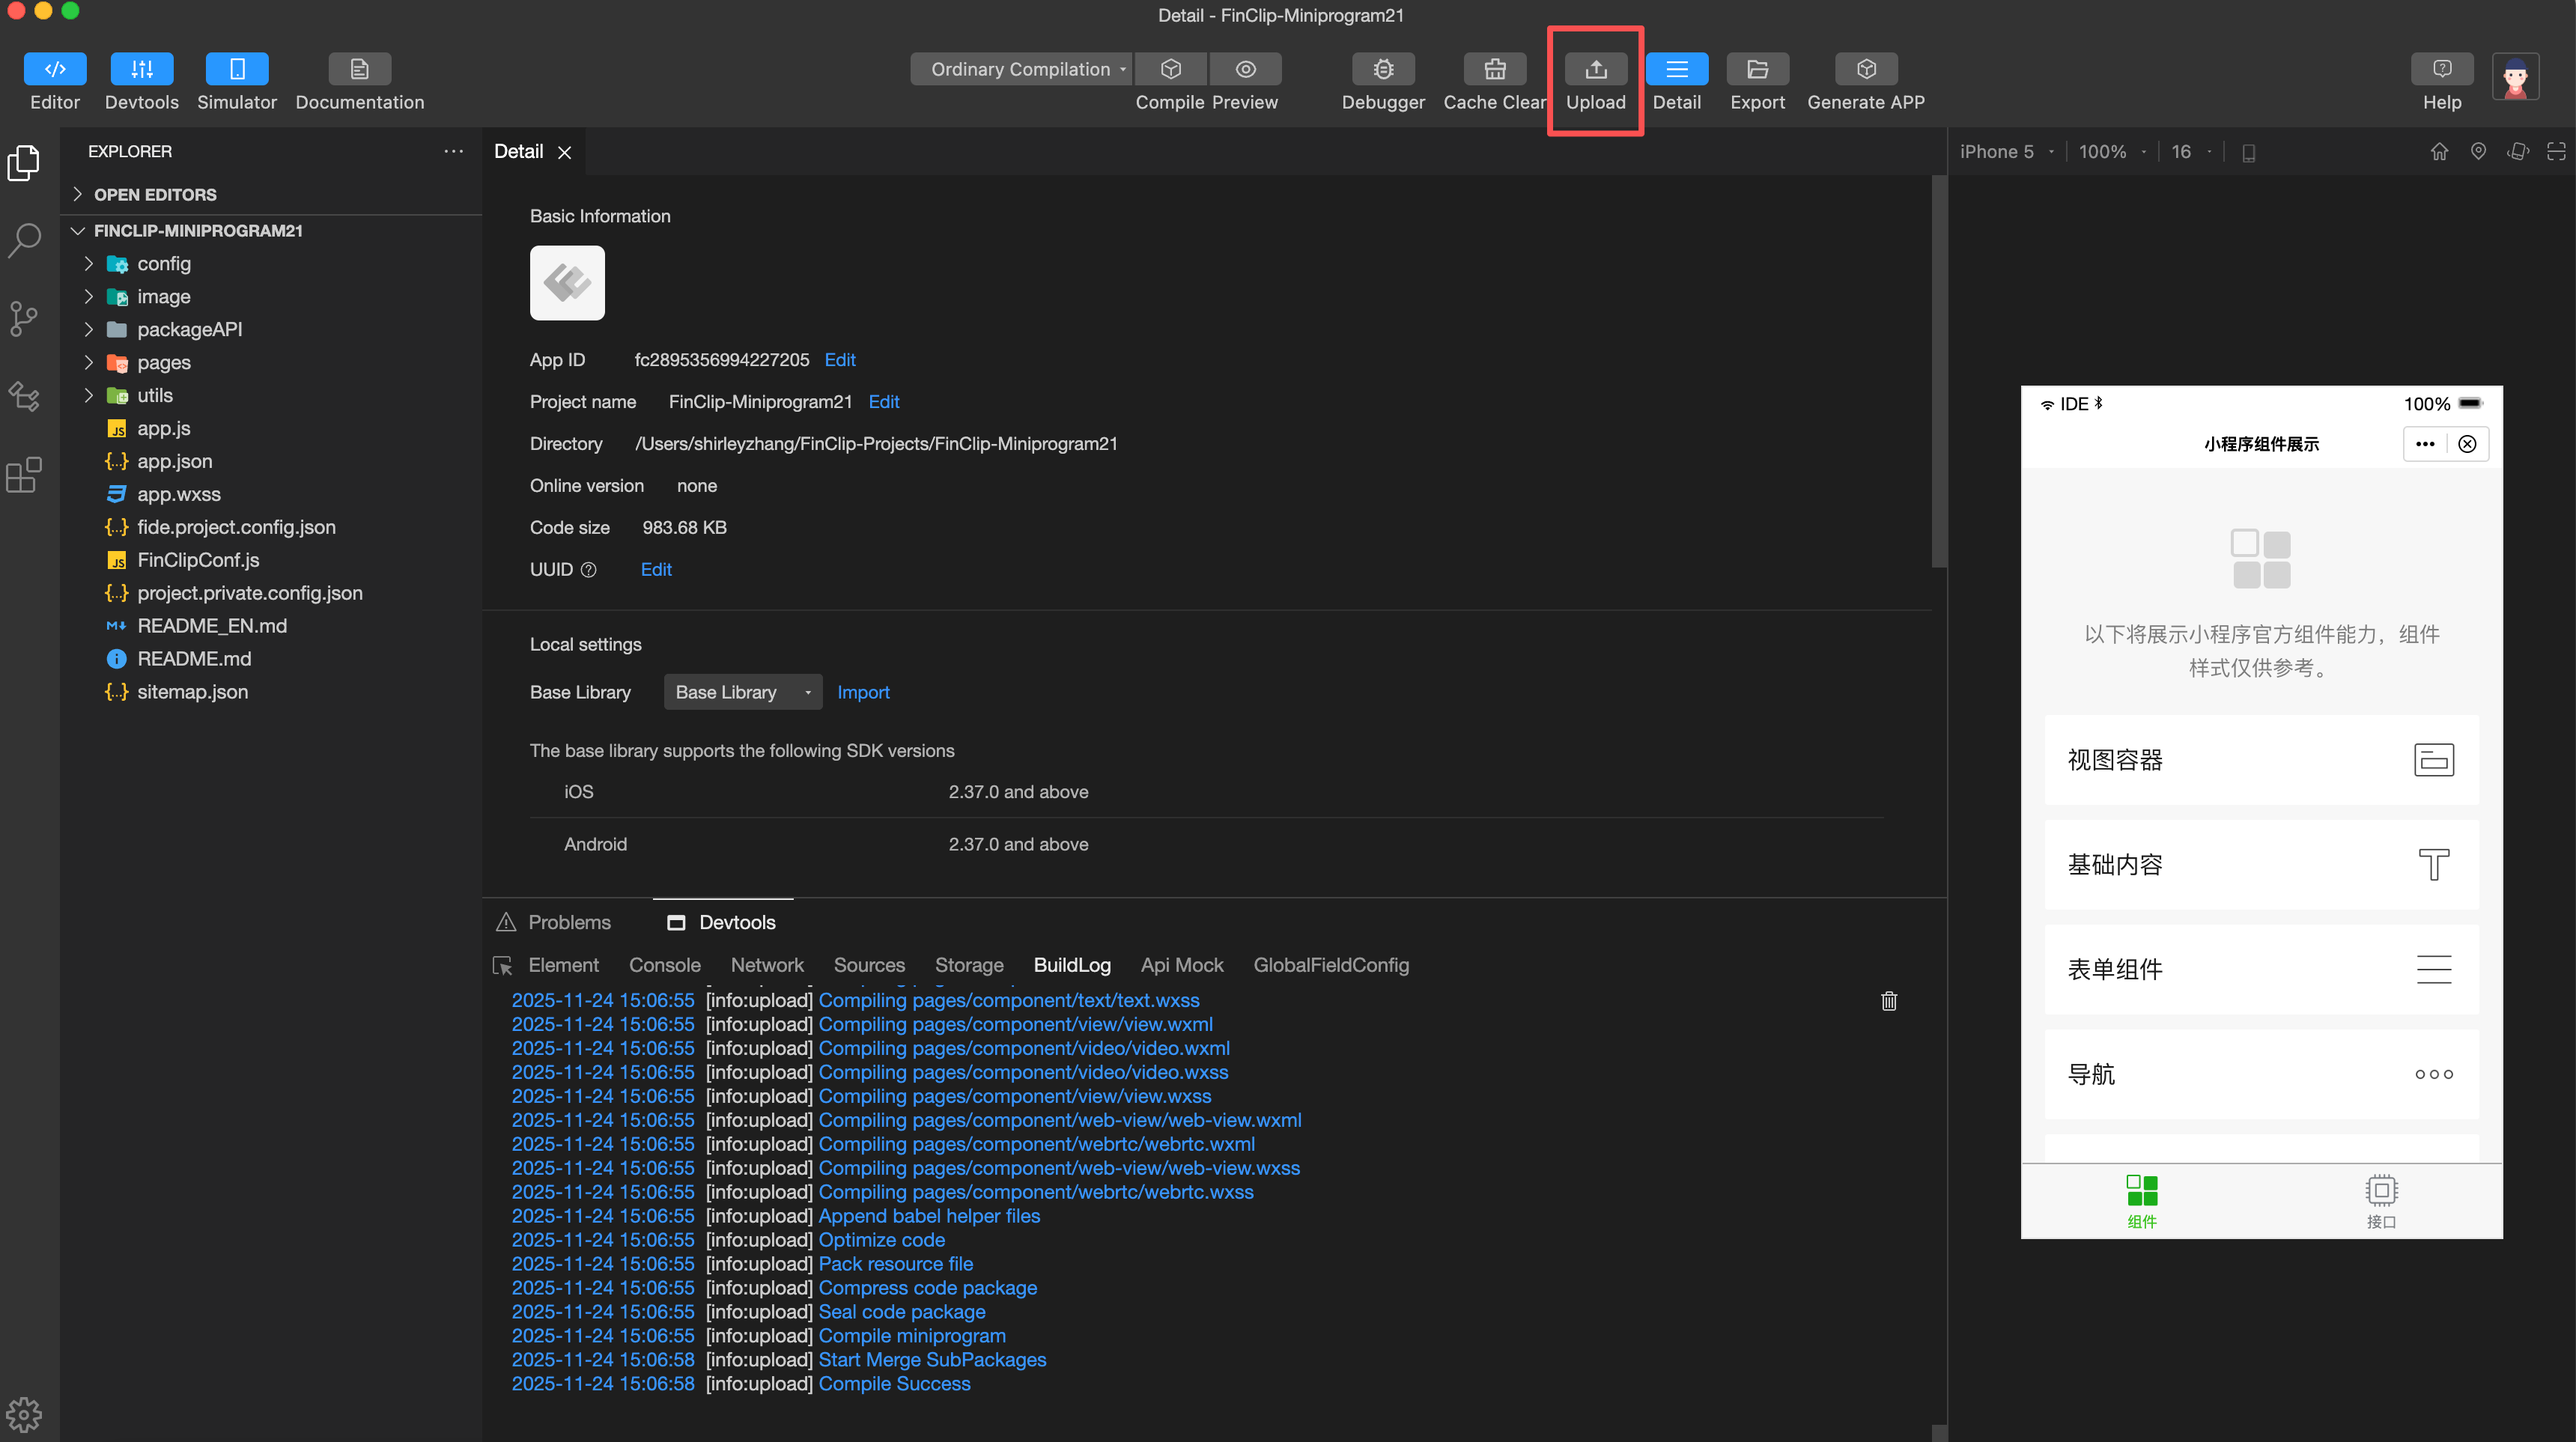
FinClip Studio can compile Mini-Program code locally and directly upload the code package. For detailed operation instructions, please refer to: Developer Tool Operation Instructions (opens new window)
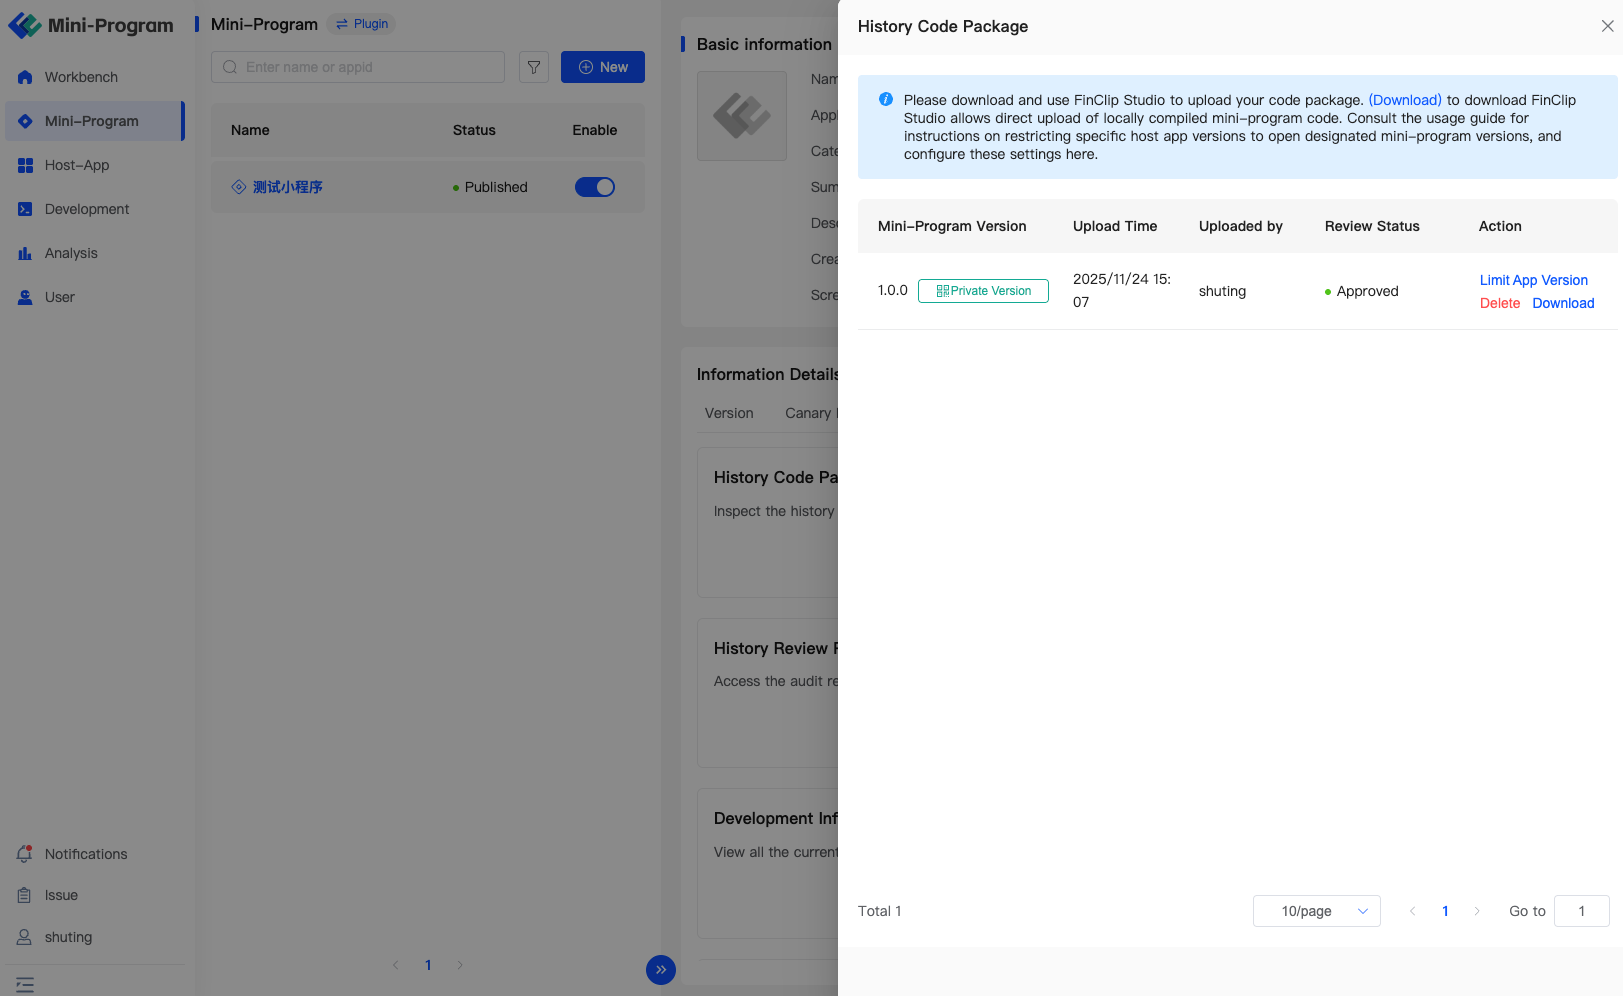
After successful upload, you can view it in "Mini-Program - Details - Others - Historical Code Packages."
# 6. Mini-Program Review and Online/Offline Operations
After completing the related development and debugging work of the Mini-Program, you can submit the corresponding version of the Mini-Program for review.
After the Mini-Program is created, you need to complete the "Privacy Settings" before you can submit the code package and proceed with the Mini-Program online review.
# 6.1 Submitting Mini-Program Review Version
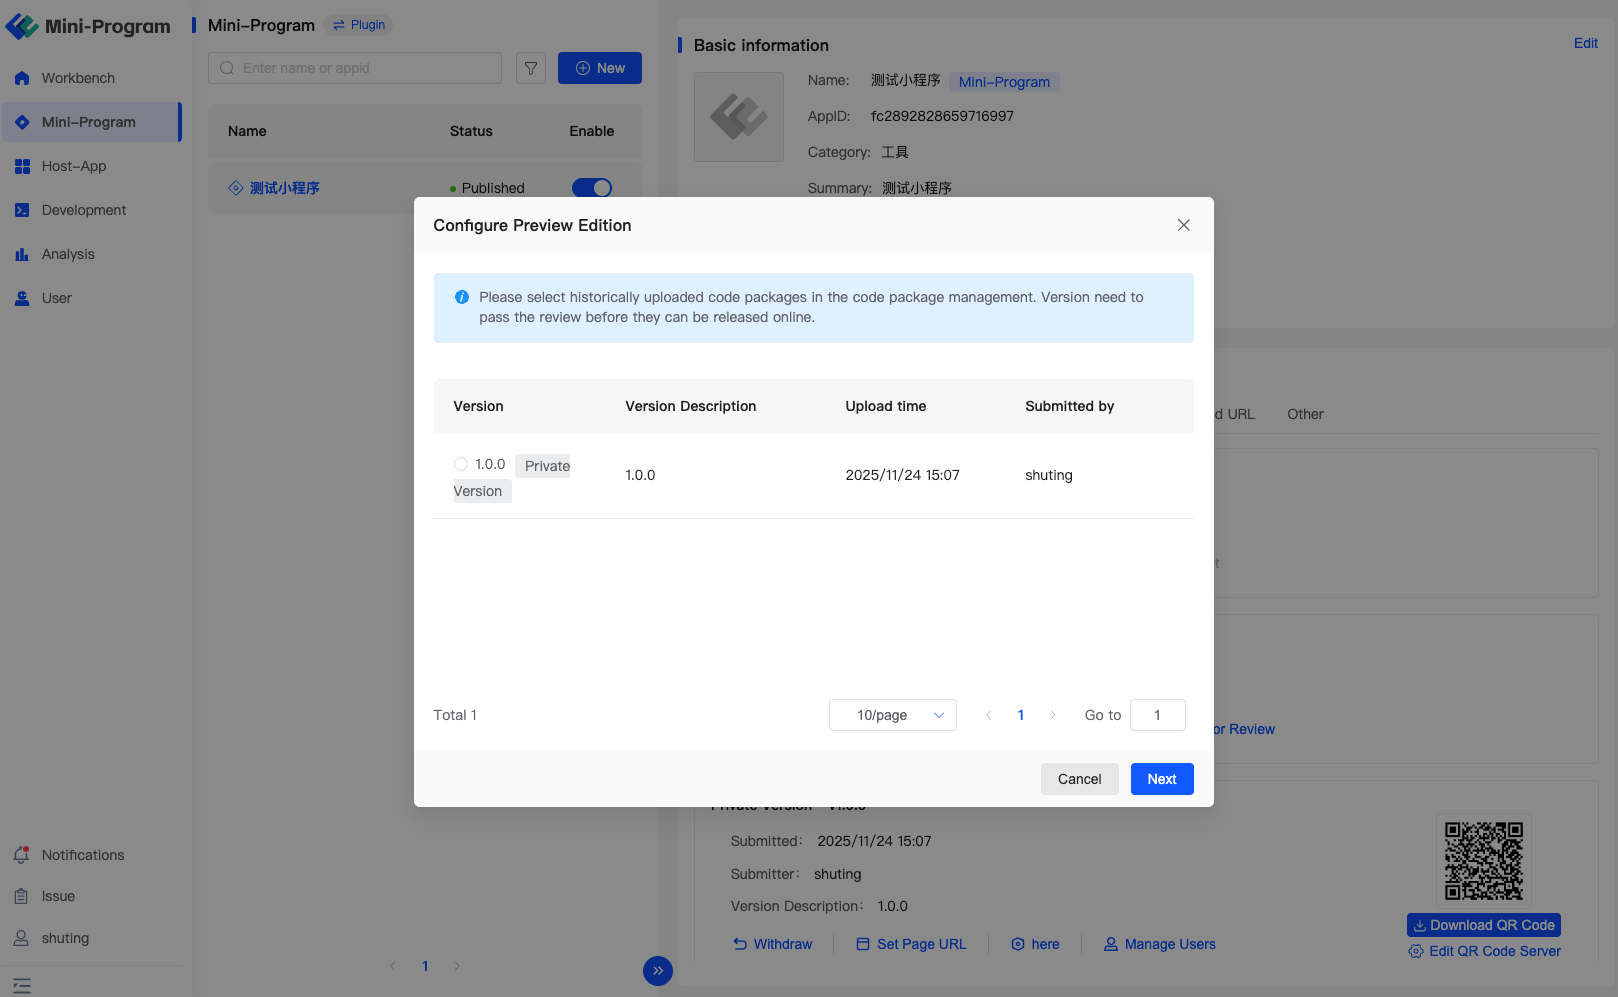
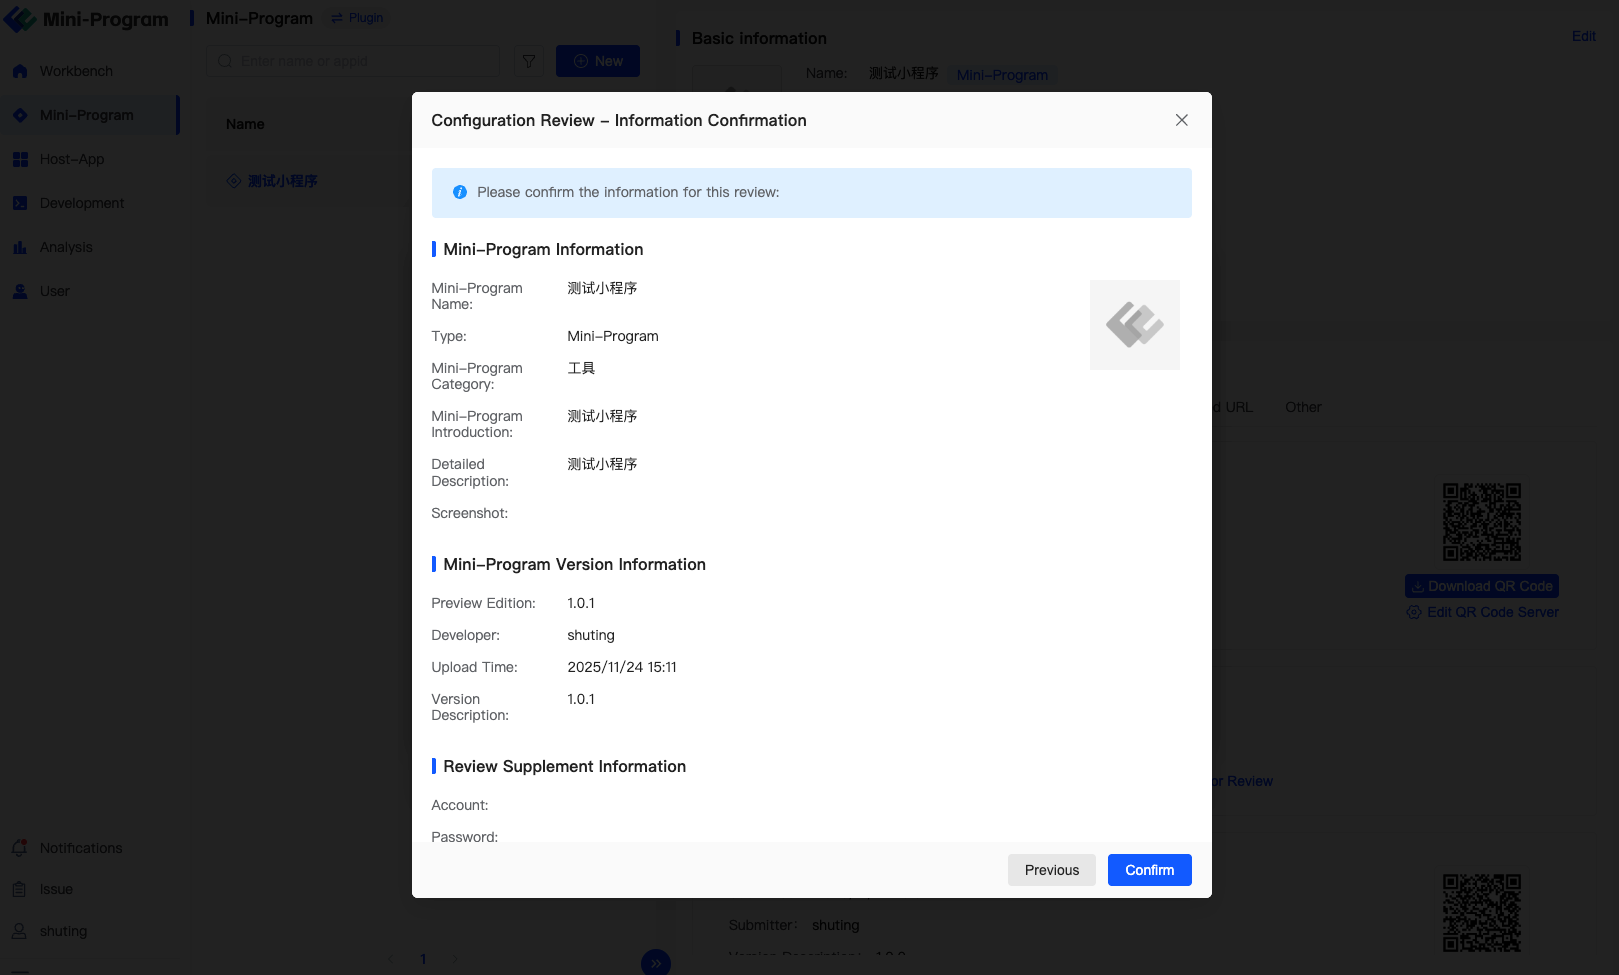
You can add and submit the Mini-Program review version in "Mini-Program - Details - Version Management." When submitting, you need to fill in the corresponding information required during the review process. After the Digital Center approves or rejects, you will see the review results of the corresponding Mini-Program in the "Notification Center."
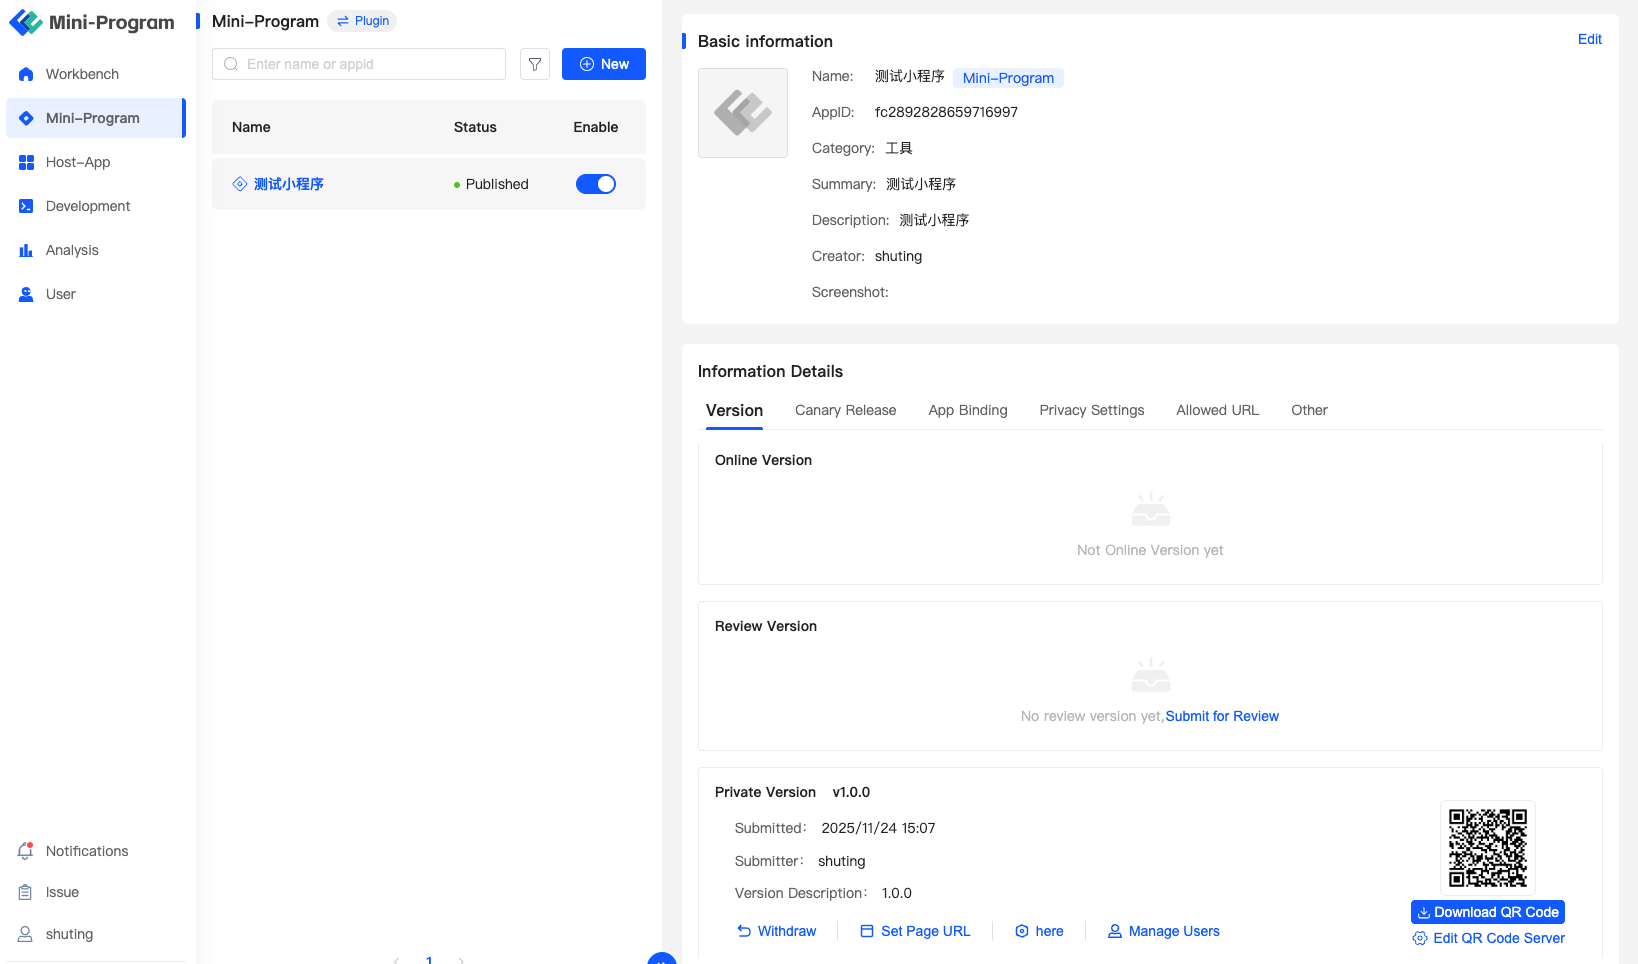
All versions of Mini-Programs uploaded to the Mini-Program Open Platform can be selected and set as review versions. You can distinguish them by the upload time and submission user of the Mini-Program to avoid submitting Mini-Programs under development or debugging as review versions.
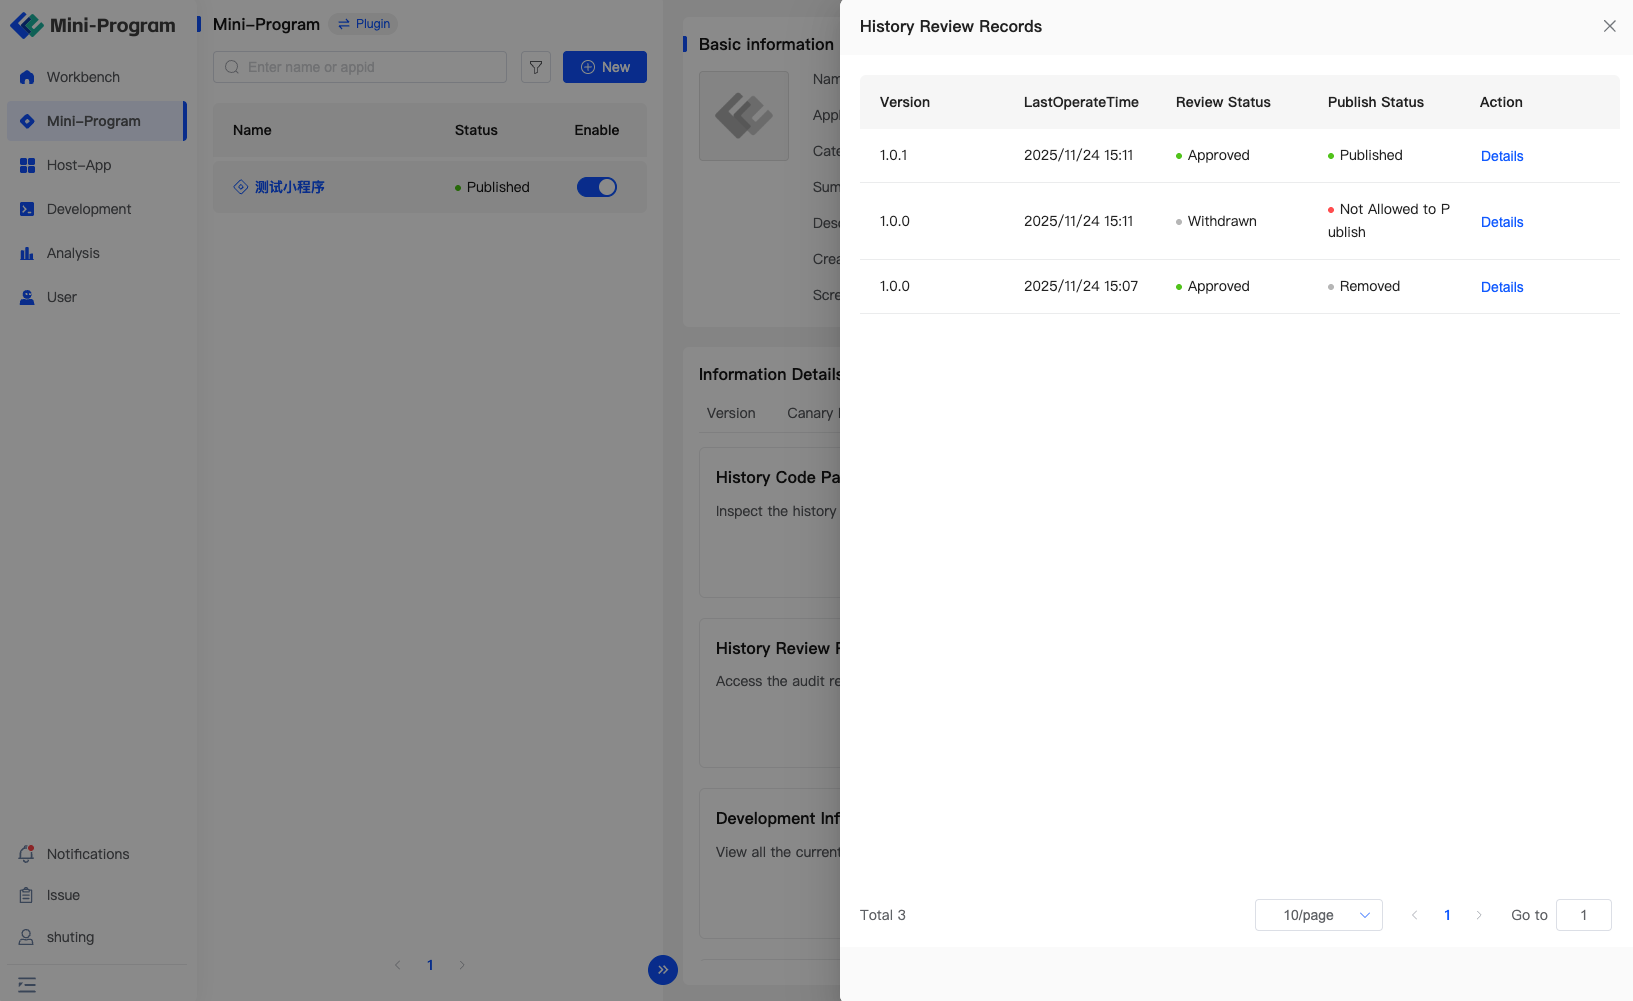
In "Mini-Program Details - Others - Mini-Program Historical Review Records," you can see all historical review records of the current Mini-Program.
# 6.2 Mini-Program Online/Offline Operations
If you check "Automatically go online after approval" when submitting the Mini-Program as a review version, the Mini-Program will be automatically published as an online version after passing the review; otherwise, you need to operate manually.
After the Mini-Program passes the review, you can publish the current Mini-Program as an online version in "Mini-Program Details - Review Version." After the Mini-Program goes online, it can be associated with the Host-App.
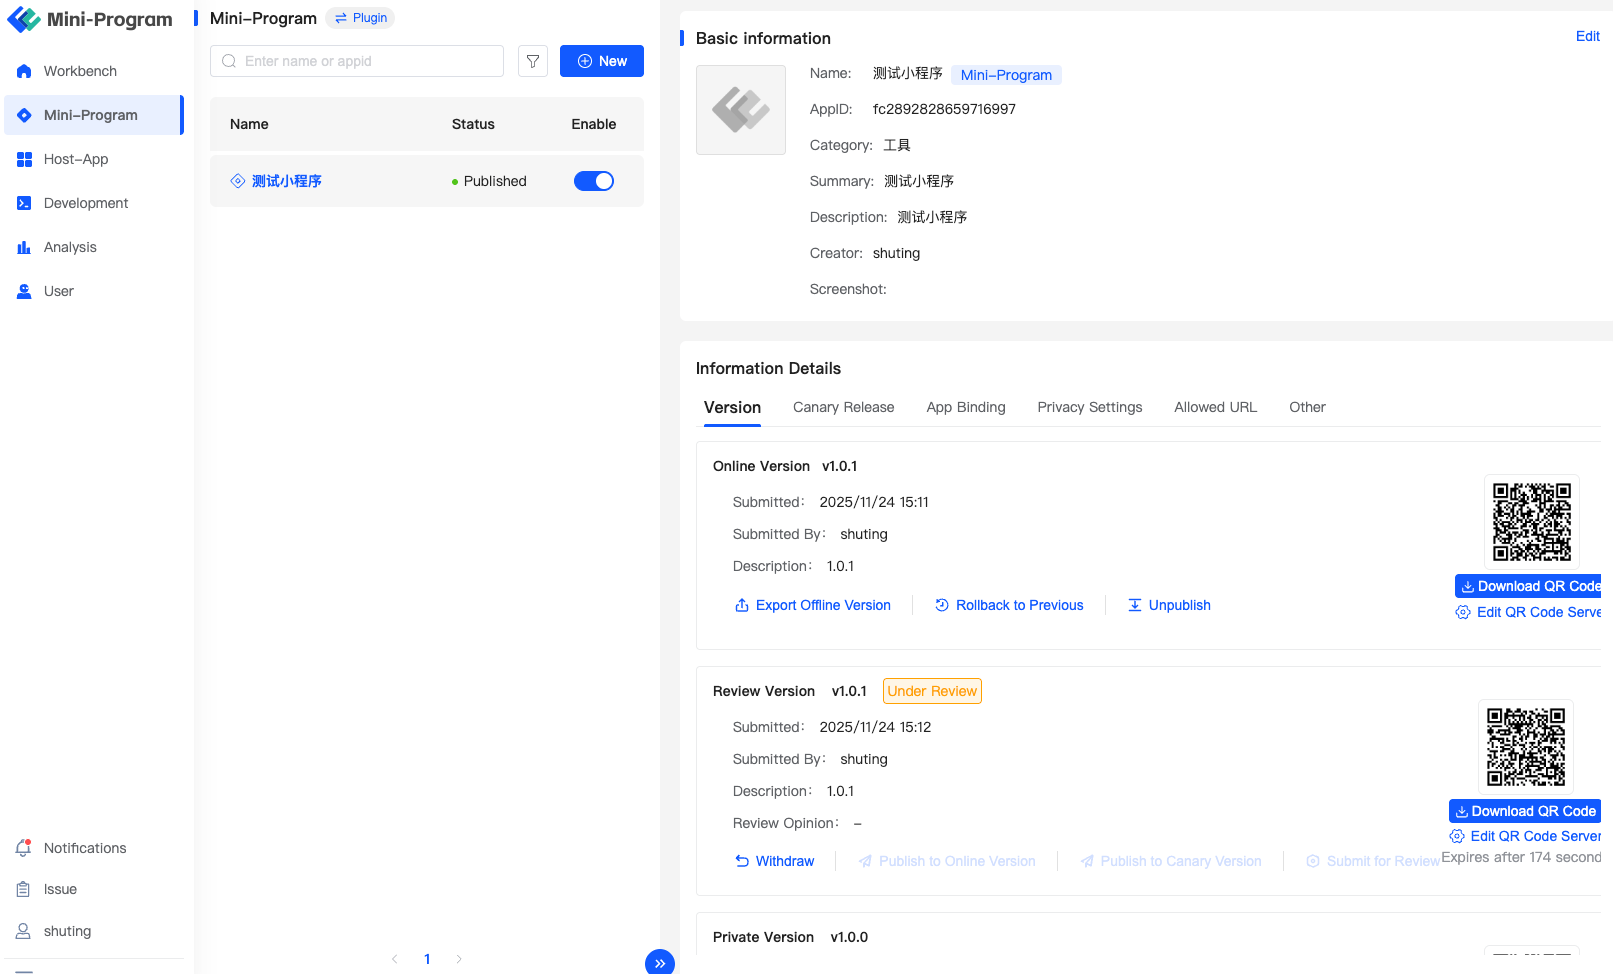
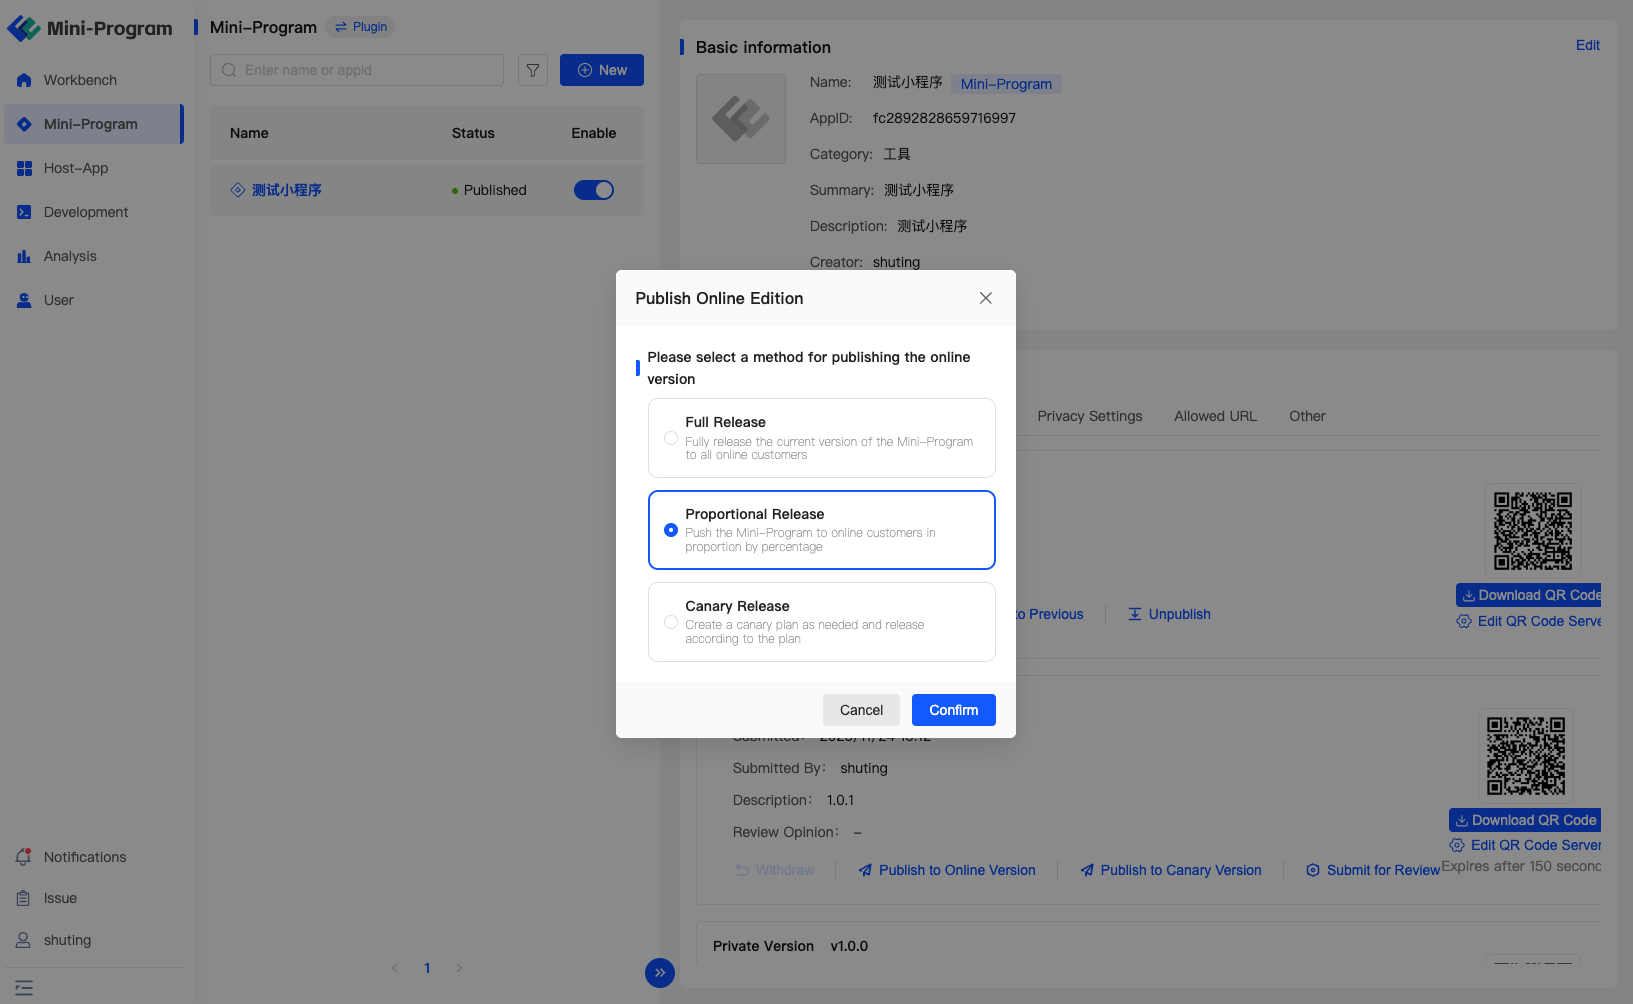
When publishing the Mini-Program as an online version, there are three publishing methods available for you to choose from:
- Full release, which pushes directly to all users, and users can open the latest version of the Mini-Program after release;
- Confirm release, which pushes to random users within 10 minutes according to the release ratio. You can view the version update quality within 15 days. If no action is taken within 15 days after release, it will push to all users;
- Create a gray release plan, creating the current version as a specified gray release plan.
# 7. Associating Mini-Programs with Host-Apps
After completing the related work of creating a new Mini-Program, we need to configure the relevant information of the Host-App in the FinClip Mini-Program Open Platform. Only after configuring the relevant information of the Host-App can the Mini-Program run normally in the specified Host-App.
# 7.1 Adding a New Host-App
If you are logging into the FinClip Mini-Program Open Platform for the first time, you can click the "Add" button from the homepage or the Mini-Program page to start creating a new Host-App.
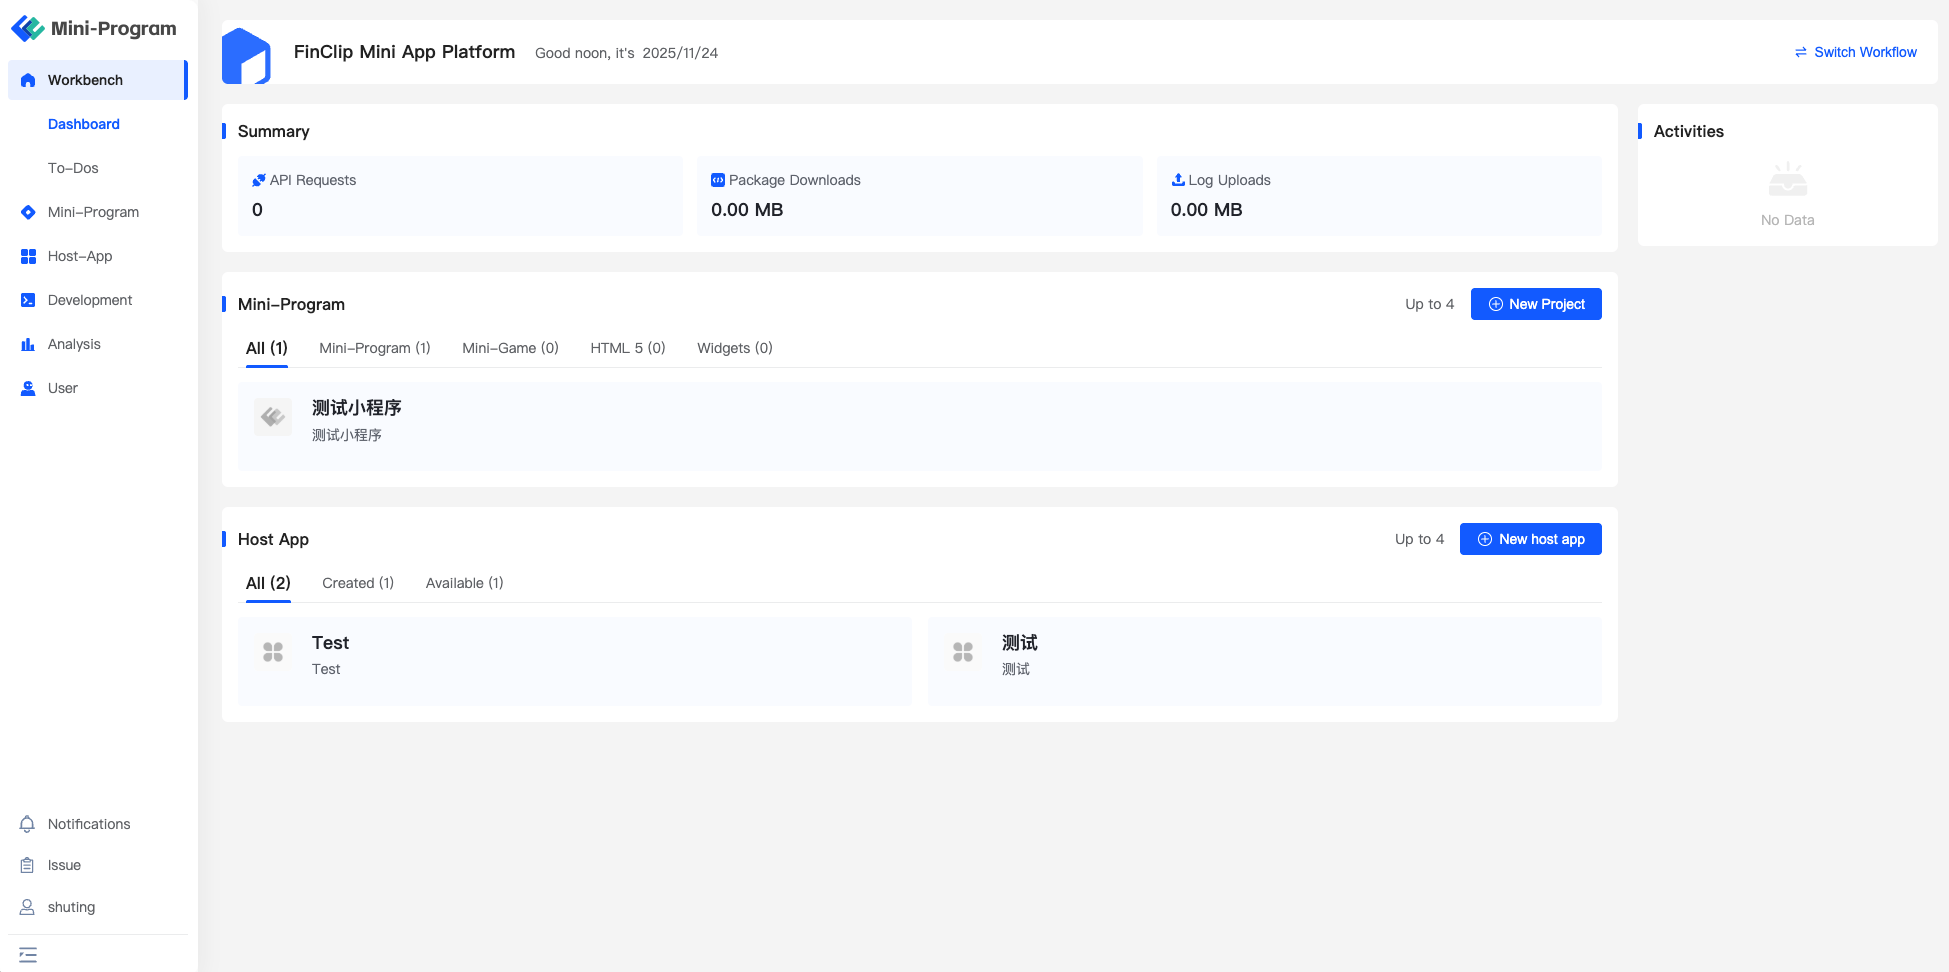
You can also complete the addition operation on the application page.
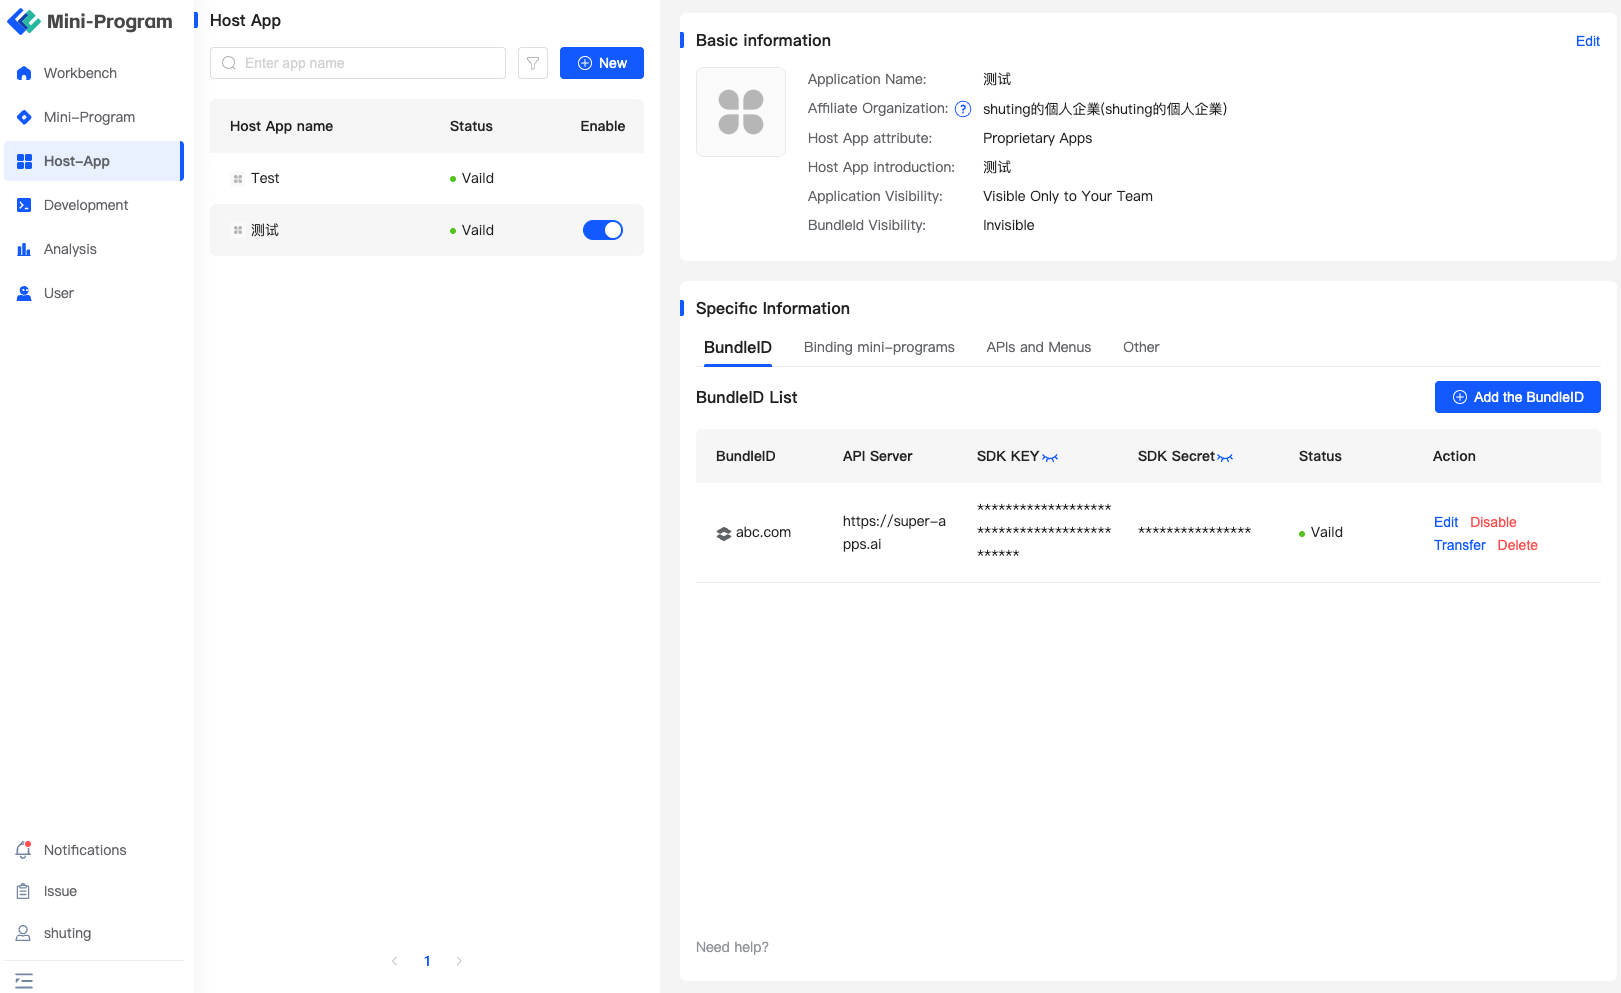
# 7.2 Supplementing Application Information
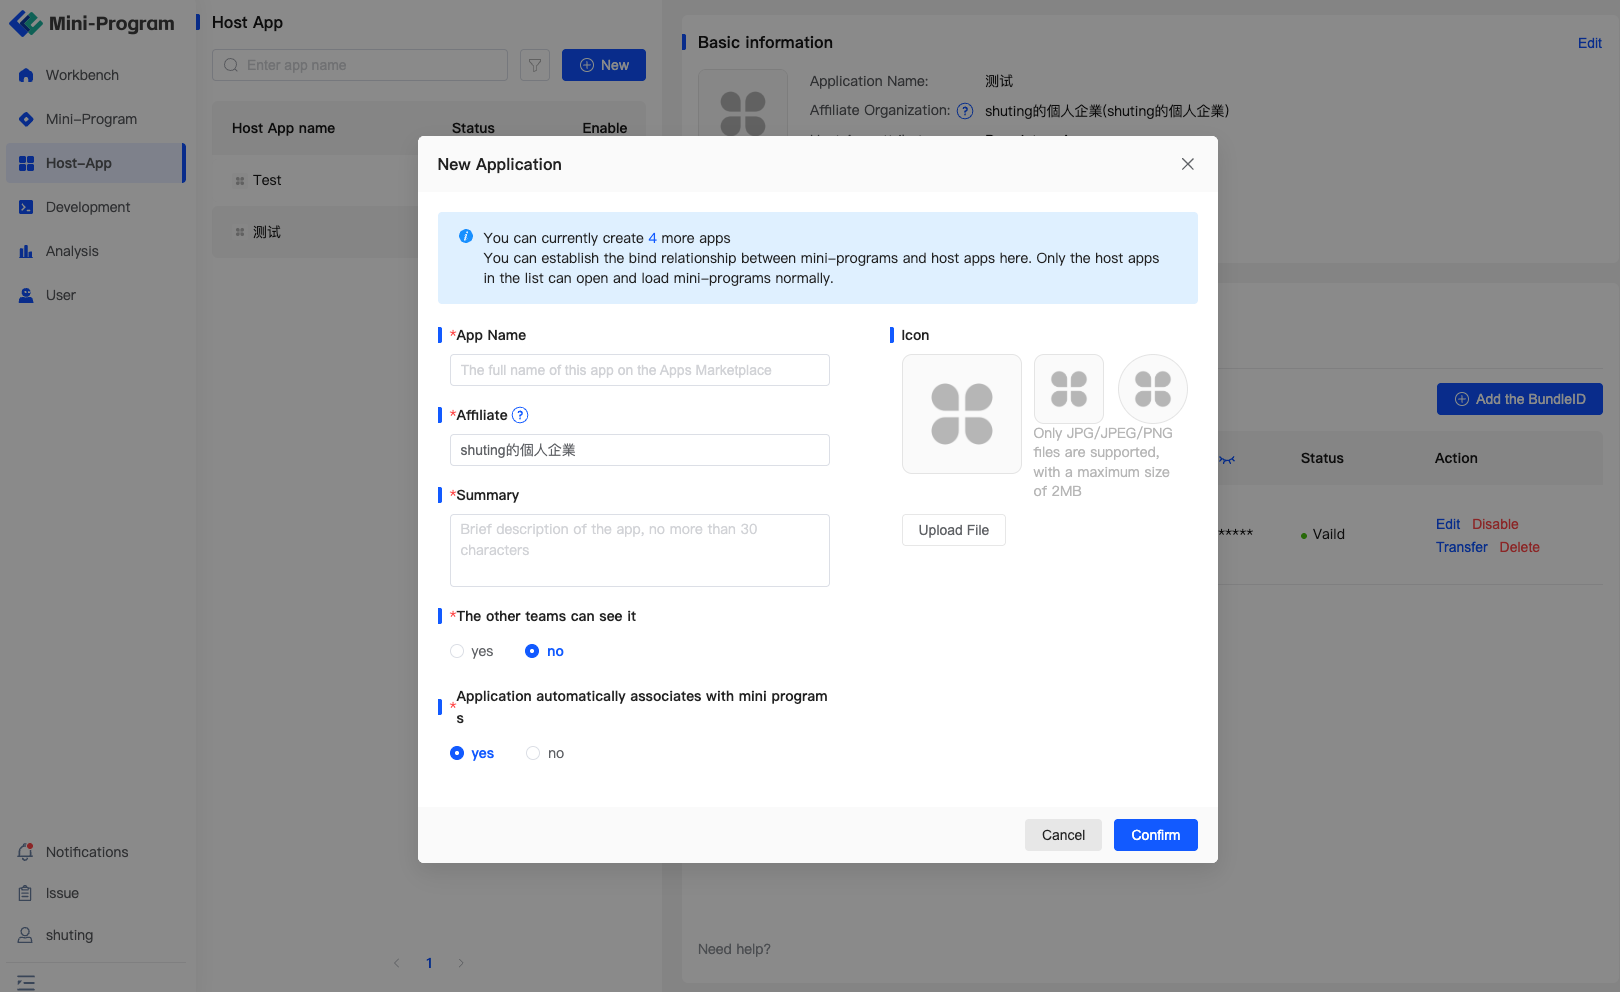
When creating a new Host-App, you need to configure the name, affiliated organization, introduction, icon, and visibility of the Host-App, among other related information. The last two items, "Whether visible to other teams" and "Whether BundleID is displayed to other teams," are mainly used to protect your application-related information and improve the information protection quality of Mini-Programs and Host-Apps.
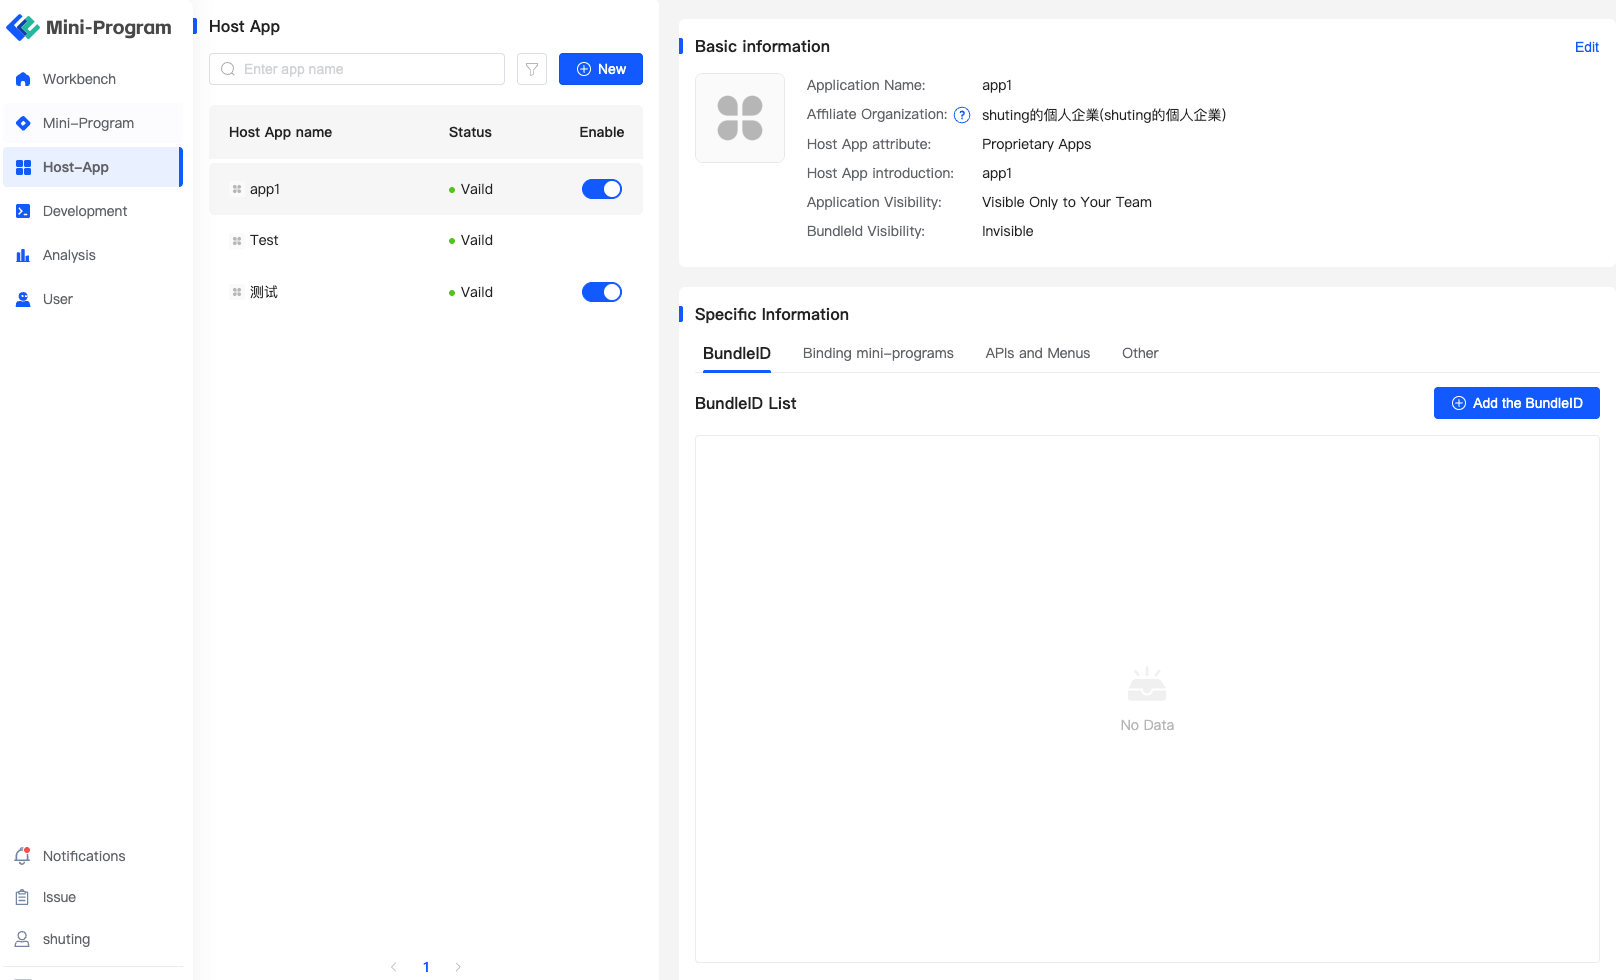
After completing the addition of the Host-App, you also need to enter the BundleID information of the Host-App and its platform.
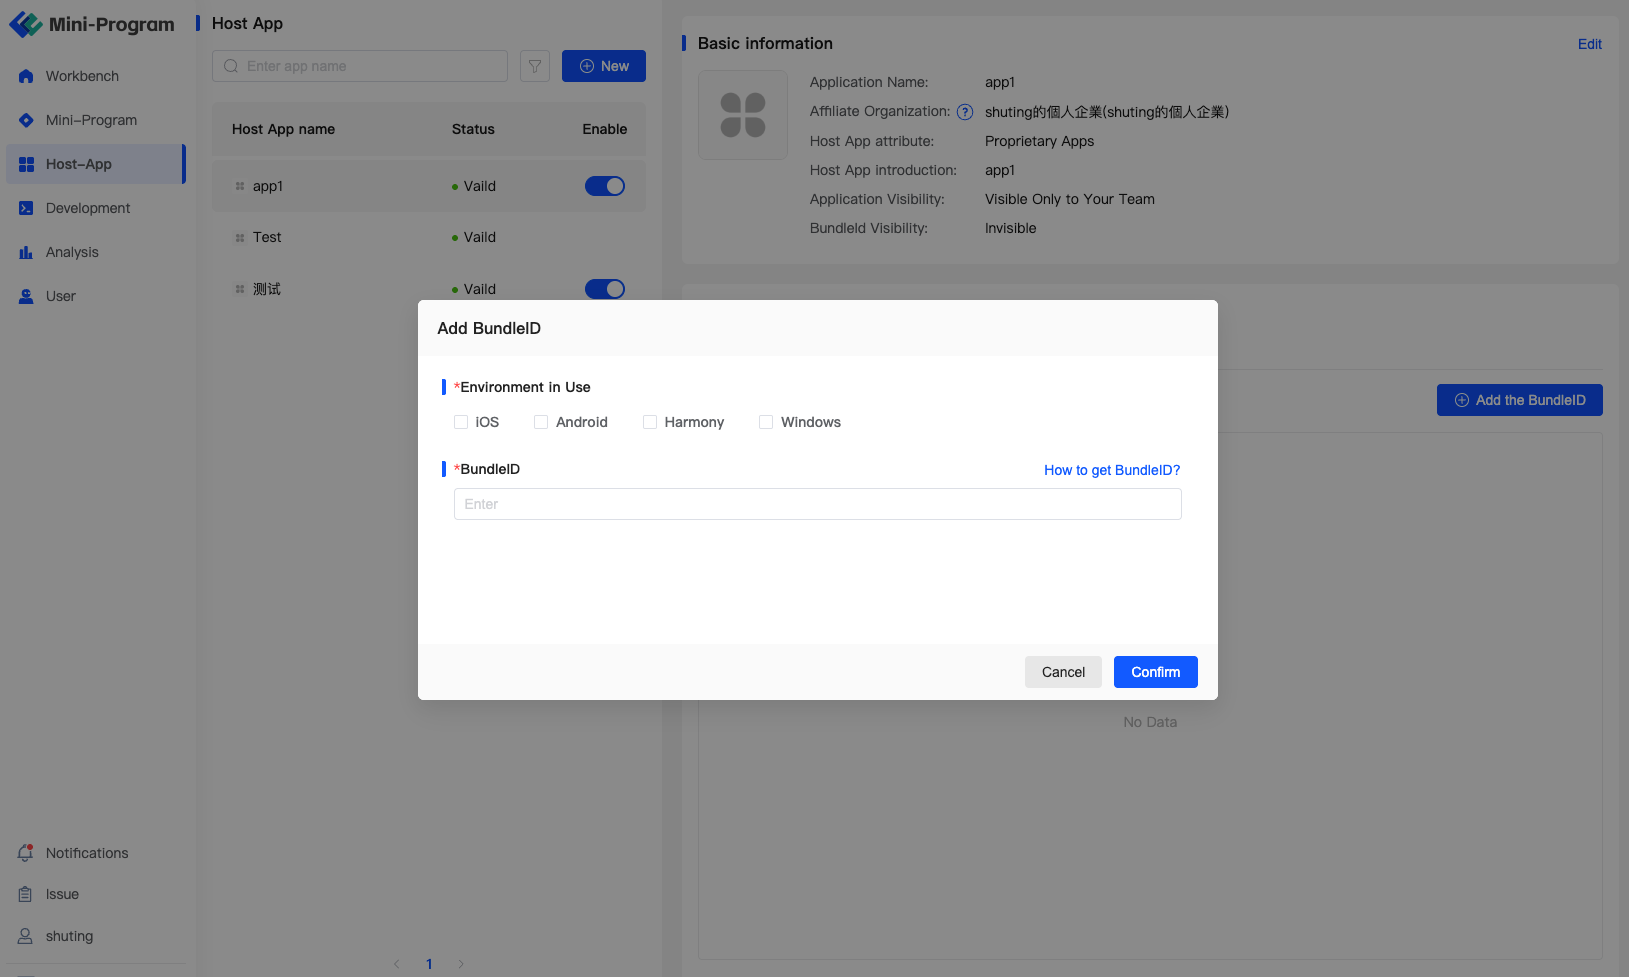
# 7.3 Configuring SDK Key & Secret
When opening a Mini-Program in the Host-App, the SDK decrypts based on the current App's BundleID, SDK Key & Secret. Only when configured correctly can the Mini-Program run normally.
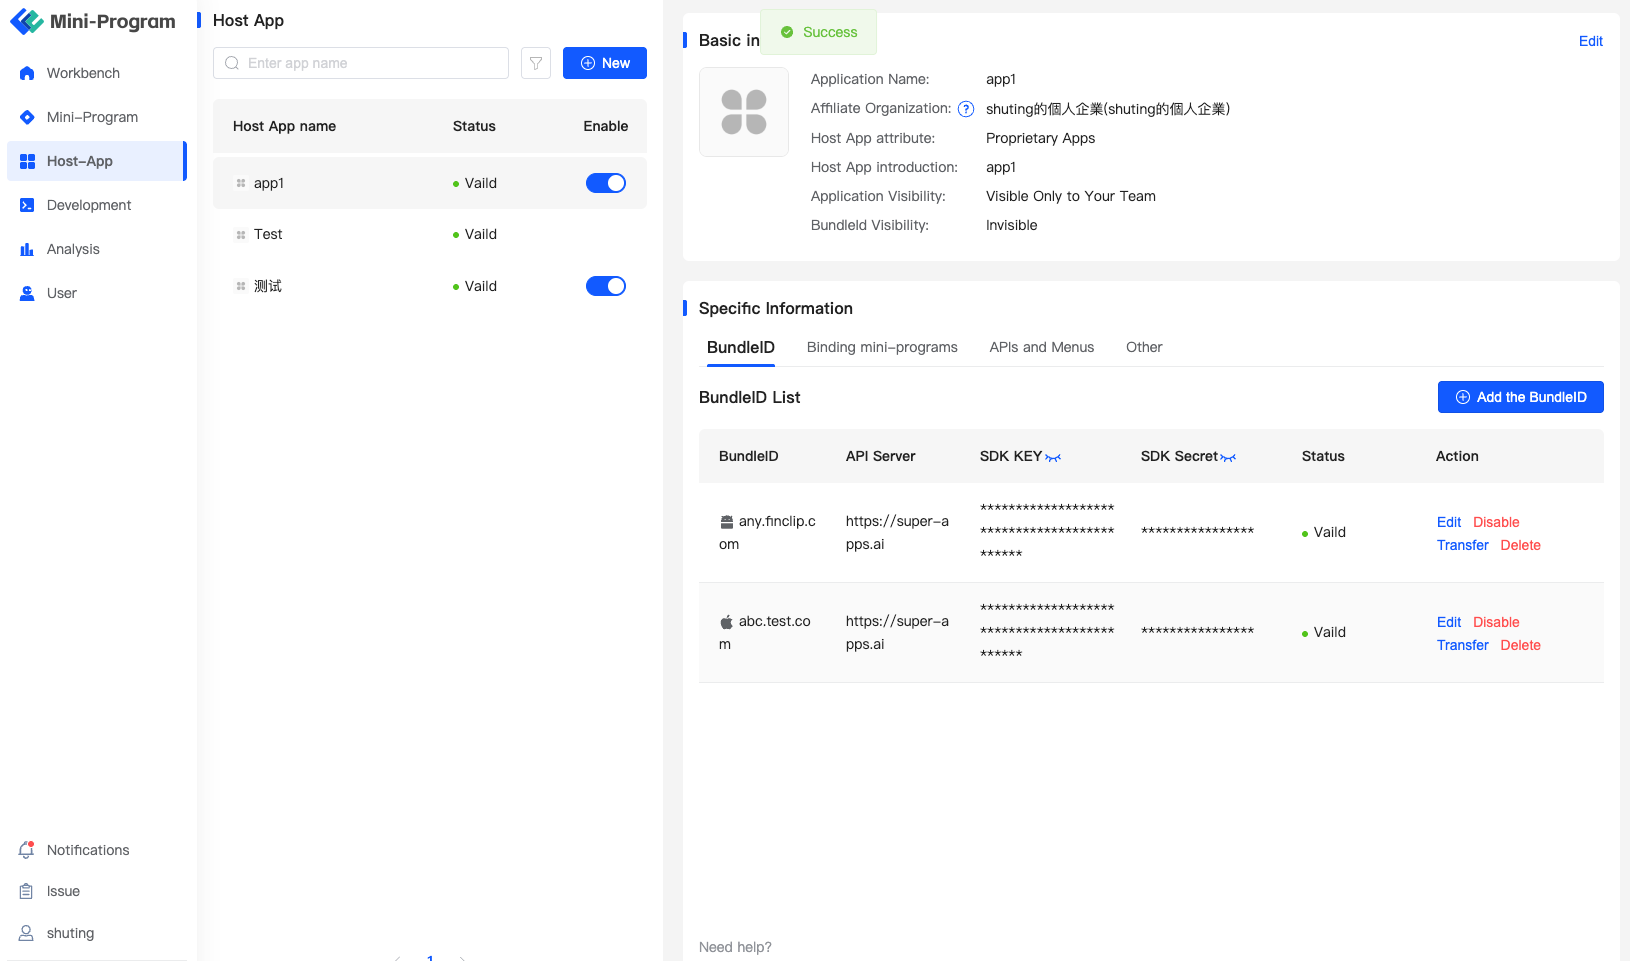
Therefore, you need to copy the corresponding Key and Secret on the right side of the corresponding BundleID and fill them into the SDK initialization fields according to the SDK configuration documentation.
# 7.4 Associating Mini-Programs with Host-Apps
After creating the Mini-Program and Host-App, you need to associate the Mini-Program with the Host-App.
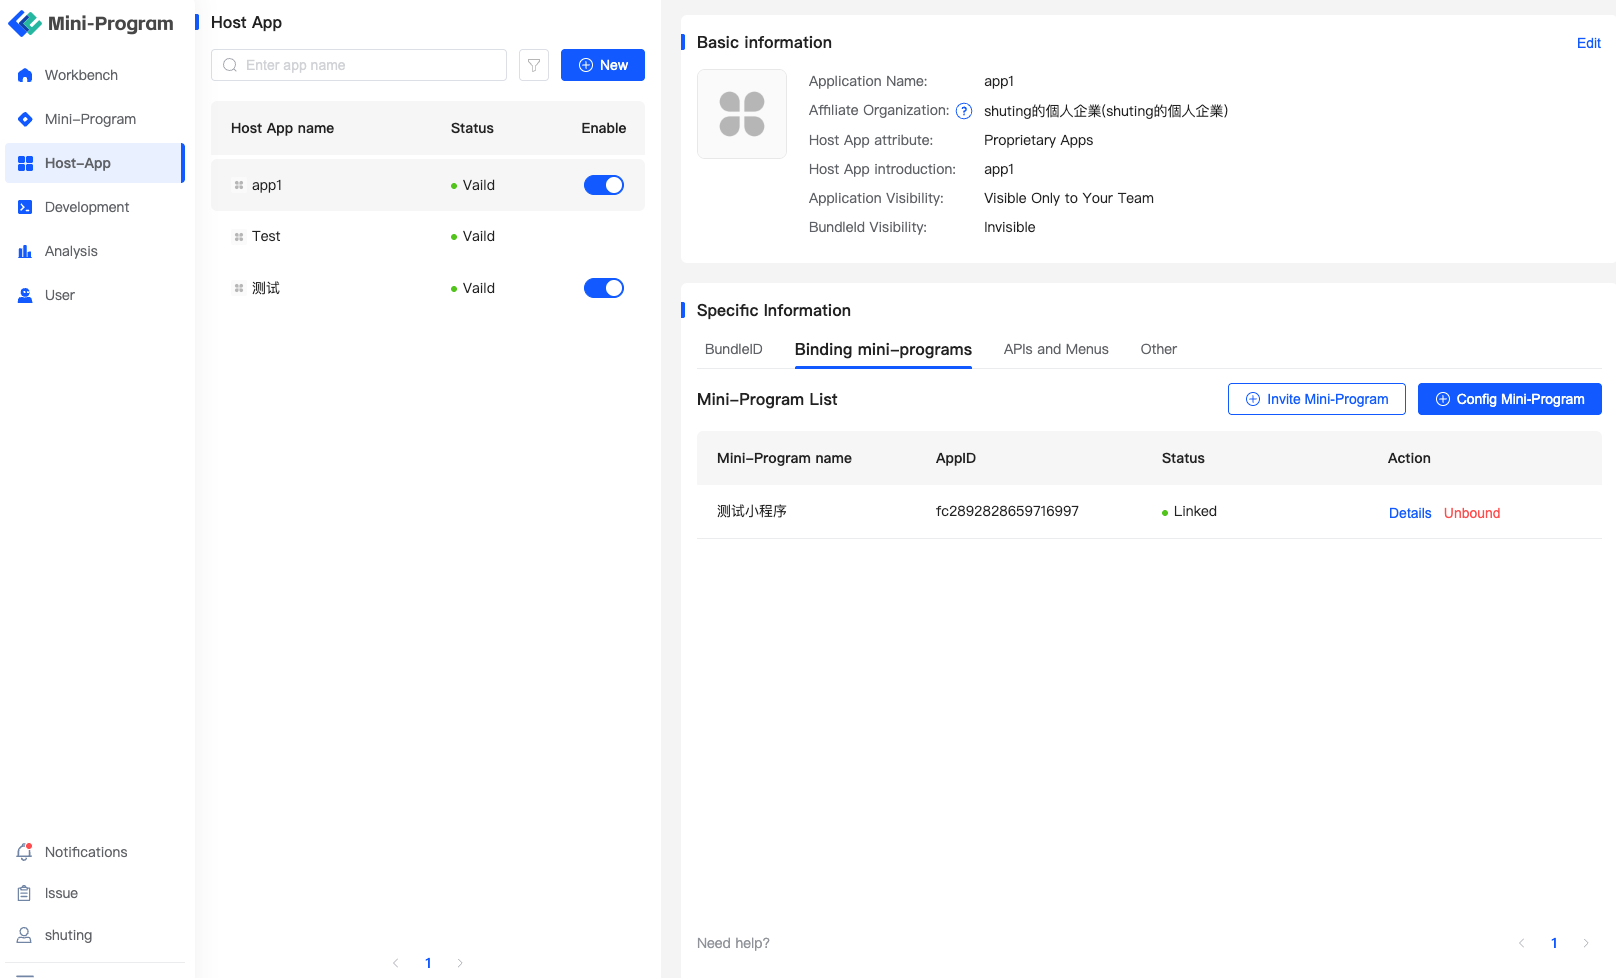
On the "Application - Associate Mini-Program" page, we can associate visible Mini-Programs with applications. After completing the association of the Mini-Program with the Host-App, the Host-App also needs to add an entry for the Mini-Program in its own App so that users can open the Mini-Program normally.
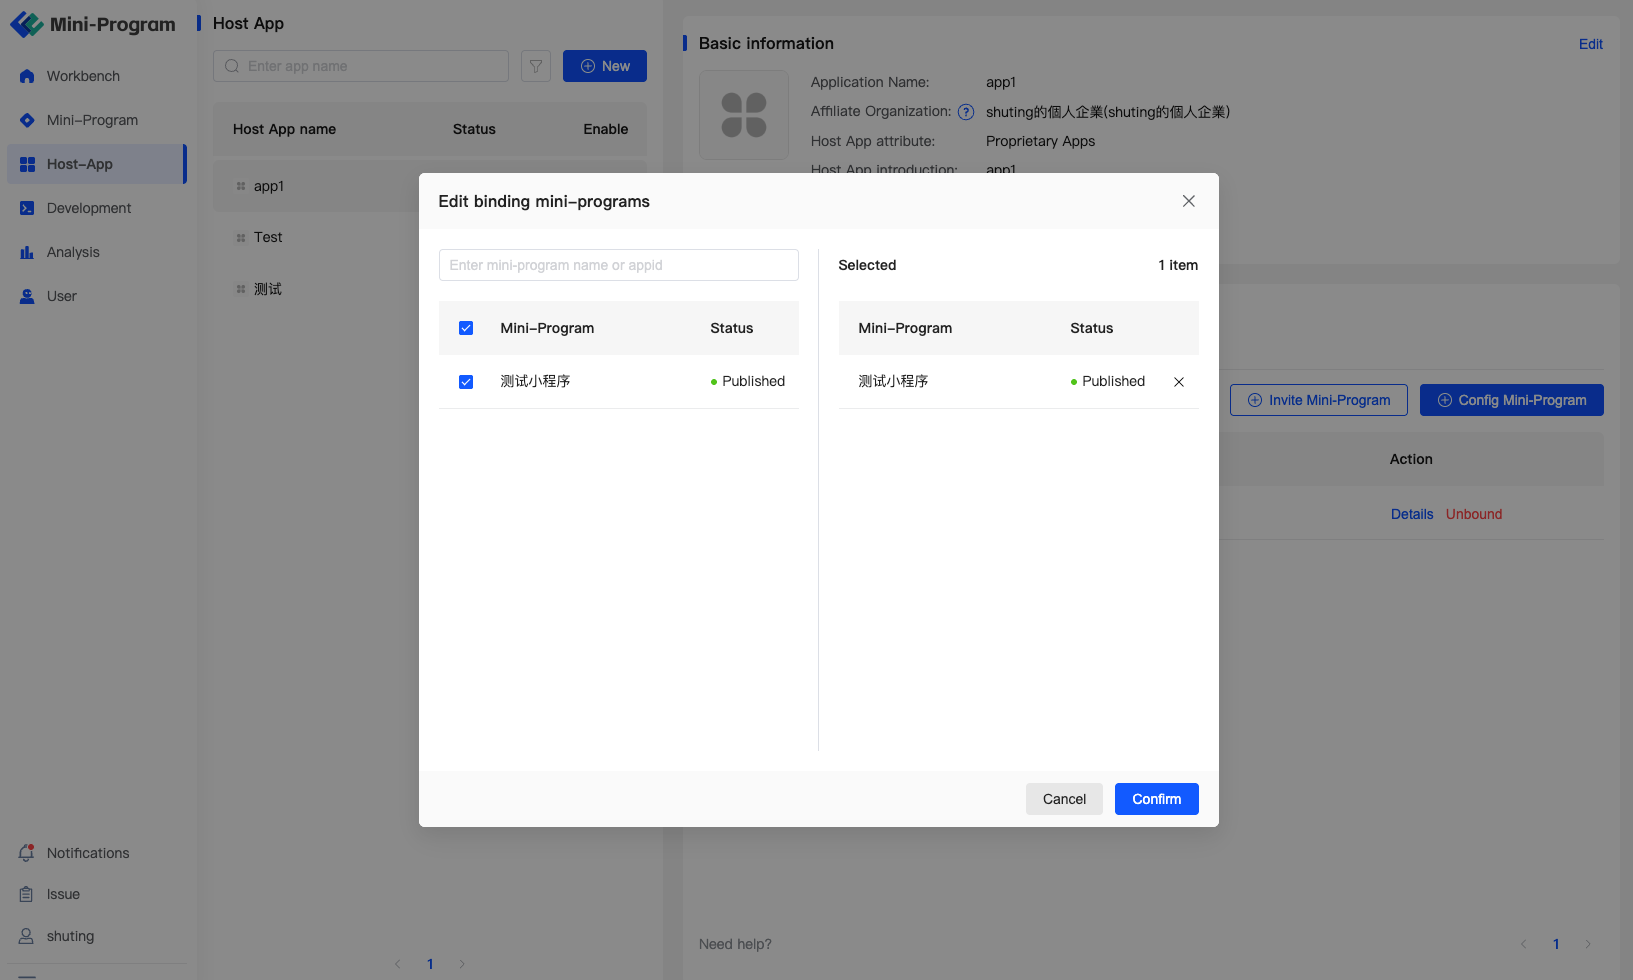
Please note the following when associating Mini-Programs with Host-Apps:
- Cooperative applications must integrate the FinClip Mini-Program SDK and configure the corresponding SDK Key and Secret;
- Enterprises need to associate the listed Mini-Programs with cooperative applications to open the corresponding Mini-Programs;
- The Mini-Program Open Platform will verify the SDK KEY, application Bundle ID, and the association relationship of the Mini-Program. If not associated, the Mini-Program cannot be opened normally.
For SDK integration instructions, please refer to:
# 7.5 Associating Mini-Programs with Third-Party Host-Apps
If you want to associate your own Mini-Program with a third-party Host-App, you need to follow the configuration process below.
First, log in to the Digital Center, go to the "Application - Application Management - Application Authorization Management" page, and turn on the switch on the right side of "Developer Center Application Display - Developer Center Self-Setting Application Visibility."
Second, log in to the Developer Center with a third-party Host-App account with management permissions, go to the "Application Management - Application Basic Information" page, and modify the "Application Visibility" in the application to be visible to third-party teams.
After completing the above operations, Mini-Program developers can see the third-party Host-App on the application management page, then click the "Configure Mini-Program" button below, select their own Mini-Program content, and click confirm. After the third-party Host-App developer enters the to-do center page and approves the binding application, the Mini-Program can be used in the third-party Host-App.
For more information on how to configure the Mini-Program entry in the application, please click here.
# 8. Handling User Feedback
The Mini-Program SDK of the Open Platform provides a feature entry for collecting user feedback. Click the "..." in the upper left corner of the Mini-Program to see the complaint and feedback entry.
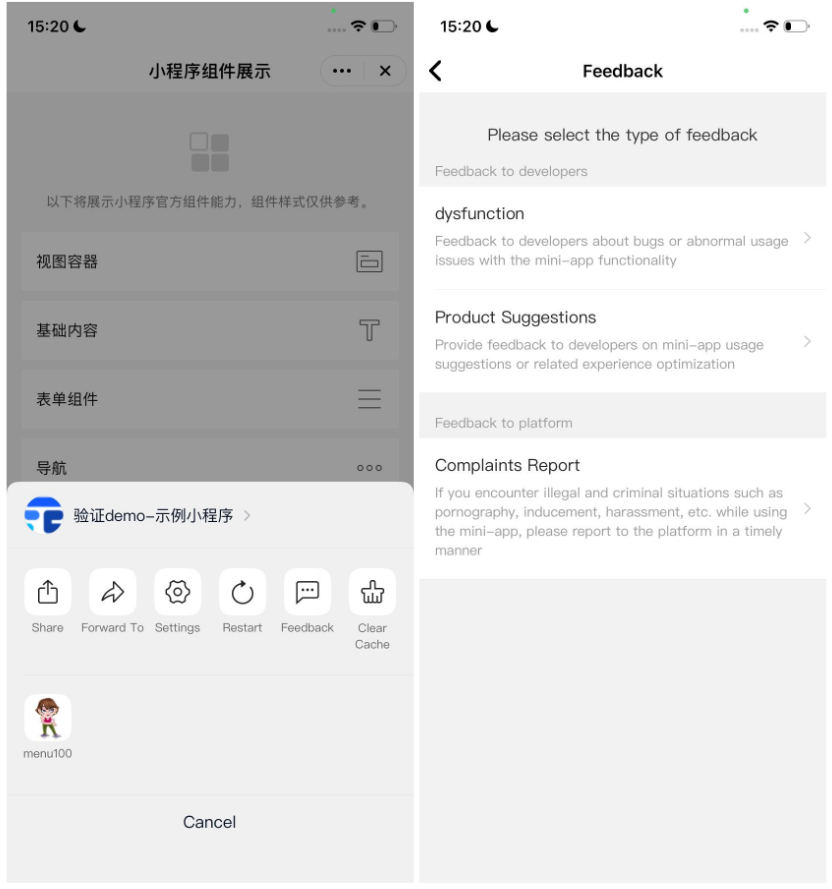
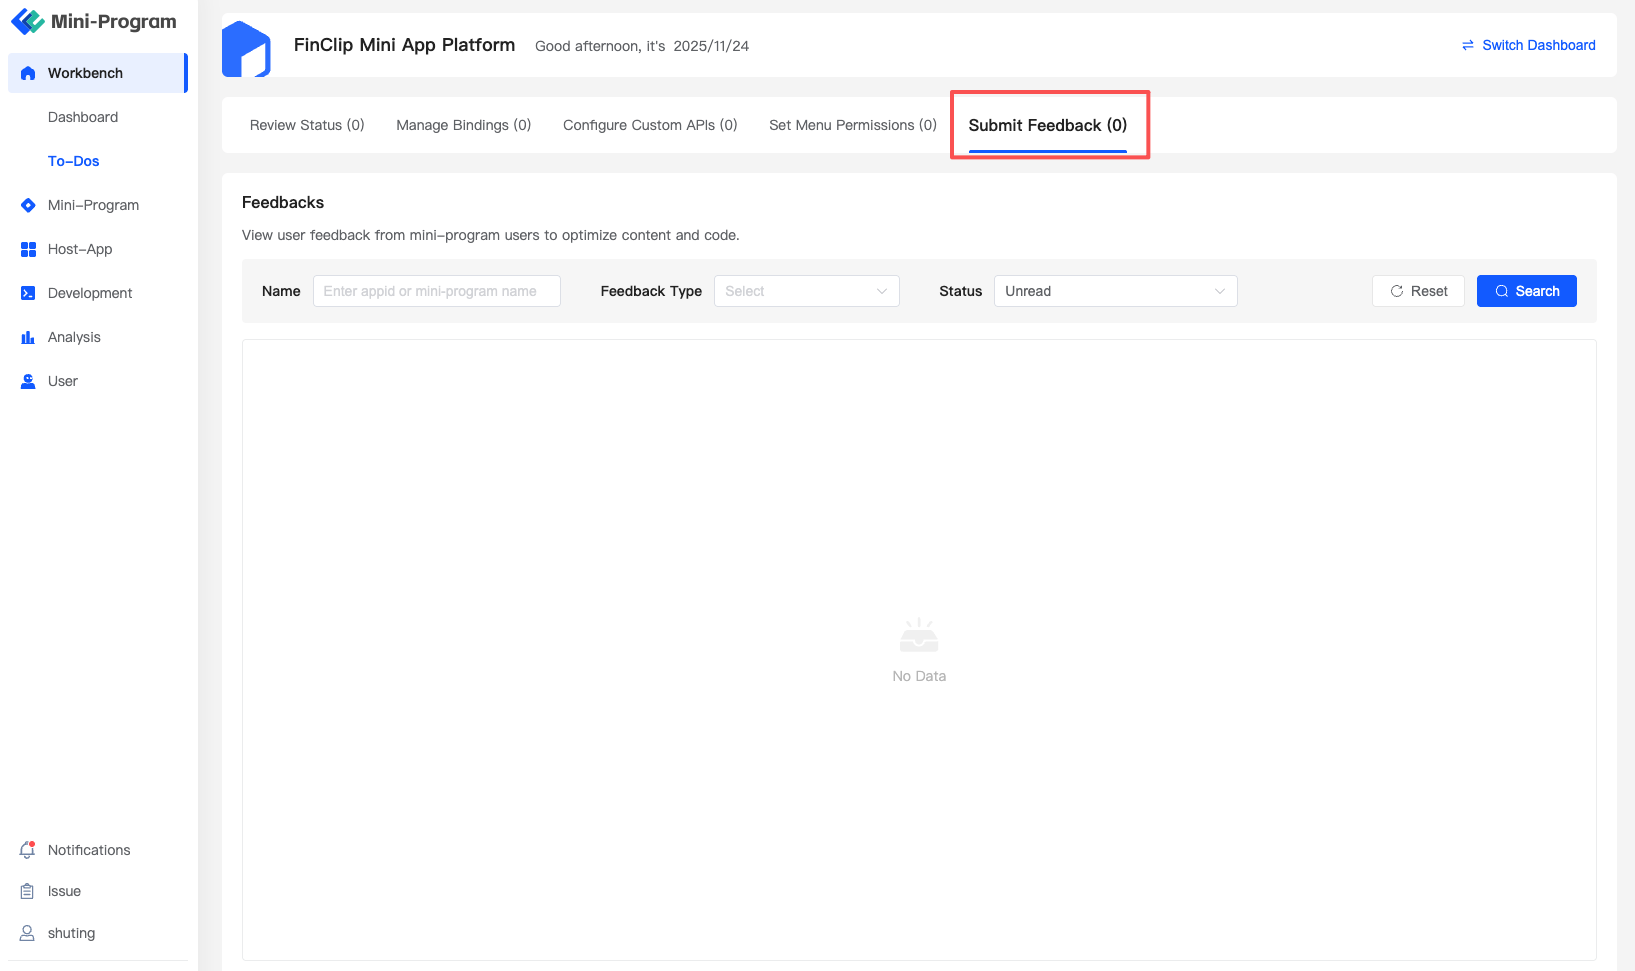
The above information can be viewed and processed in the management console.
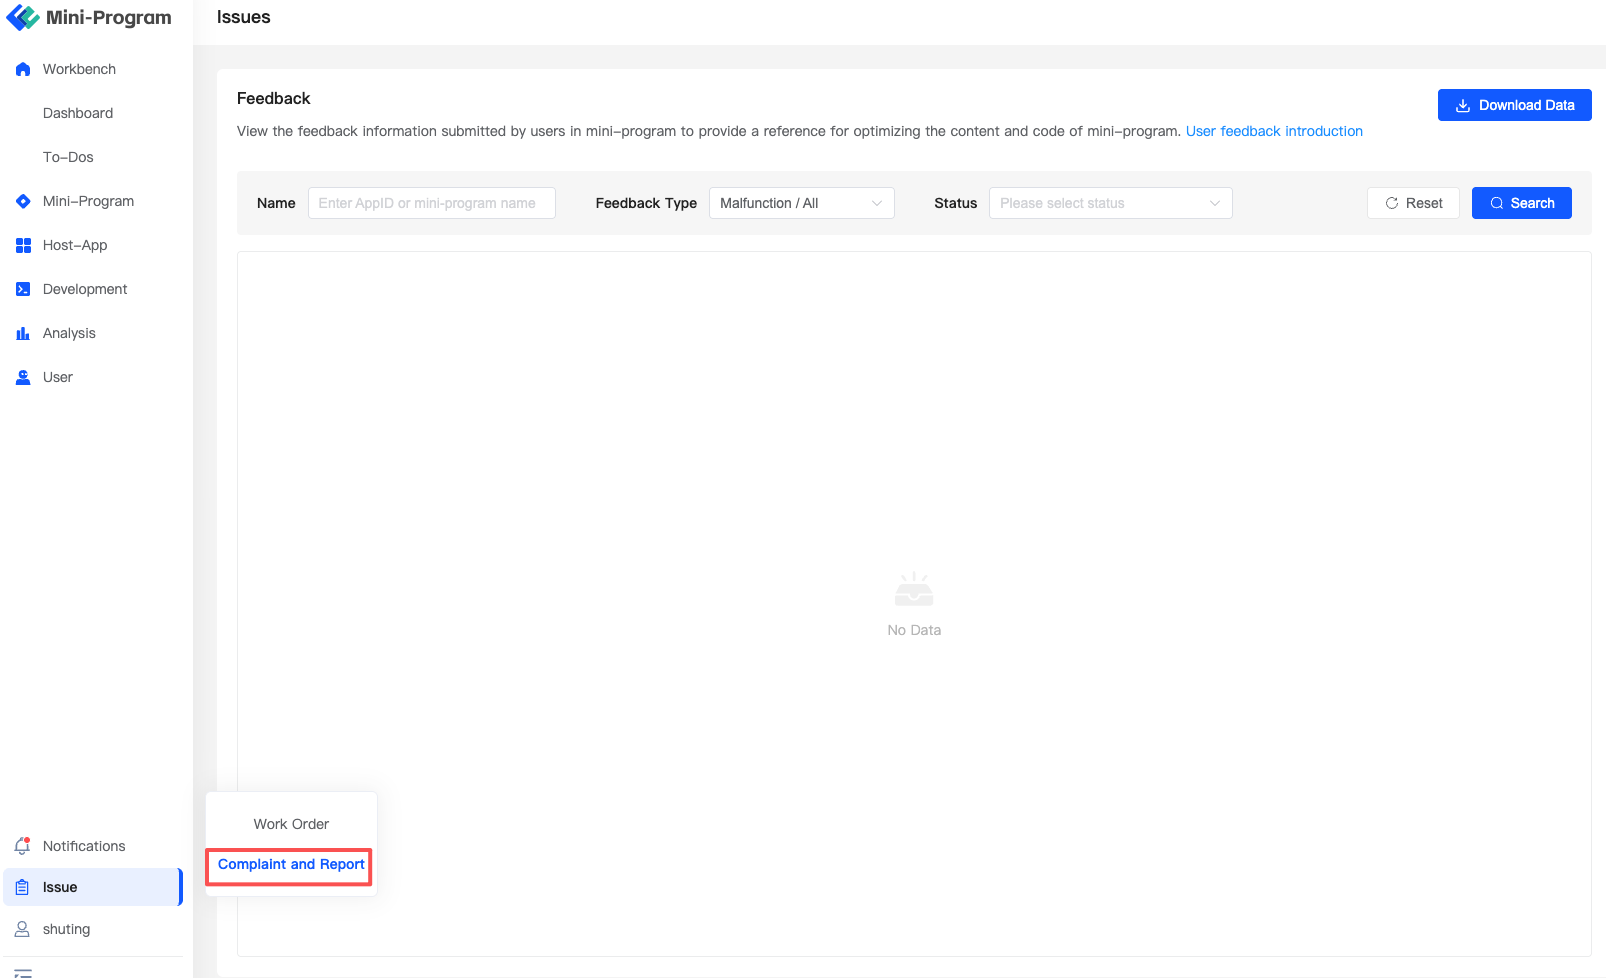
Of course, the above complaint information can also be viewed and processed in the work order management in the lower left corner of the screen.
# 9. To-Do Center
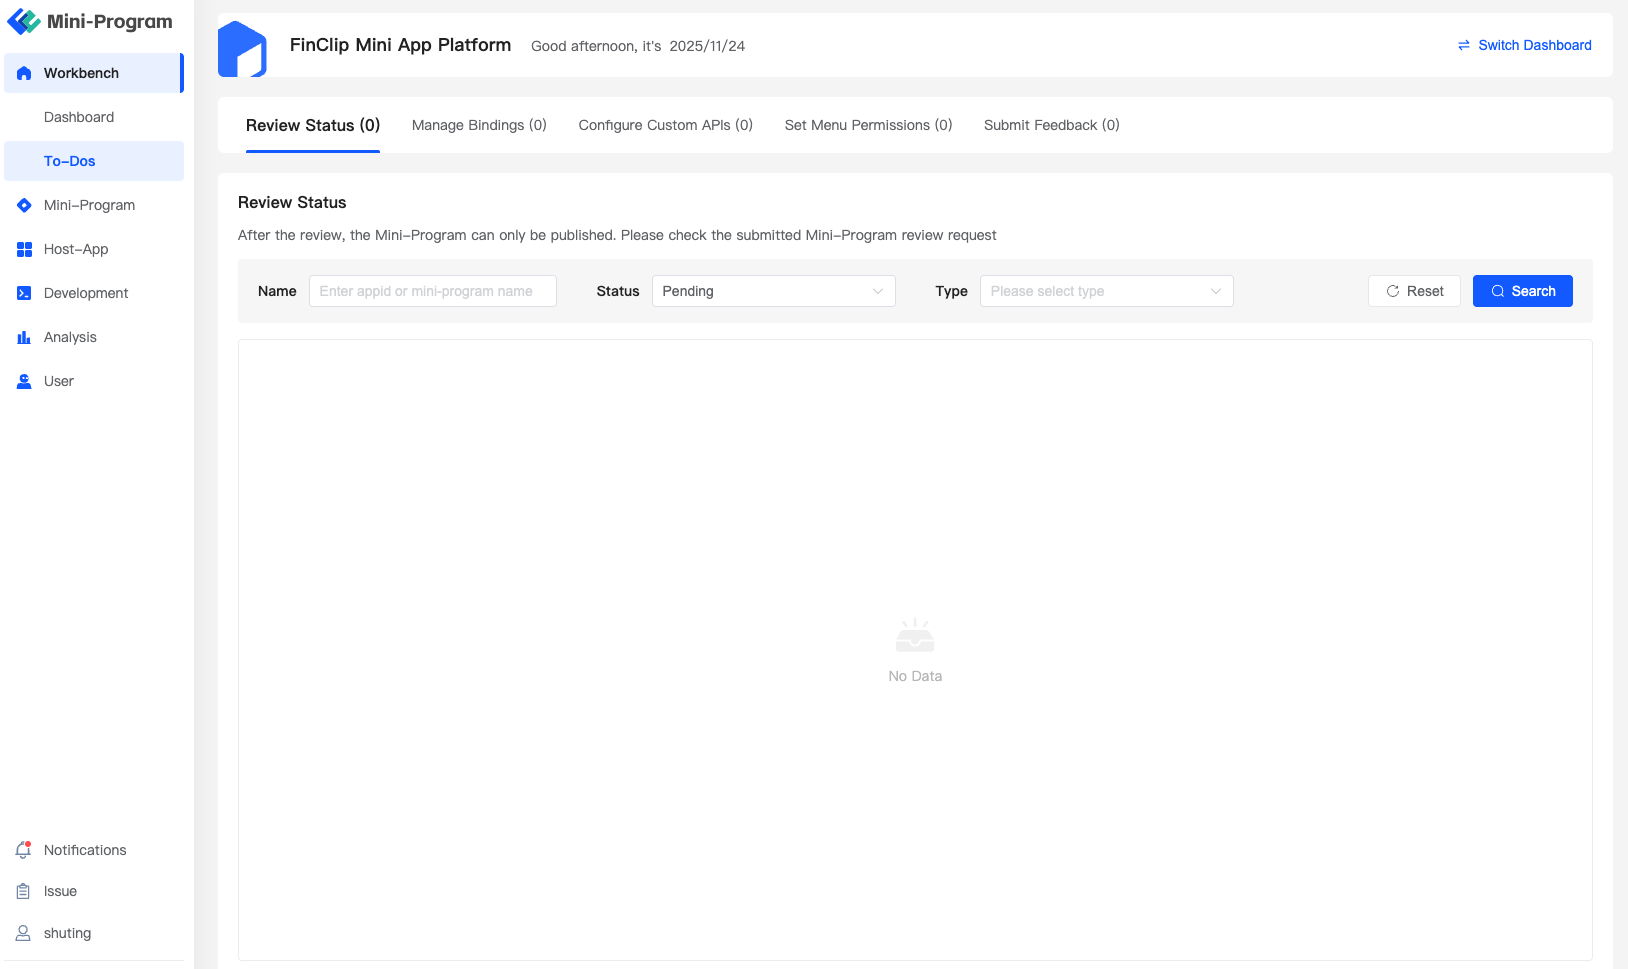
For other pending operations, you can enter through the "To-Do Center" entry on the homepage, which includes related business processes that you need to handle (such as Mini-Program review, Mini-Program binding, custom API calls, etc.). Through the To-Do Center, you can quickly enter the business processes that need to be handled, helping you carry out related business.
# 10. Other Usage FAQs
The above document outlines the main usage process of the FinClip Cloud product. If you need more detailed introductions to product-related functions when using the product, you can view the detailed introductions of different functions. If you encounter other issues, you can contact your dedicated after-sales consultant for assistance.