
# FinClip Studio Operation Guide
Please Note
You can obtain relevant Mini-Program code samples by creating a new Mini-Program in FinClip Studio, or get the Mini-Program demo from our Github (opens new window).
For basic introduction of FinClip Studio, please check here
# 1. Basic Usage of FinClip Studio
# 1.1 Create and Open a Mini-Program
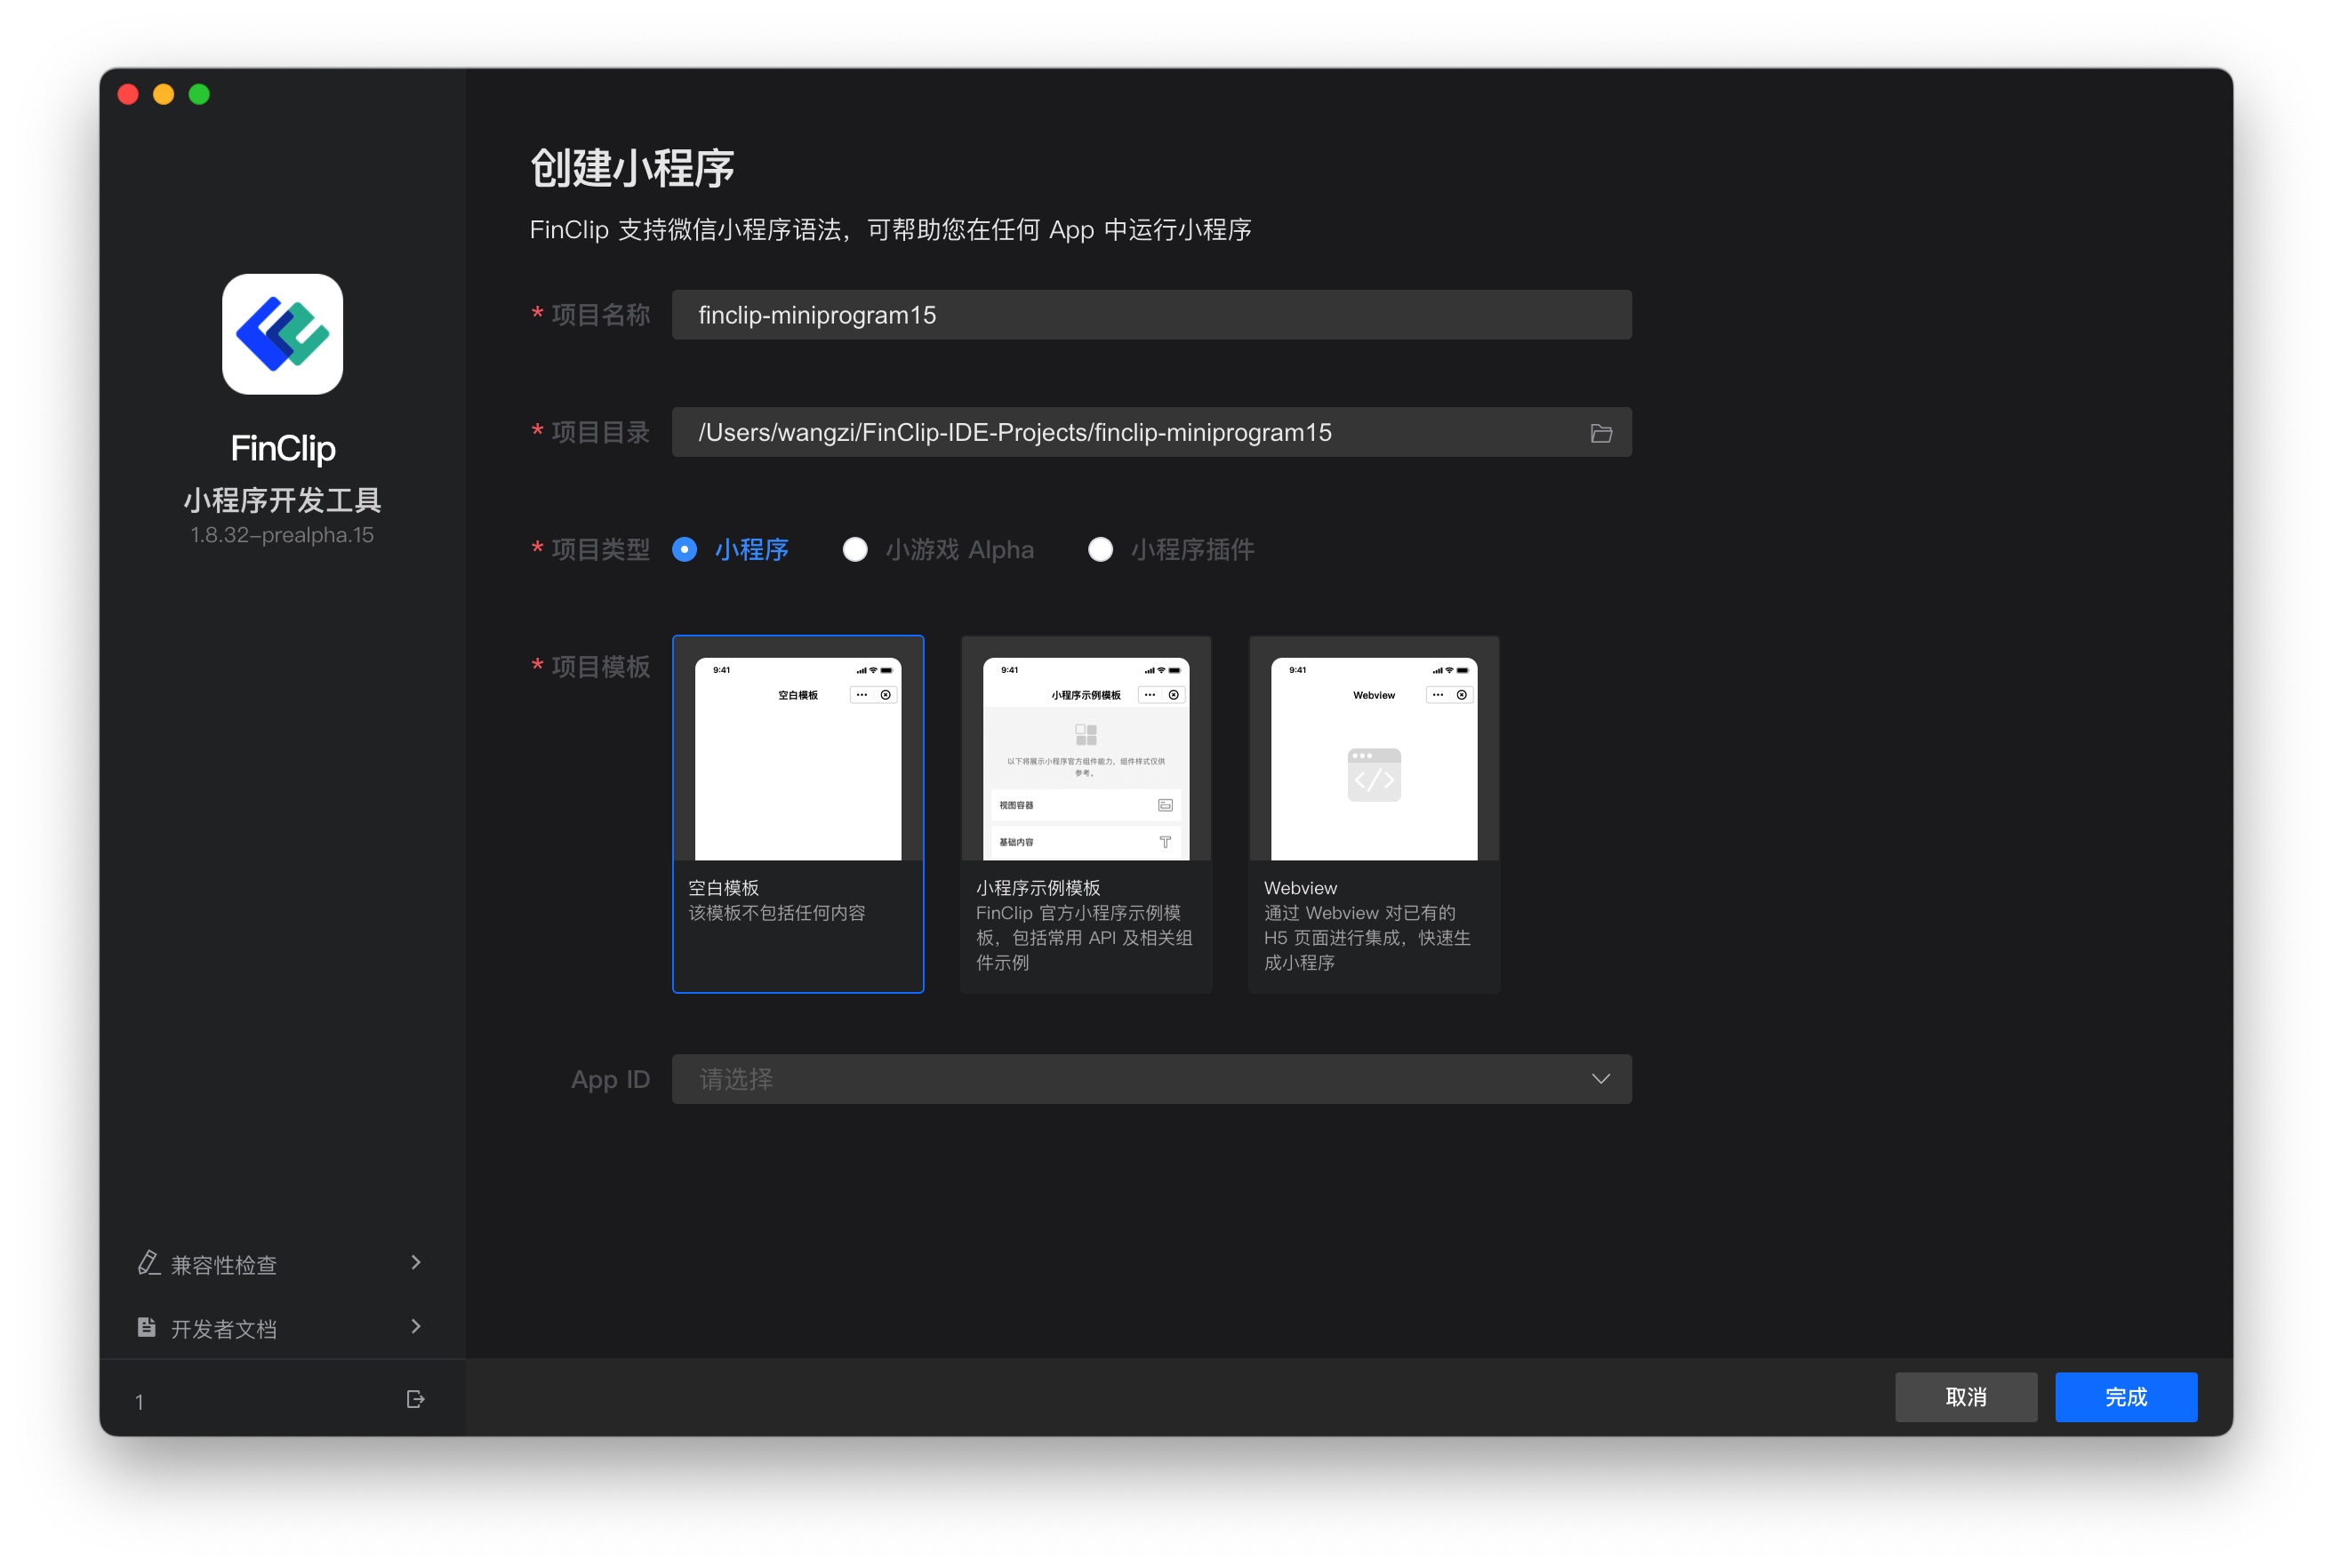
First, click the plus sign in FinClip to enter the page for creating a Mini-Program. On the newly opened page, you need to enter the project name, project directory, project type, and select a project template to create a new Mini-Program.

If the directory you selected is not empty, FinClip Studio will prompt you to skip the Mini-Program creation process and open the Mini-Program directly.
# 1.2 FinClip Studio Overview
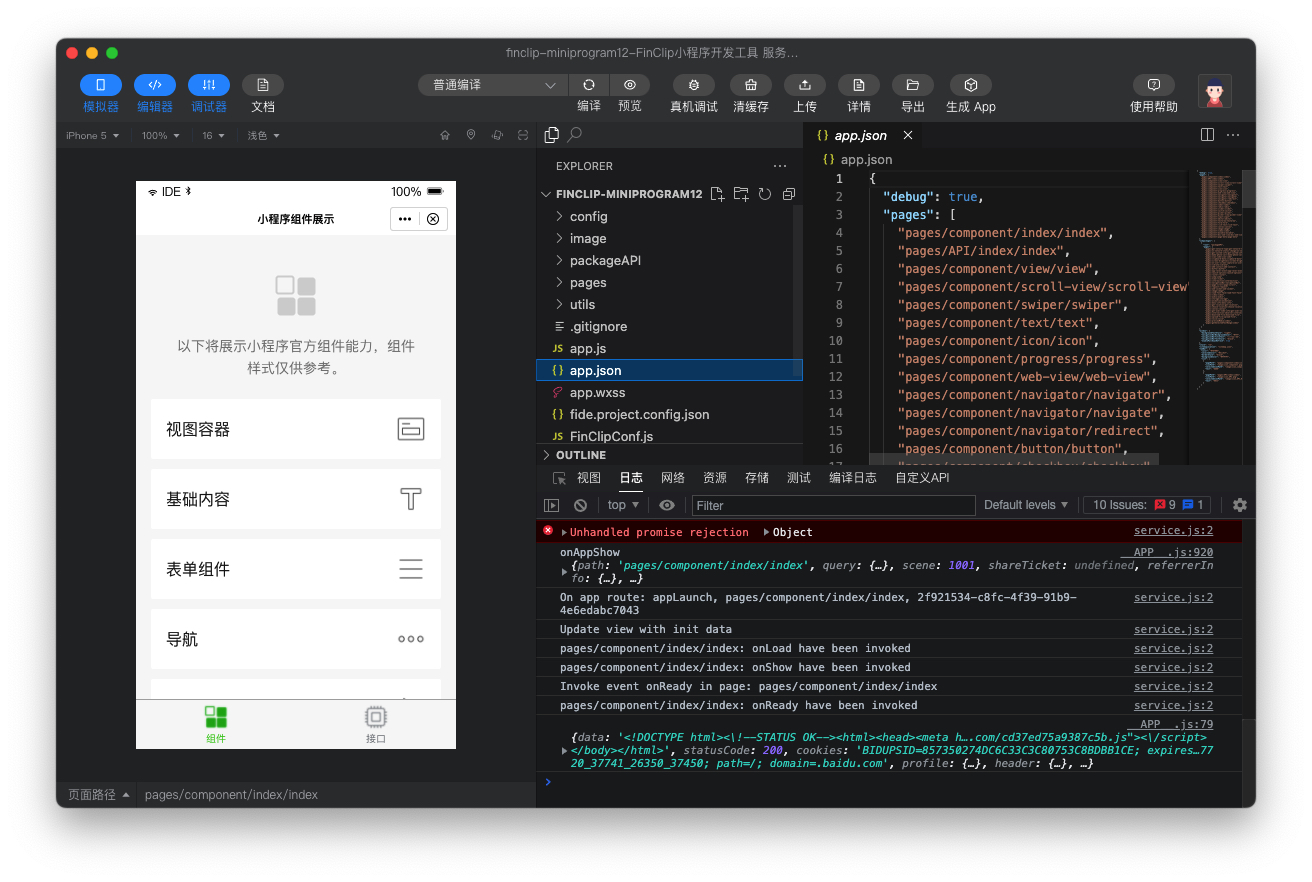
After completing the Mini-Program creation (or opening a Mini-Program), you will enter the Mini-Program overview page. The current page consists of a toolbar, simulator, file manager, content editor, and debugger. You can click the left directory or here to view relevant introductions.
# 1.3 Mini-Program Simulation and Debugging
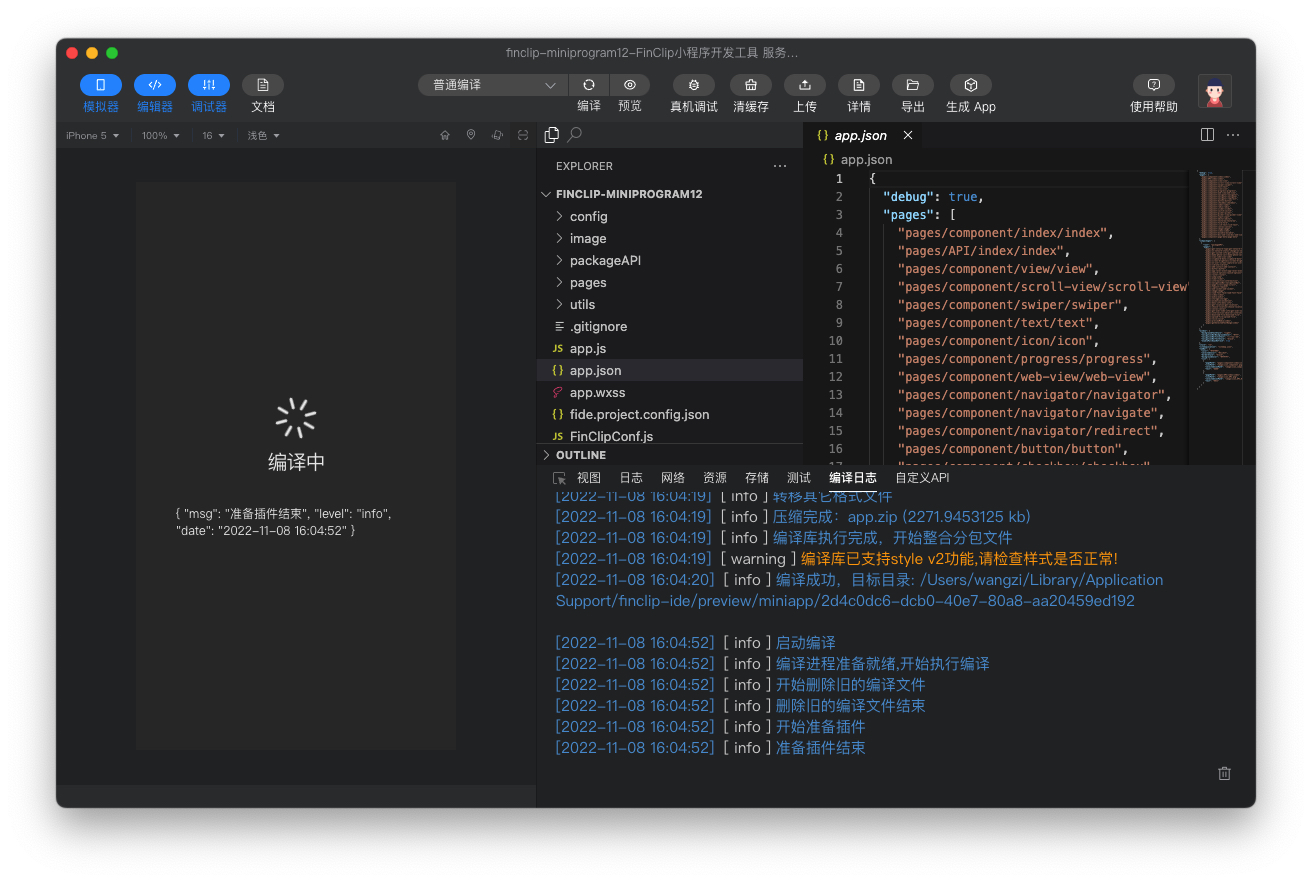
After modifying the Mini-Program code in the editor, you can click "Compile" in the top toolbar (or trigger automatic compilation on save via the shortcut Command (Ctrl) + S) to see the corresponding effect of the modified Mini-Program code in the simulator on the left.
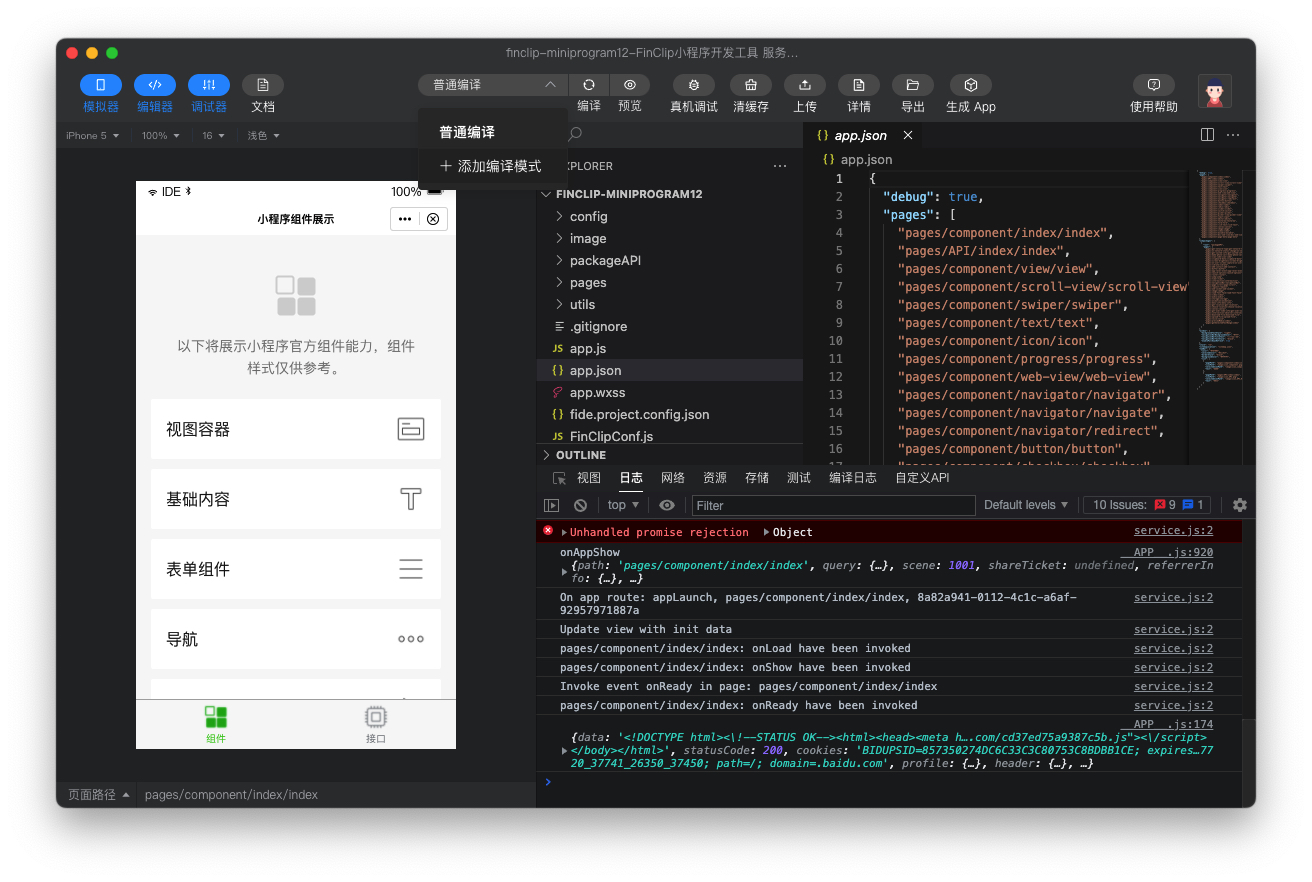
If you have special scenarios that require customization, you can also click "Add Compilation Mode" in the top toolbar. In the pop-up window, add fields such as mode name, startup page, and startup parameters, then click confirm to generate new compilation conditions.
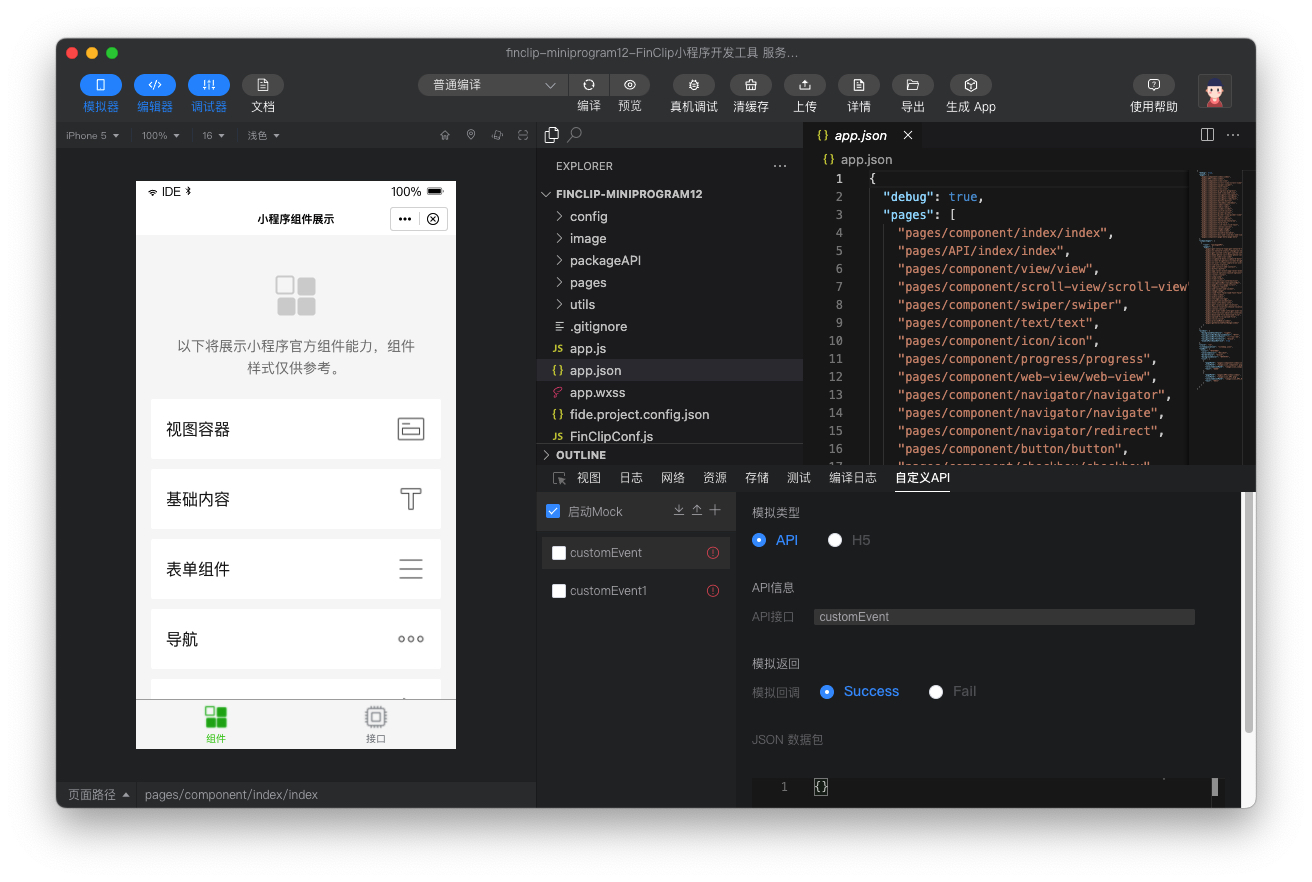
You can also directly run Mini-Program APIs in the "Log" panel at the bottom for quick debugging.
Please Note
If you encounter issues during Mini-Program debugging that might be caused by cache, you can click "Clear Cache" at the top and choose to clear file cache or compilation cache as needed.

Clicking "Preview" in the top toolbar will display a QR code that can open the Mini-Program. You can open the Mini-Program by scanning the QR code in the FinClip App or your own App for preview operations during development.
# 1.4 Mini-Program Details
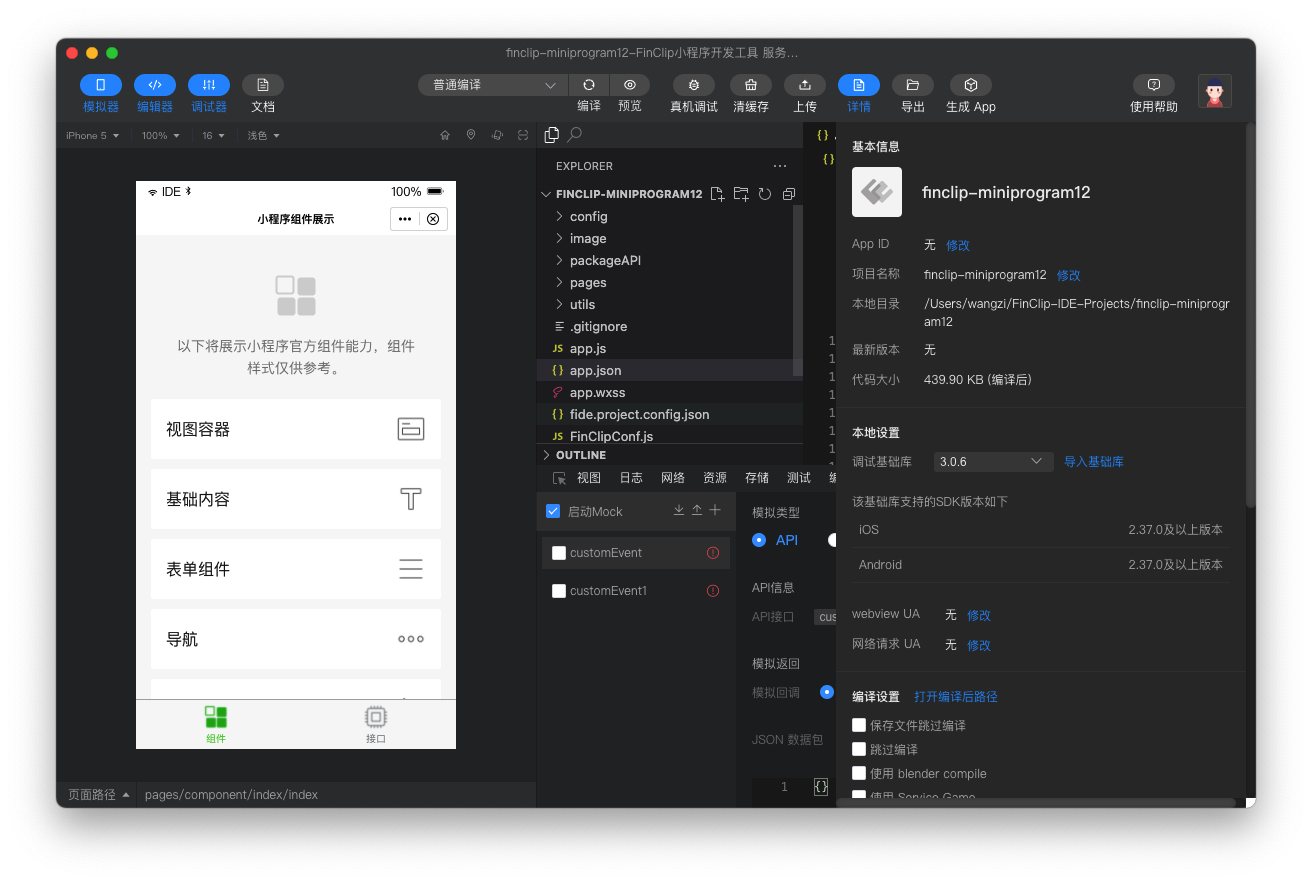 You can click the "Details" button at the top to view detailed information about the currently compiling Mini-Program, which includes basic information, local settings, compilation settings, and ICP filing domain information (only displayed after login):
- Basic Information: Basic information of the Mini-Program, such as App ID, project name, local directory, latest online version, and compiled code size;
- Local Settings: Local Mini-Program Base Library version, UA information;
- Compilation Settings: Configure whether compilation is required when saving files;
- ICP Filed Domain List: When you are logged in, the domain information you set in FinClip will be loaded. If resource loading fails during local preview or after upload, please check here.
# 1.5 Mini-Program Upload
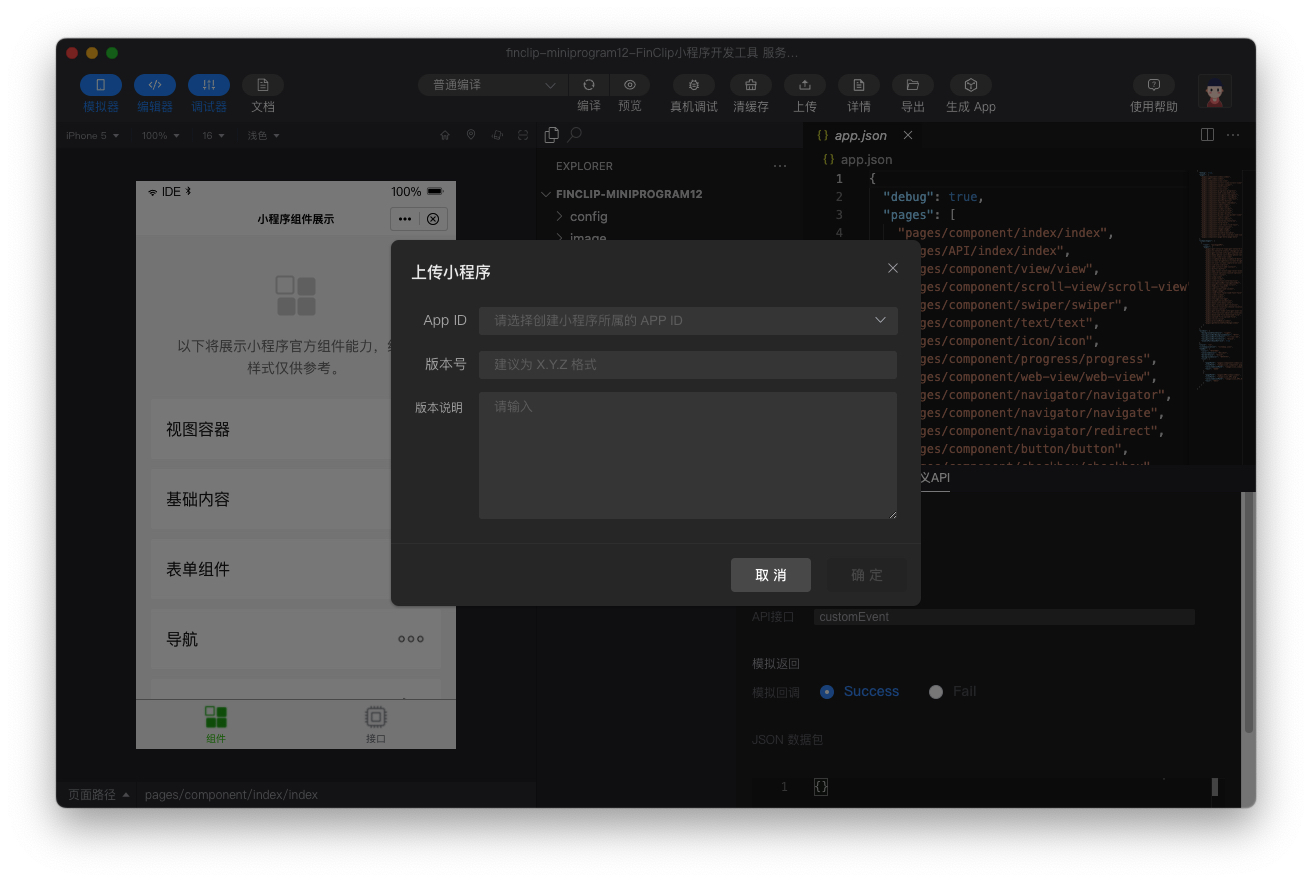
After logging into your FinClip account, click the "Upload" button in the top toolbar, select the corresponding Mini-Program App ID, enter the Mini-Program version number and version description information, and you can directly upload the compiled Mini-Program to the backend.
# 2. Advanced Usage of FinClip Studio
# 2.1 FinClip Studio Simulator Settings
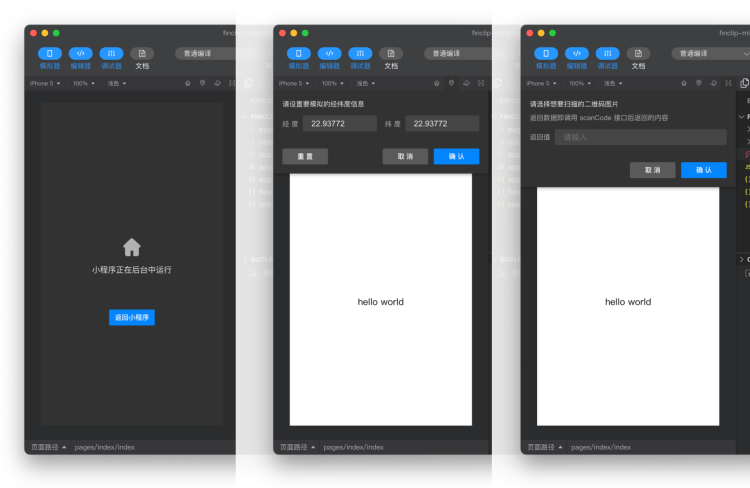
In the FinClip Studio simulator, you can also click the operation buttons above to perform simulation operations such as "Switch to Background / Simulate Location / Shake / Scan Code" to simulate and test relevant business logic in the Mini-Program.
# 2.2 API Mock
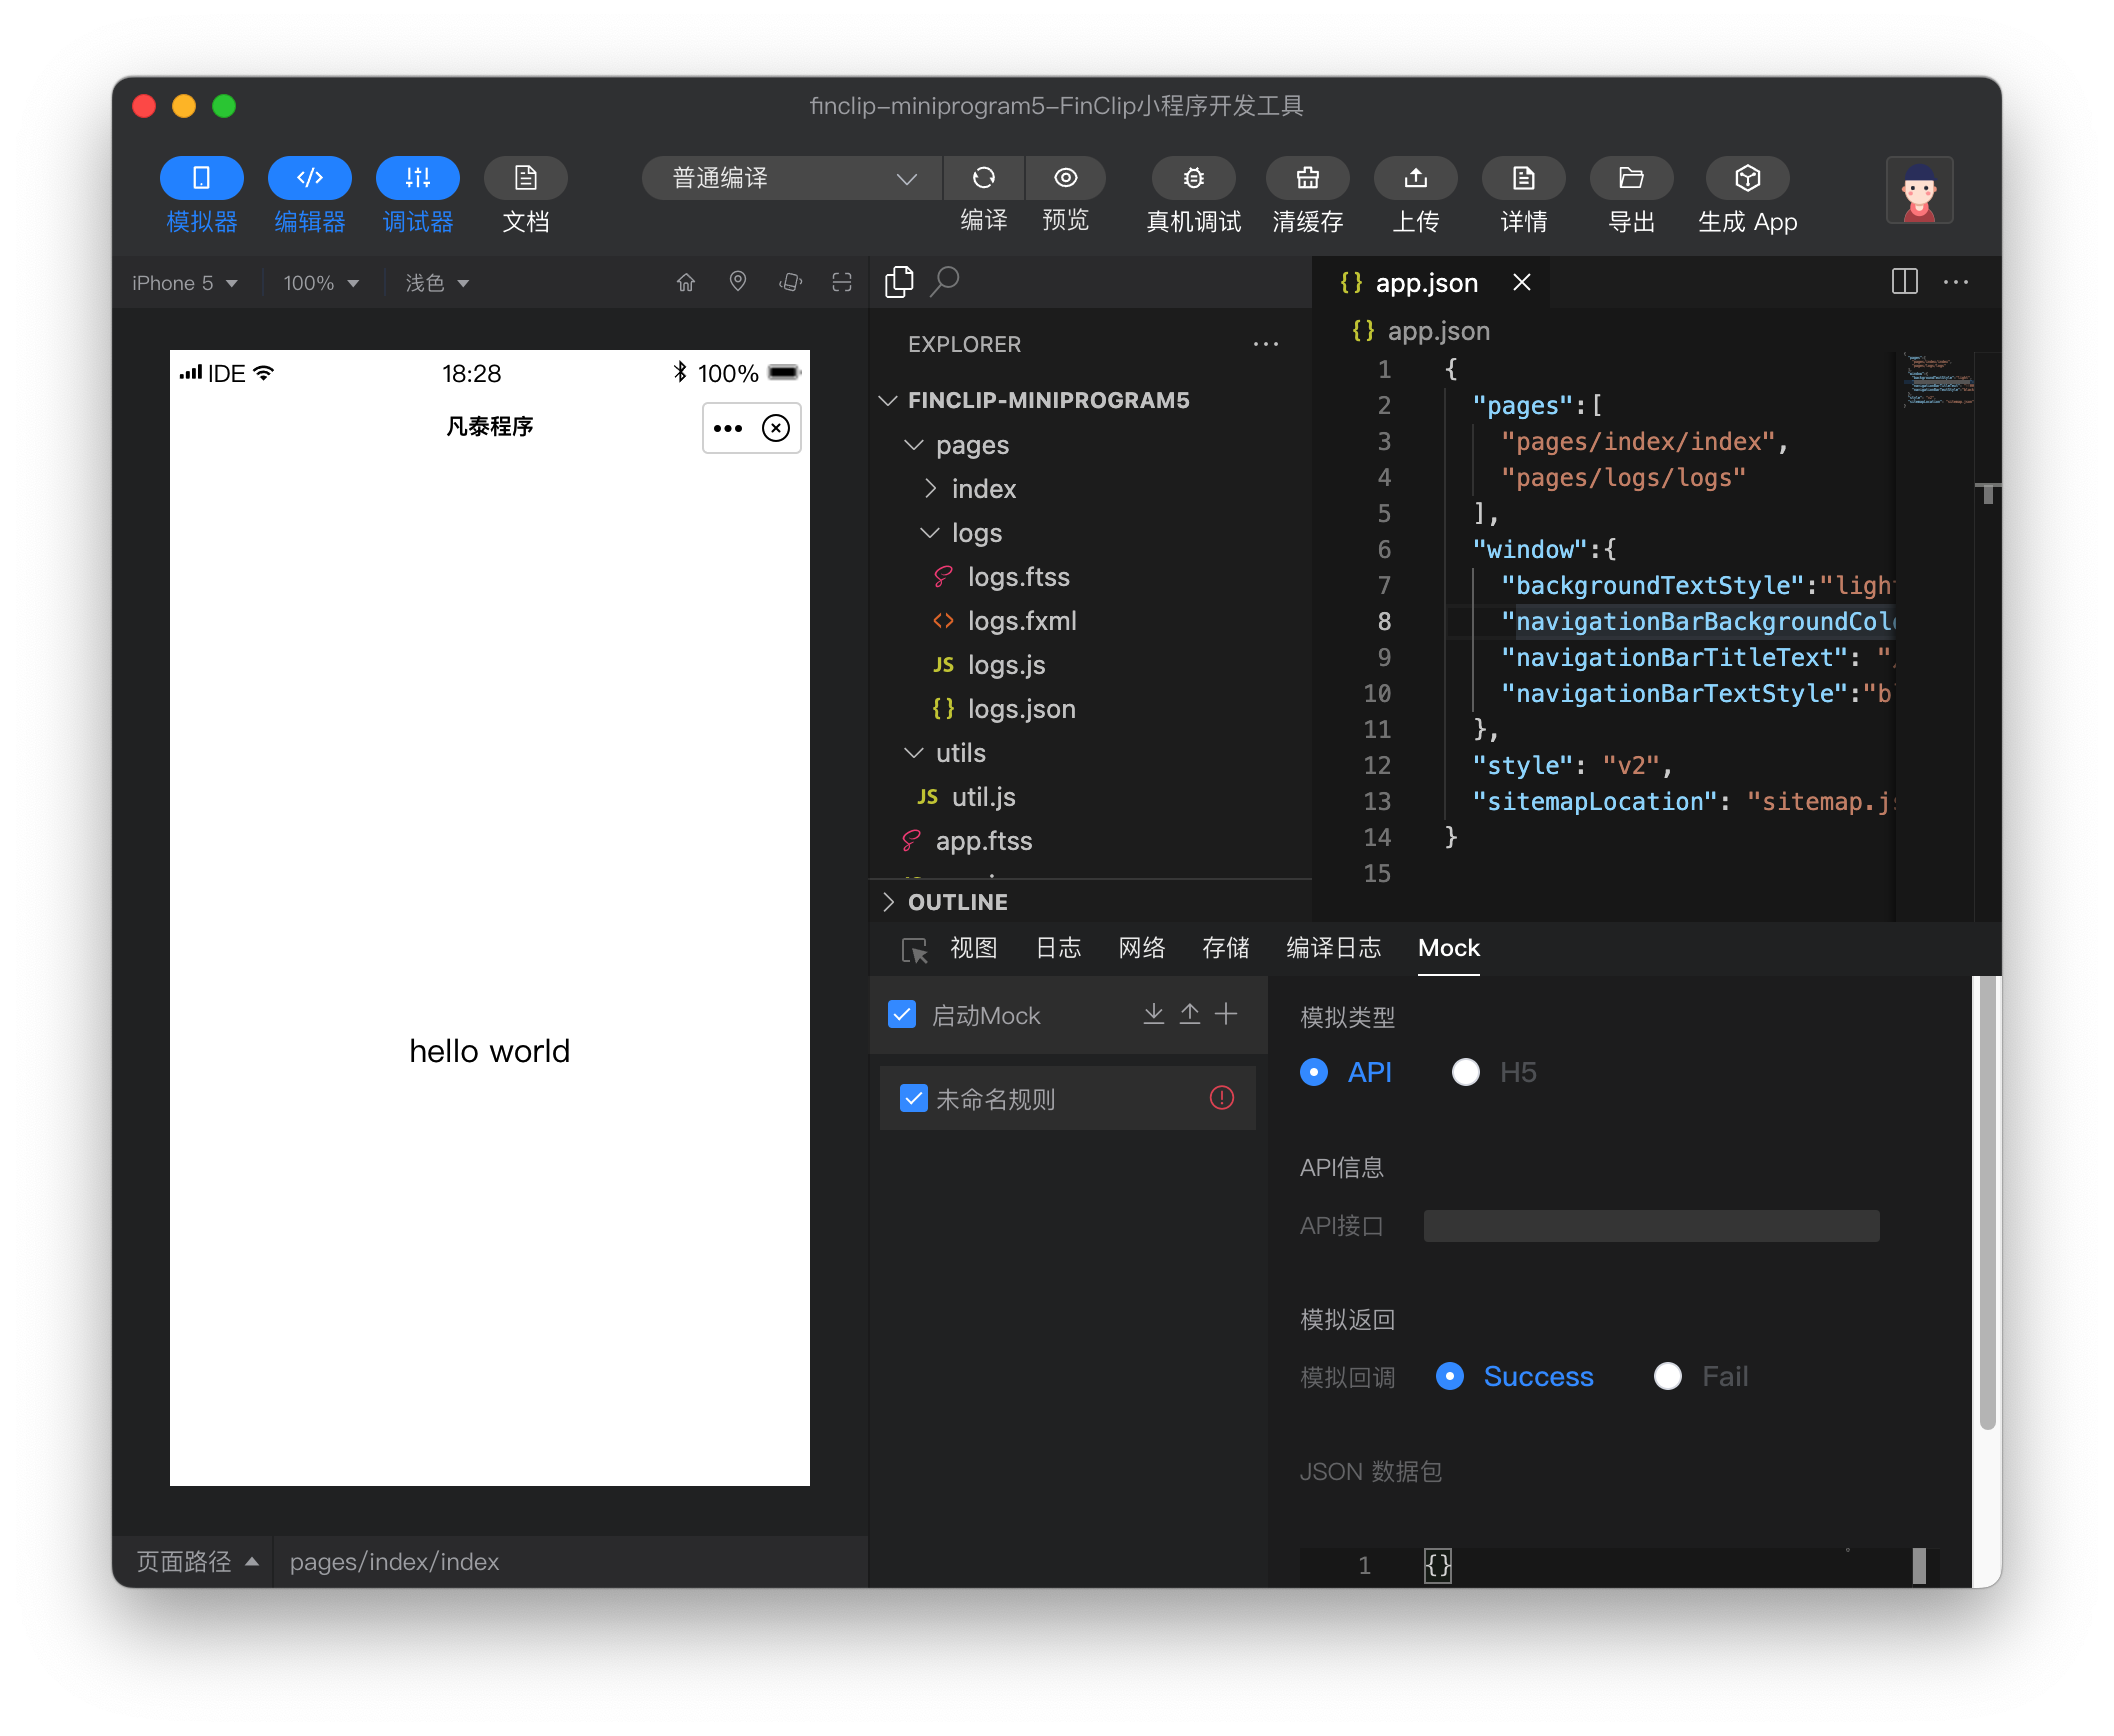
Unlike common Mini-Program FinClip Studios, since FinClip Mini-Programs can be used in developers' own Apps, FinClip Studio also provides API Mock capability. Developers can use this function to modify all native interfaces that communicate with the SDK.
For example, you can modify the native callback content of
ft.getAppConfigviaMock getAppConfig. However, since the field names of native interfaces are not necessarily the names of API interfaces (this part does not belong to the standard Mini-Program SDK interface, but belongs to the underlying implementation of the SDK Base Library), if core basic native events are Mocked, it may also lead to unpredictable errors. In this case, simply disable the relevant Mock.
# 2.3 npm Support
Please Note
This feature requires developers to have some understanding of npm. If you haven't used npm before, please refer to the official documentation (opens new window) to learn.
# 2.3.1 Install npm Package
Execute the command to install the npm package in the directory where the Mini-Program's package.json is located:
npm install
This requires that the package.json participating in the npm build must be within the miniprogramRoot defined in project.config.js.
# 2.3.2 Build npm
Before using npm packages in a Mini-Program, you need to build npm first. After completing the npm build, a miniprogram_npm directory will be generated in the corresponding directory.
Click the menu bar in FinClip Studio: Tools -> Build npm.
# 2.3.3 Using npm Packages After Build
Import npm packages in js:
const myPackage = require('packageName')
const packageOther = require('packageName/other')
Using custom components from npm packages (when using npm packages here, if only the package name is introduced, it will default to looking for the index.js file or index component under the package name):
{
  "usingComponents": {
    "myPackage": "packageName",
    "package-other": "packageName/other"
  }
}
# 2.4 Code Compatibility Check
The compatibility check tool can help you quickly identify the differences in component and interface support between WeChat Mini-Programs and FinClip Mini-Programs.
If you want to migrate an existing WeChat Mini-Program to an application integrated with the FinClip Mini-Program SDK, you can use the compatibility check to locate specific items that need modification.
# 2.4.1 Usage Instructions
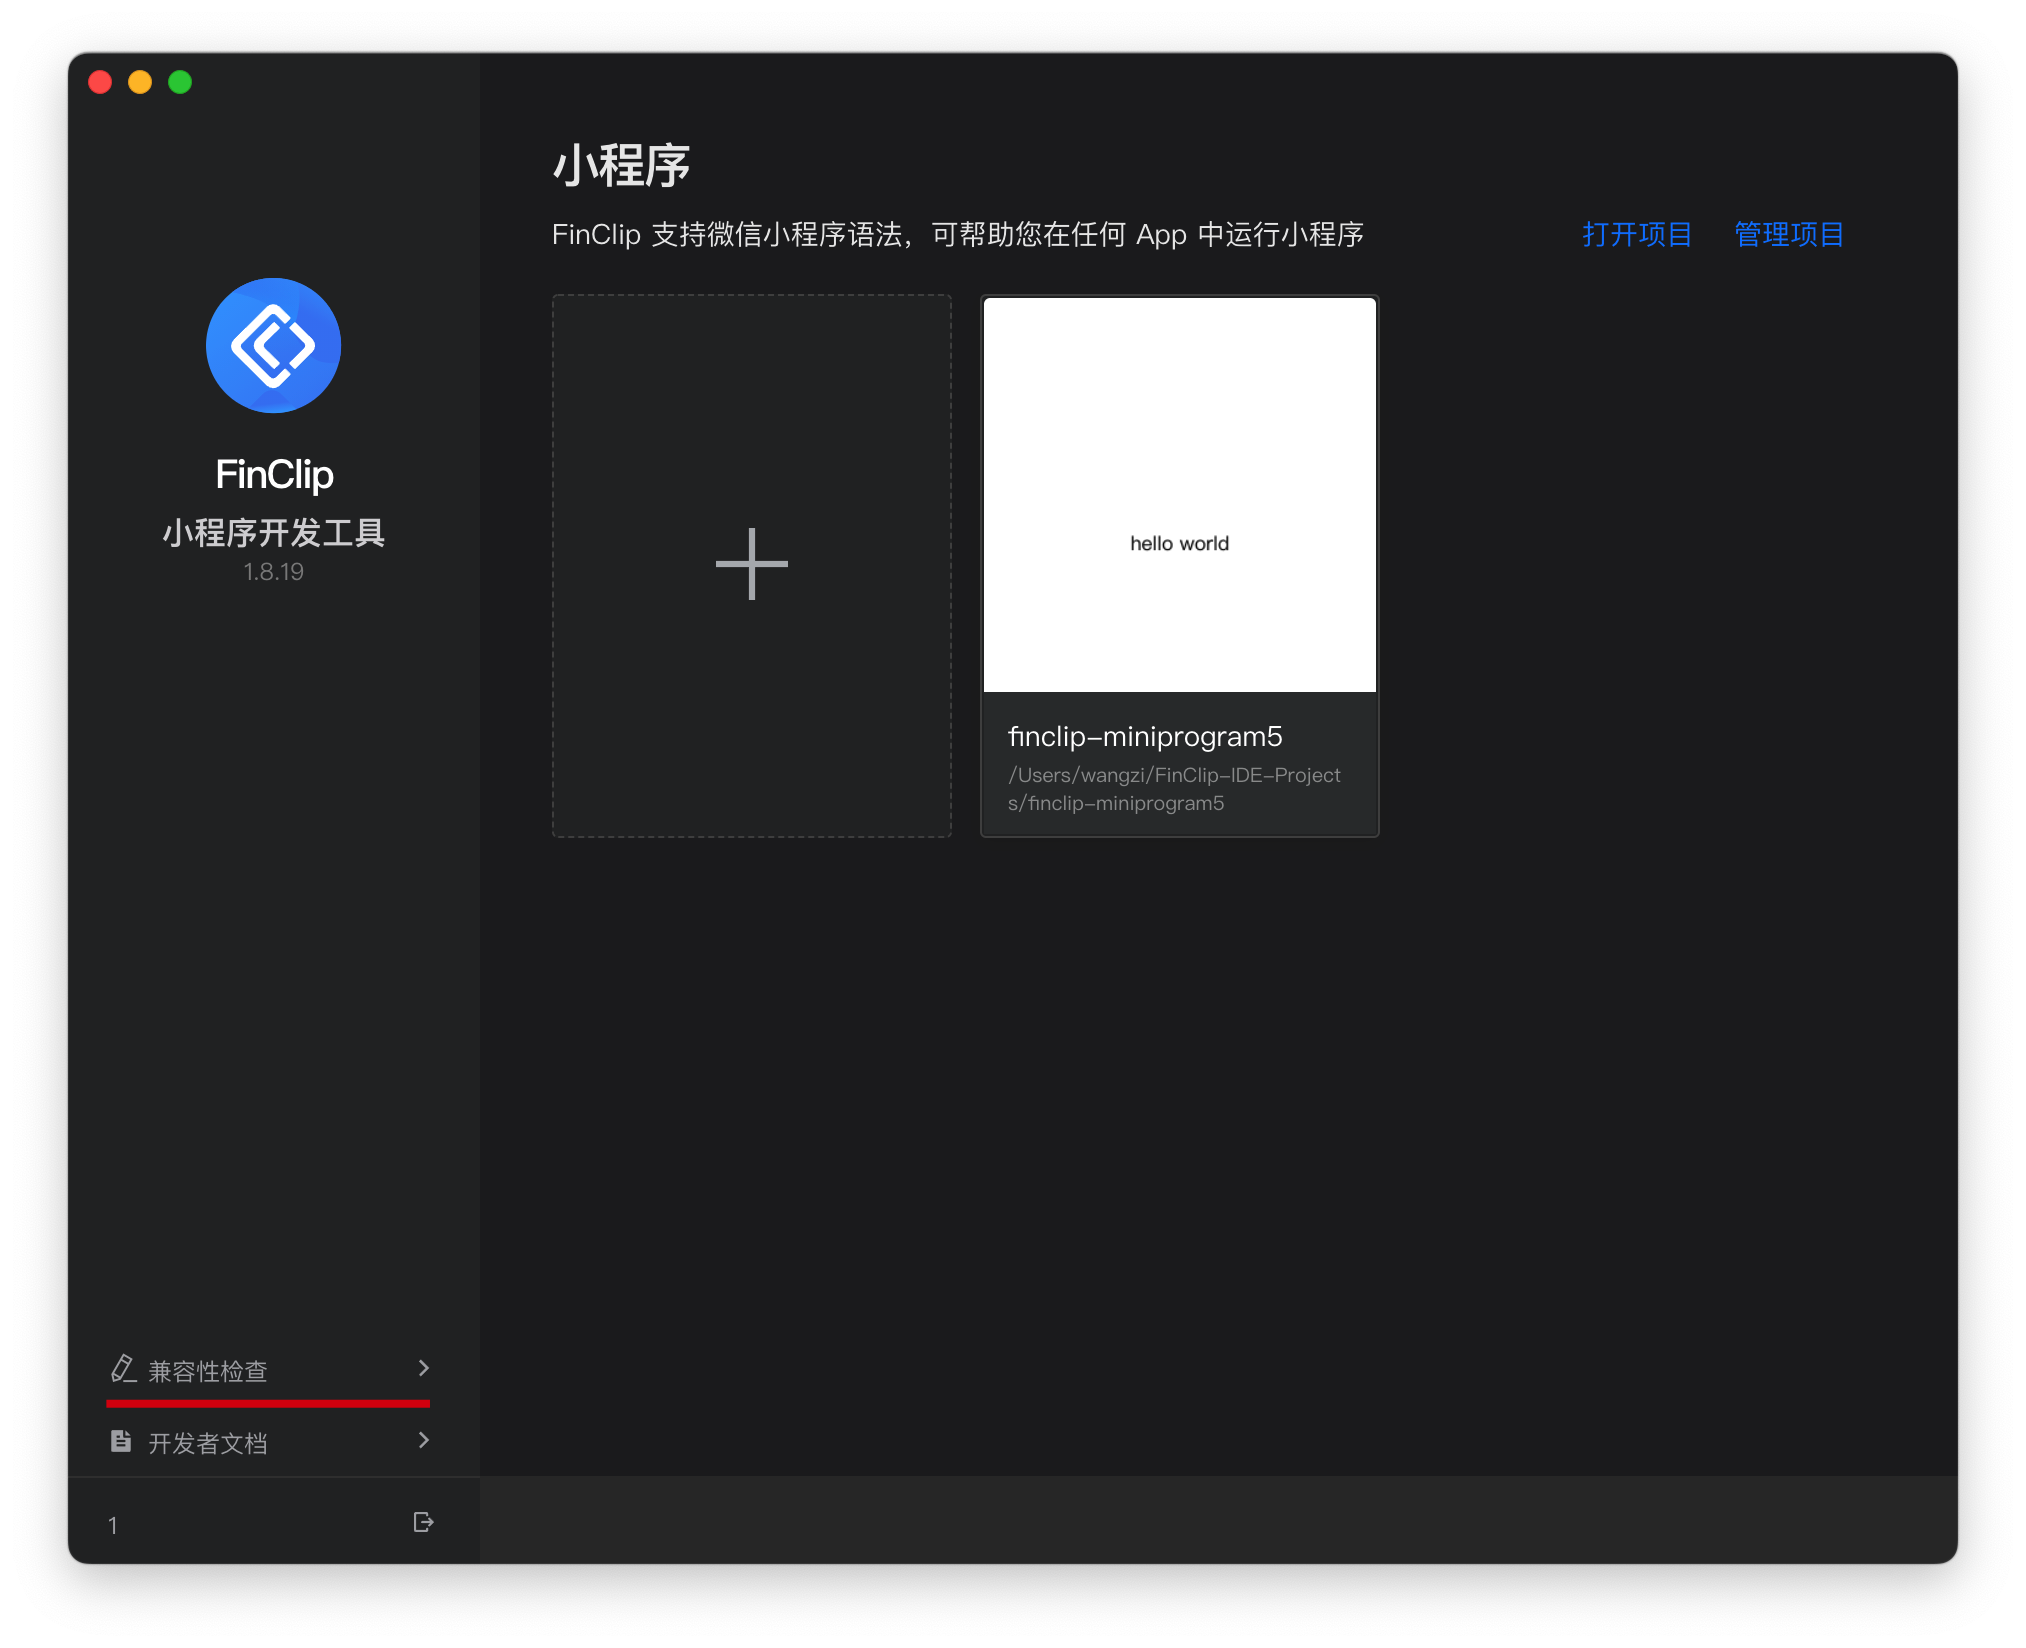
First, open FinClip Studio and click the bottom left to enter the "Compatibility Check Tool";
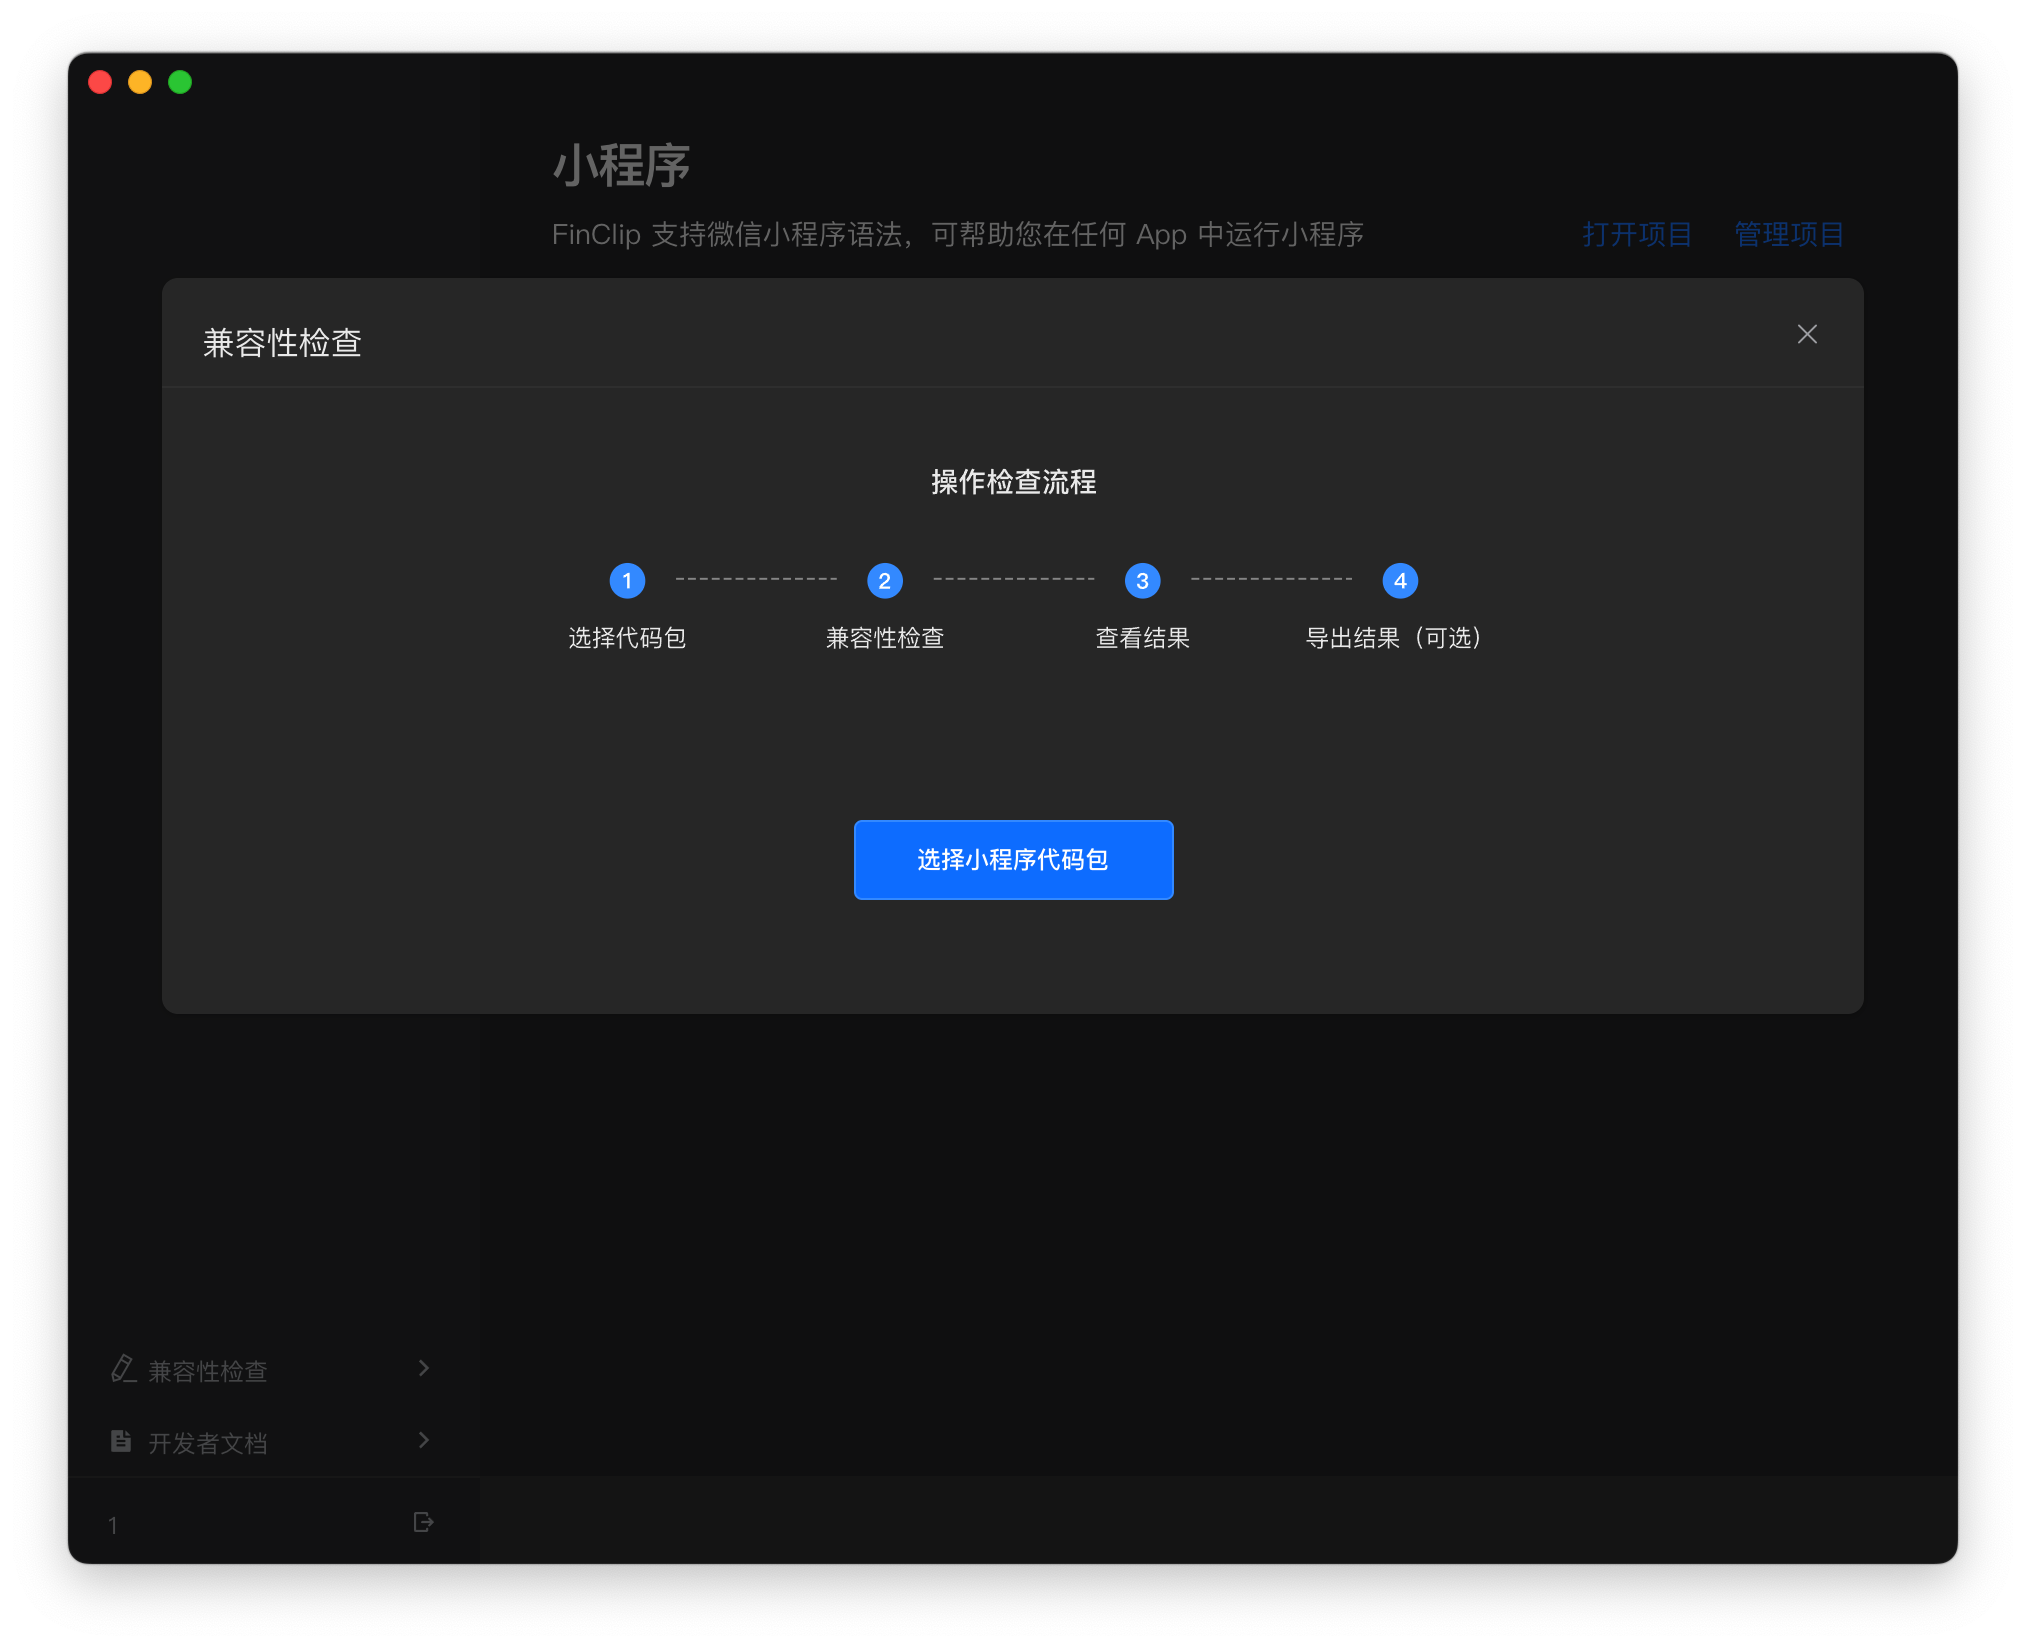
Select the Mini-Program code package that has not been compiled and start the compatibility scan.
# 2.4.2 Scan Result Explanation
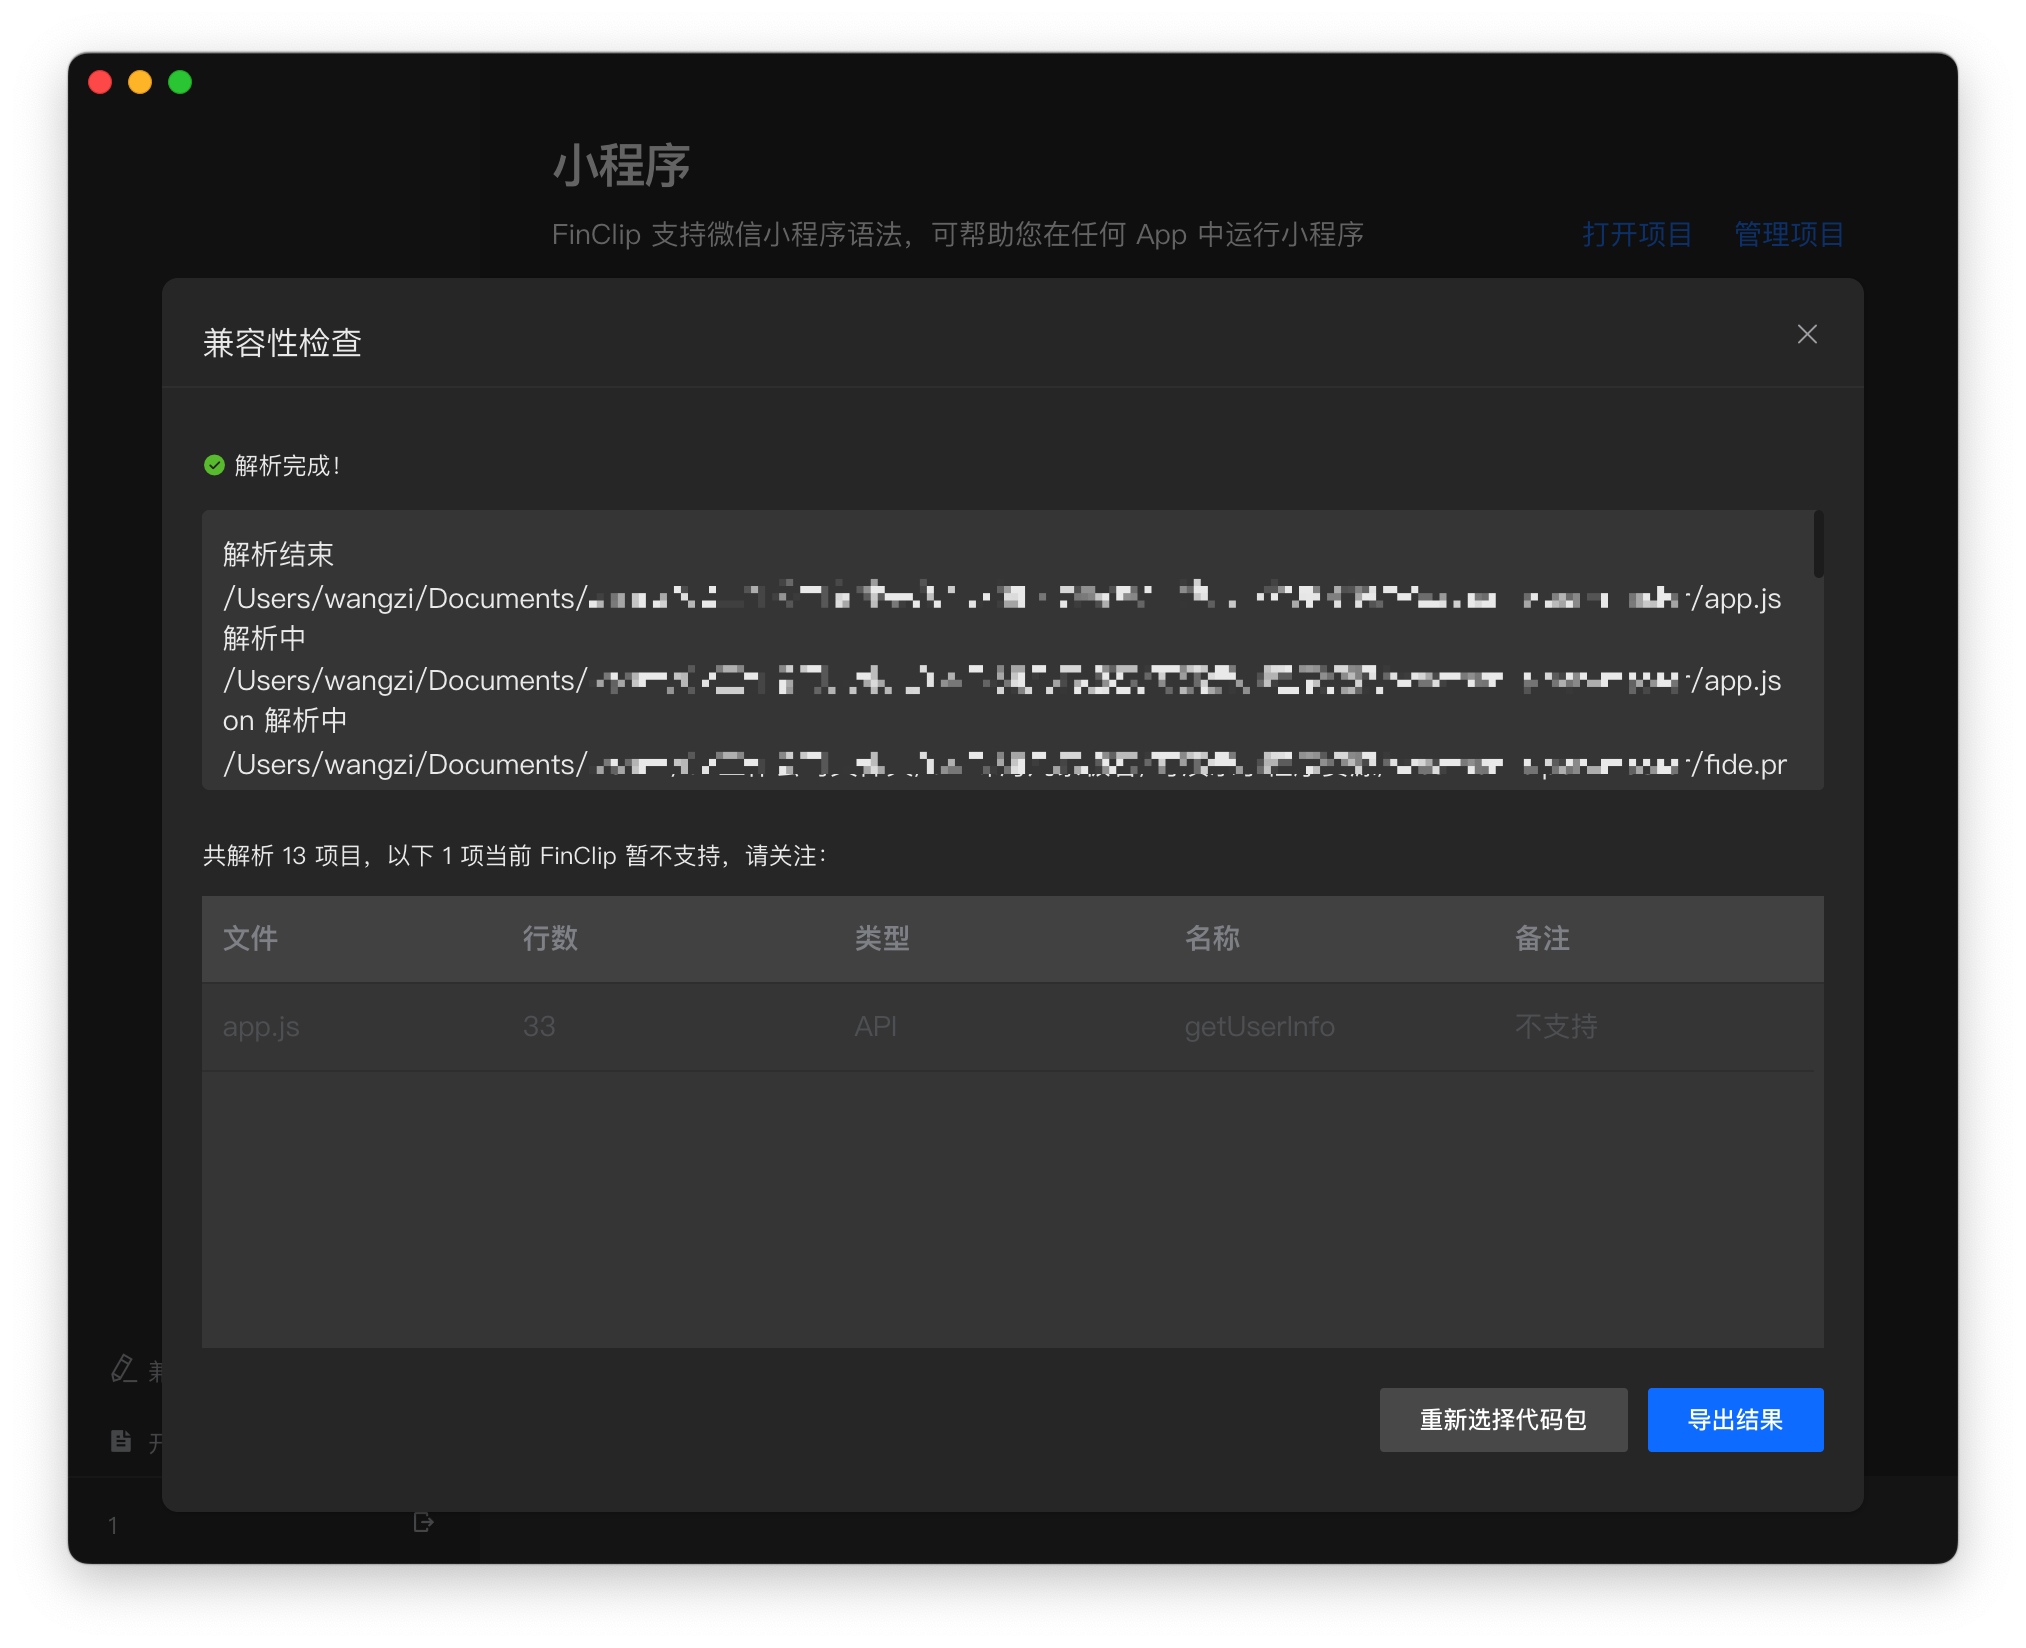
The exported check result is shown in the figure above. Developers can locate the specific position of the current code using the "File" and "Line Number" below.
"Type" is the type of problem identified by the scan. Currently supported monitoring types are Component, API, and Configuration Item (json). You can also perform compatibility optimization of the Mini-Program code based on the information noted in the "Remarks".
# 2.5 Real Device Debugging
The Real Device Debugging function connects via network, opens the Mini-Program by scanning a QR code on a real mobile device, and simultaneously implements Mini-Program development and debugging in FinClip Studio, helping developers quickly locate issues in an environment close to a real device.
# 2.5.1 Requirements
Version Requirements:
- FinClip Studio: Version 1.8.23 and above
- FinClip App: Version 2.37.1 and above
- FinClip Mini-Program SDK: Version 2.37.3 and above
# 2.5.2 Usage Instructions
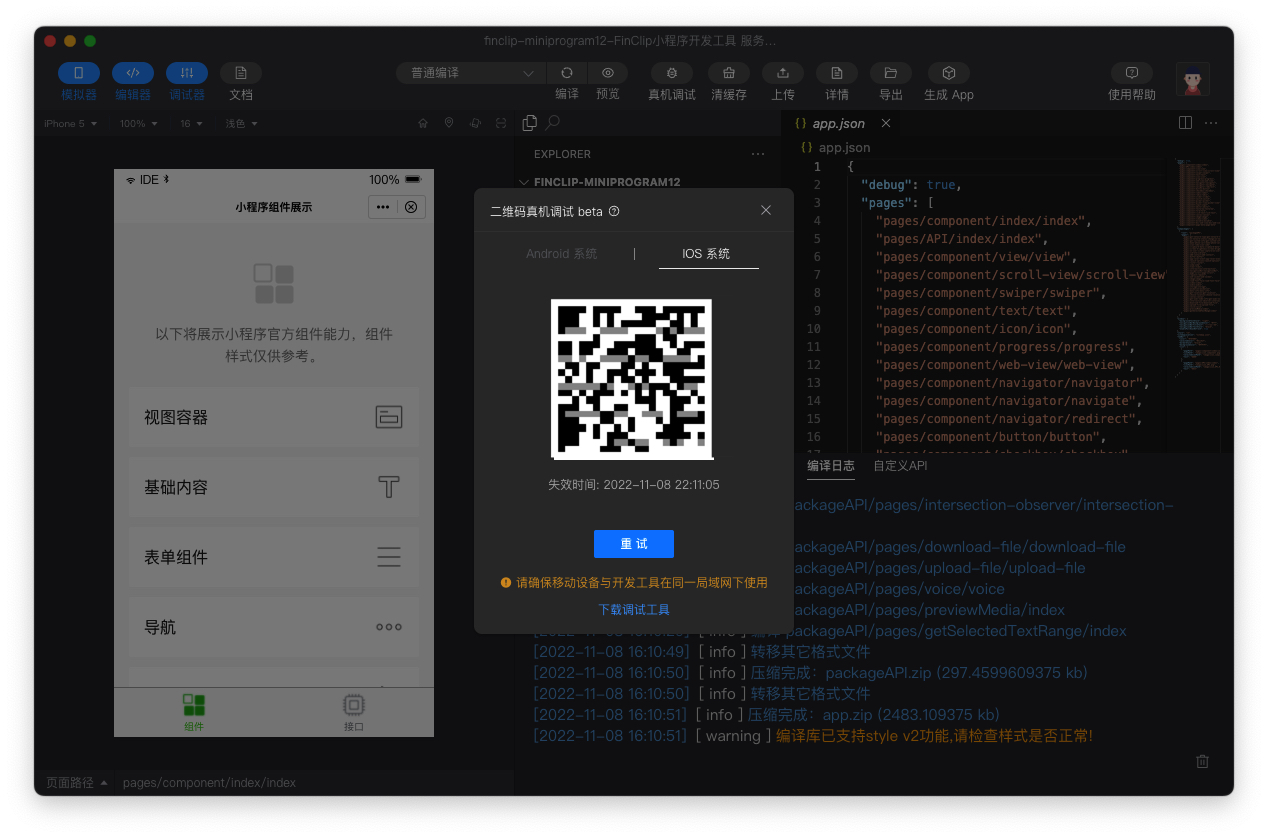
Edit the Mini-Program project in FinClip Studio, click "Real Device Preview", select the operating system of the debugging device, wait for the compilation to complete, and a corresponding QR code will be generated. Open the Mini-Program by scanning the QR code to enter the Real Device Debugging mode. Your parameter adjustments and actions on the Mini-Program will be displayed in real-time on the FinClip Studio Real Device Debugging interface.

# 2.5.3 Precautions
- The mobile device and FinClip Studio need to be kept on the same local area network.
- Remote connections may be affected by VPN / network proxies. If the remote debugging panel does not appear after scanning the code, try closing the VPN or network proxy and try again. Proxies on the mobile device and the local computer may both affect the remote debugging connection.
- The implementation mechanisms for iOS and Android Real Device Debugging are different. Pay attention to selecting the correct debugging mode.
- Real Device Debugging can be used independently of the FinClip App, as long as the mobile App application has integrated the FinClip Mini-Program SDK. For details, refer to the iOS Reference Documentation and Android Reference Documentation
# 2.6 TypeScript Support
# 2.6.1 Getting Started
In the project.config.json file, modify the useCompilerPlugins field under setting to ["typescript"] to enable the built-in TypeScript compilation plugin of the tool. If you need to enable the less compilation plugin at the same time, you can change this field to ["typescript", "less"]. Currently, three compilation plugins are supported: typescript, less, sass.
# 2.6.2 Function Description
- The current logic for converting TypeScript code to JavaScript code is handled by the
@babel/plugin-transform-typescriptplugin. Therefore, during the compilation process, only type declarations and other information in the TypeScript code are removed. Type errors and similar information are not prompted during compilation; they are only prompted in the editor. - After enabling the TypeScript compilation plugin, .js files are also supported. If there are .ts and .js files with the same name, the .ts file takes precedence.
- In addition to ordinary Mini-Programs, Mini-Program plugin development is also supported.
Please Note
If the Base Library you specified is disabled, the user will receive the latest available Base Library version when opening the Mini-Program, and you will be reminded that the selected Base Library is temporarily unavailable.
# 3. Generate App from Mini-Program
FinClip Studio provides corresponding operations and templates, allowing users to ultimately generate App project files (users can perform secondary development and configuration based on the project files).
You can click here to view detailed information about generating an App from a Mini-Program.