
# SaaS Version Operation Guide
FinClip SaaS Version is our online offering for developer users. Any user can use the vast majority of FinClip SaaS Version's software features without paying any fees. In the SaaS Version, we provide essential capabilities for Mini-Programs, which can meet the daily usage needs of small teams, project groups, and small and micro-enterprises.
Please Note
We provide registered users on FinClip.com with 10,000 free API calls per month, 1GB of free code package download traffic, and 500MB of log upload traffic. You can click here (opens new window) to view usage details.
# 1. Usage Process
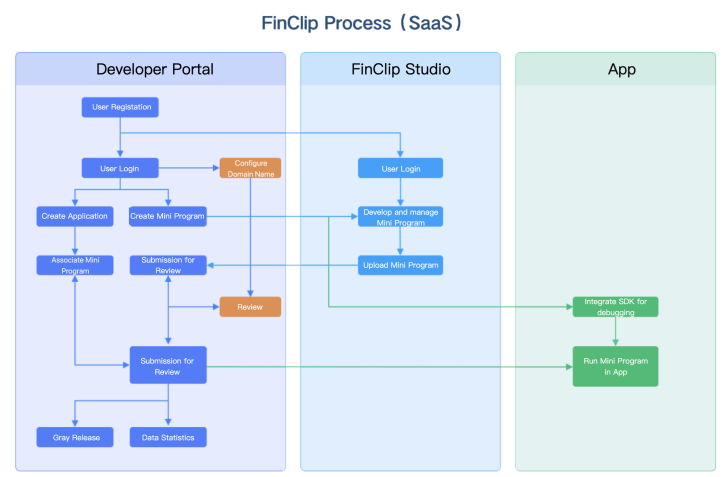
The usage process for FinClip SaaS Version is shown in the diagram below. You can refer to the following sections for detailed information.
# 1. Platform Registration and Enterprise Certification
Log in to FinClip.com and click "Free Registration" in the upper right corner to open the FinClip product registration page.


You need to complete the account registration process through the following steps:
Step 1: Fill in Mobile Number and Login Password Enter your mobile number and verification code, click "Get Verification Code", and proceed to the next step after entering the code.
Step 2: Supplement Relevant Information Enter your company or personal name and email, configure your login password, check the privacy policy and service agreement below, and click the "Complete Creation" button.
Please Note
Once you have completed registration and can log in to the FinClip Management Console normally, it means you have successfully finished the registration process. If you have multi-user management and usage requirements during use, you can upgrade the currently logged-in account to an enterprise account. Click "Change to Enterprise Account" in the upper right corner of the page to enter the upgrade process.
You need to enter "Enterprise Name", "Unified Social Credit Code", "Business License", "Authorization Letter", administrator's name, and ID number on the newly opened page.

After clicking the submit button at the bottom, you can successfully apply for enterprise certification. Generally, the enterprise certification process takes about 2 working days to complete. Please wait patiently. You can click "View Development Documentation" or "Go to Development Platform" below to perform more operations.

# 2. Role and Member Management
After completing enterprise-type account certification, you will have access to multi-member management and role management functions. You can flexibly customize permissions according to roles to manage member account permissions. The specific operation process is as follows:
Step 1: Add Role
Click the "Add Role" button on the "Basic Management - Roles" page.

Step 2: Assign Permissions to the New Role
Enter the role name in the pop-up window, configure the corresponding role permissions, and click Save.

Step 3: Assign Members to the New Role
Select "Add Member" under "Account - Collaborating Members". After entering the new member's information, you can check the box to assign them to this role:


When an account configured with the corresponding role logs into the platform, that account will have the functional permissions assigned to that role. Other unassigned functional permissions will be unavailable. When adding a member, you need to set the member's mobile number, username, password, and assign the relevant role. Subsequently, this member can log in to FinClip.

On the current page, you will also find Collaborating Members, Development Members, and Experience Members. The specific differences are as follows:
- Collaborating Members refer to account members of the Mini-Program Open Platform who have the permission to log in and use platform functions.
- Development Members refer to members who are set as developers after client APP accounts are imported into the platform. They have permission to open development version and experience version Mini-Programs.
- Experience Members refer to members who are set as testers after client APP accounts are imported into the platform. They have permission to open experience version Mini-Programs.
When adding Development Members or Experience Members, follow these steps:

The User IDs for Development Members and Experience Members need to be imported via file. After import, you can select the corresponding member IDs from the candidate list on the left side of the pop-up window and add them successfully after clicking OK. The imported User IDs are shared with the Experience Member settings; the Experience Member module does not require a separate import.
The downloaded import file is shown below. Enter the User ID in the first column on the left and upload this file to proceed with member selection.

The "User ID" here represents the unique identification ID of the user in the APP account system (such as mobile number, email, openID, etc.). It is the credential used by the system to verify whether the user has permissions in the background. Currently, the User ID passed by the FinClip App to the SDK and backend for permission verification is the user's mobile number. Therefore, you can directly use the mobile number when importing users and setting developer permissions in the FinClip backend. Enterprise accounts can set up to 100 Development Members and Experience Members. Personal accounts can set up to 15 Development Members and Experience Members. The set members take effect for all Mini-Programs under the current account.
For Mini-Program management function descriptions, please refer to the document [Introduction - Feature Description - Mini-Program Management].
# 3. Creating a Mini-Program
# 3.1 Create a New Mini-Program
You can enter the Mini-Program creation process from the following two entry points:
Entry 1: After logging into FinClip, click "Create Mini-Program" on the homepage.

Entry 2: Under "Mini-Program Management - My Mini-Programs", click "Add Mini-Program".

When creating a Mini-Program, you need to provide the Mini-Program name, category, tags, and introduction information, as shown below:

After successful creation, a Mini-Program usage guide will be displayed. Please read it carefully:

# 3.2 Complete Mini-Program Basic Information
After successfully creating the Mini-Program, enter its "Details" page to edit the basic information.

Basic information includes: Mini-Program Name, Mini-Program Category, Mini-Program Tags, Mini-Program Introduction, Mini-Program Avatar, and Detailed Description.

The Code Package Management section within the Mini-Program Details is primarily used to view historical Mini-Program version information.

After completing the Mini-Program details editing and uploading the Mini-Program code package, you can submit the Mini-Program for review.
# 3.3 View Created Mini-Programs
You can view created Mini-Programs by accessing the homepage or the "My Mini-Programs - Mini-Program Management" page.

On the My Mini-Programs page, you can also see the Mini-Program's AppID, release status, creation and expiration time, as well as related quick operations.

::: Please Note You can click the "Disable" button on the far right of the Mini-Program name to disable the current Mini-Program. Once disabled, the Mini-Program will be inaccessible, and the occupied quota will be released. :::
# 4. Mini-Program Development
# 4.1 Development Tools
- Mini-Programs on this platform are compatible with multi-platform Mini-Programs. It is recommended that developers use the Developer Tools or WeChat Developer Tools for development.
- Before development, it is recommended to read the Mini-Program Development Guide. Due to the high compatibility between this platform and WeChat Mini-Programs, you can also refer to the WeChat Mini-Program Development Documentation (opens new window) for development.
- If you need to use third-party frameworks, it is recommended to use Taro, mpvue, Vant, or iView frameworks.
# 4.2 Domain Name Settings
You can click "Development Management - Domain Name Settings". Enterprises need to set domain names before Mini-Programs can access the corresponding servers. When adding a domain name, please ensure you fill in the complete address including the protocol header, e.g., https://example.com/page1.html (opens new window).

# 4.3 Submitting Code Packages
Uploading Mini-Program code packages requires compiling them locally using the Developer Tools and then uploading the compiled code package.
Download and install the Developer Tools from the Mini-Program release process module on the "Homepage" or the code package upload module under "My Mini-Programs - Version Management". For detailed operation instructions, please refer to: Developer Tools Operation Guide

The compiled Mini-Program code will output corresponding compilation logs. Developers can debug the code based on the compilation logs:
- For successfully compiled Mini-Programs, you can "Download Code Package" to get the compiled Mini-Program code package.
- Failed compilations do not provide code package downloads, but you can "View Compilation Logs" to check the failure reason.

# 4.4 Debugging
You can debug by setting the Mini-Program to Experience Version, or by performing real-time preview debugging in the Developer Tools. The FinClip App also displays instructions for uploading Mini-Program versions.
Debugging by Setting as Experience Version
After successfully uploading the Mini-Program code package, you can set the uploaded Mini-Program code as the Experience Version on the "Mini-Program Details" page.


After configuration, click the QR code icon for the Experience Version and scan it with the FinClip App (for FinClip App usage, please refer to: FinClip App FAQ) to preview and test.
Debugging via Development Version
Alternatively, you can also search for "FinClip" in the App Store, download and install the app, then click "Homepage - Manage Mini-Programs - Select Mini-Program - Click Development Version" to open the corresponding uploaded Mini-Program information. The Development Version Mini-Program will display a corresponding mark on the right side of the details. You can also quickly click the "Enable Debugging" switch at the bottom for debugging.

# 5. Mini-Program Submission for Review and Release/Takedown
# 5.1 Privacy Statement Configuration
When you add a Mini-Program for the first time, you will see a prompt as shown below guiding you to supplement the "Standardized User Privacy Protection Guidelines".

After clicking the "Start Filling" button, you will be redirected to the "Mini-Program Privacy Settings" page. You need to click the "User Privacy Protection Guidelines Settings - Set" button on the page to configure.

Then, follow the page instructions to supplement the corresponding Mini-Program privacy information interfaces. If your Mini-Program does not use user-generated content (UGC), select the first option: "The developer of this Mini-Program promises and guarantees that it does not process any user information in any way. If user information is processed subsequently, the 'Mini-Program Privacy Protection Guidelines' will be updated promptly." Otherwise, please select the second option as guided and enter the corresponding permissions.

# 5.2 Submit for Review
After completing the Mini-Program basic information, configuring domain names, and uploading the code package, you can add a review submission in the "Mini-Program Details", fill in the supplementary review information, and conduct the review yourself.


# 5.3 Mini-Program Review
In the SaaS Version, you need to complete the Mini-Program review work yourself. Click "Mini-Program Release Review" in the left navigation bar to enter the page.

Click "Details" on the right side of the Mini-Program to open the Mini-Program details page. The interface is shown below:

You can use the FinClip App to scan the QR code to preview Mini-Program functions. You can also click "Page Review Preview" below to simulate Mini-Program usage in a browser page. After previewing and confirming no issues, click "Approve" in the lower right corner to complete the Mini-Program review.
# 5.4 Mini-Program Release and Takedown
After the Mini-Program review is approved, you can perform the "Release" operation. Only after release can the Mini-Program be associated with partner applications. Please note when releasing:
- Only one version is allowed to be "Under Review" at the same time. You can withdraw the current version under review and submit a new version for review.
- Click "Review History" to "Withdraw Review" for a Mini-Program currently under review. The withdrawal takes effect immediately.
- Approved versions can all be released. Therefore, you can have multiple Mini-Program versions "Pending Release".
- The takedown operation targets the currently released version and takes effect immediately. After takedown, developers can continue to submit new review applications.

# 6. Associating Mobile Applications
# 6.1 Add Partner Application
Enterprises must add intended partner applications in the Open Platform before proceeding with subsequent operations. This can be done under "Host-App - Add Host-App".

When adding a partner application, you need to fill in the Application Name and the Name of the Enterprise the application belongs to. Among these:
- The Application Name can be modified later.
- The Enterprise Name the application belongs to cannot be modified.

After adding the application, you also need to add the associated Bundle ID to generate the corresponding SDK KEY and SDK SECRET, thereby completing the application association operation. At this point, click "Add BundleID" at the bottom of the partner application to configure. If the Bundle ID for iOS and Android is the same, simply check "Android/iOS Universal" and add one Bundle ID:

If an enterprise needs to terminate cooperation with an application, it can select "Terminate Cooperation" in the application management list. After termination, when users try to open Mini-Programs through that application, they will receive a "Cooperation Terminated" reminder. This operation will be synchronized to all Mini-Programs associated with that application. Both "Terminate Cooperation" and "Resume Cooperation" take effect immediately.

Please Note
You can click the "Disable" button on the far right of the Application or BundleID name to disable the current Application or BundleID. Once disabled, the Application or BundleID will be inaccessible, and the occupied quota will be released.
# 6.2 Export SDK KEY
After creating an application and adding a Bundle ID, if you need to export the corresponding SDK KEY and SDK SECRET, select "Copy" next to the corresponding Bundle ID. You can then paste using ctrl+v or command+v.

Third-party partner applications must write the corresponding SDK KEY and SDK SECRET into their Mini-Program SDK to access the Mini-Program. Please note the following:
- Partner applications must integrate the FinClip Mini-Program SDK and configure the corresponding SDK key and secret.
- Enterprises need to associate released Mini-Programs with partner applications for them to open the corresponding Mini-Program.
- The Mini-Program Open Platform will verify the association between the SDK KEY, the Application Bundle ID, and the Mini-Program. If not associated, the Mini-Program cannot be accessed.
For SDK integration, please refer to:
# 6.3 Associate Mini-Program
- To open a Mini-Program within an application, you need to associate the Mini-Program with the application. You can click "Associate Mini-Program - Add Association" in the application management, then select the released Mini-Program from the list to associate.
- After selecting the Mini-Program, the third-party application also needs to add a Mini-Program entry point within its own APP so that users can access it normally.


# 6.4 Disassociate
- After associating a Mini-Program, users can disassociate the application from the Mini-Program at any time. Click the "Associate Mini-Program" button in the application, then select the Mini-Program to disassociate from the list in the pop-up window.
- After disassociation, when users try to open the Mini-Program through that application, they will be reminded that "Cooperation has been terminated".
# 7. User Feedback
The Mini-Program SDK in the Open Platform provides a function entry point for collecting user feedback. Click "..." in the upper left corner of the Mini-Program to see the entry for complaints and feedback, as shown below:

Feedback for "Functional Abnormalities" and "Product Suggestions" will be collected in the enterprise backend, while "Complaints and Reports" feedback will be collected in the operations backend.

# 8. SDK Integration Instructions
- The Open Platform continuously maintains the Mini-Program SDK and provides integration links and version descriptions on the "SDK Integration" page.
- It is important to note that FinClip generates a unique MD5 fingerprint for each version. After obtaining the download link, the application party can verify file security by comparing this fingerprint.
- For other integration-related questions, you can submit a ticket or send feedback via email in the WeChat developer community.

# 9. FinClip App Usage Instructions
Developers can obtain rich development assistance through the "FinClip App". Download it here: "FinClip App" Download Link
Usage Instructions:
- Log in and install the "FinClip App".
- Scan QR Code to Open Mini-Program: Can open all Mini-Programs within the platform to facilitate developer debugging.
- Manage Mini-Programs: Developers can quickly view Mini-Programs they have created and conveniently open code packages that were successfully uploaded.

Please Note
This usage guide only covers the basic product usage process. To view all feature descriptions, please jump to "Feature Description Guide".