# Android Common Issues
# 1. Common Issues During Integration
# 1.1 What are the minimum environment requirements for integrating the SDK?
Answer: The integrated SDK requires Android SDK version 19 (Android 4.4) or higher.
# 1.2 What are the specific integration steps?
Answer: Please refer to the SDK Integration Documentation.
# 1.3 Is it necessary to configure obfuscation rules when integrating the SDK?
Answer: Yes, the obfuscation rules are as follows:
-keep class com.finogeeks.** {*;}
# 1.4 What parameters are required when initializing the SDK?
Answer: When initializing the SDK, at least the SDK Key, SDK Secret, server address, server API request route prefix, and encryption method must be passed in via the FinAppConfig instance.
Before version 2.13.102, the SDK only supported configuring a single server, allowing only Mini-Programs from one environment to be opened, as shown below:
FinAppConfig config = new FinAppConfig.Builder()
        .setSdkKey(BuildConfig.SDK_KEY)   // SDK Key, issued by the platform after successfully adding a cooperative app
        .setSdkSecret(BuildConfig.APP_SECRET) // SDK Secret, issued by the platform after successfully adding a cooperative app
        .setApiUrl(BuildConfig.API_URL)   // Server address
        .setApiPrefix(BuildConfig.API_PREFIX) // Server API request route prefix
        .setEncryptionType(ENCRYPTION_TYPE_SM) // Encryption method, National Cryptography: SM, MD5: MD5
        .build();
Starting from version 2.13.102, multiple server configurations are supported, enabling Mini-Programs from different environments to be opened simultaneously, as shown below:
// Collection of server information
List<FinStoreConfig> storeConfigs = new ArrayList<>();

// Information for Server 1
FinStoreConfig storeConfig1 = new FinStoreConfig(
        "SDK Key Information",   // SDK Key
        "SDK Secret Information",   // SDK Secret
        "Server 1 Address",   // Server address
        "Server 1 Data Reporting Address",   // Data reporting server address
        "/api/v1/mop/",   // Server API request route prefix
        "",
        "Encryption Method"   // Encryption method, National Cryptography: SM, MD5: MD5
);
storeConfigs.add(storeConfig1);

// Information for Server 2
FinStoreConfig storeConfig2 = new FinStoreConfig(
        "SDK Key Information",   // SDK Key
        "SDK Secret Information",   // SDK Secret
        "Server 2 Address",   // Server address
        "Server 2 Data Reporting Address",   // Data reporting server address
        "/api/v1/mop/",   // Server API request route prefix
        "",
        "Encryption Method"   // Encryption method, National Cryptography: SM, MD5: MD5
);
storeConfigs.add(storeConfig2);

FinAppConfig config = new FinAppConfig.Builder()
        .setFinStoreConfigs(storeConfigs) // Collection of server information
        .build();
# 1.5 What parameters are optional when initializing the SDK?
Answer: In addition to the mandatory parameters mentioned above, other parameters can be configured based on your needs, including UI configuration and gray release rule settings.
UI configuration is as follows:
// UI Configuration
FinAppConfig.UIConfig uiConfig = new FinAppConfig.UIConfig();
// Whether to hide the close button in the upper right corner
uiConfig.setHideNavigationBarCloseButton(false);
// Whether to hide the "Forward" button in the "More" menu
uiConfig.setHideForwardMenu(false);
// Whether to hide "Feedback & Complaints" in the "More" menu
uiConfig.setHideFeedbackAndComplaints(false);
// Whether to hide the "Back to Home" button in the navigation bar
uiConfig.setHideBackHome(false);
// Whether to always show the back button when using the default navigation bar
uiConfig.setAlwaysShowBackInDefaultNavigationBar(false);
// Navigation bar title text style
uiConfig.setNavigationBarTitleTextAppearance(R.style.TextAppearance_AppCompat);
// Gravity of the navigation bar title relative to its parent control
uiConfig.setNavigationBarTitleTextLayoutGravity(Gravity.CENTER);
// Whether to clear the background of the navigation bar buttons
uiConfig.setClearNavigationBarNavButtonBackground(true);
// "More" menu style
uiConfig.setMoreMenuStyle(UIConfig.MORE_MENU_DEFAULT);
// Capsule button configuration
uiConfig.setCapsuleConfig(new CapsuleConfig());
APM data reporting extension information is as follows:
// APM data reporting extension information
Map<String, Object> apmExtendInfo = new HashMap<>();
apmExtendInfo.put("key1", "value1");
apmExtendInfo.put("key2", "value2");
Optional parameters are passed to the SDK along with the mandatory parameters through the FinAppConfig instance, as shown below:
// UI Configuration
FinAppConfig.UIConfig uiConfig = new FinAppConfig.UIConfig();
// Whether to hide the close button in the upper right corner
uiConfig.setHideNavigationBarCloseButton(false);
// Whether to hide the "Forward" button in the "More" menu
uiConfig.setHideForwardMenu(false);
// Whether to hide the "Settings" button in the "More" menu
uiConfig.setHideSettingMenu(false);
// Whether to hide "Feedback & Complaints" in the "More" menu
uiConfig.setHideFeedbackAndComplaints(false);
// Whether to hide the "Back to Home" button in the navigation bar
uiConfig.setHideBackHome(false);
// Whether to always show the back button when using the default navigation bar
uiConfig.setAlwaysShowBackInDefaultNavigationBar(false);
// Navigation bar title text style
uiConfig.setNavigationBarTitleTextAppearance(R.style.TextAppearance_AppCompat);
// Gravity of the navigation bar title relative to its parent control
uiConfig.setNavigationBarTitleTextLayoutGravity(Gravity.CENTER);
// Whether to clear the background of the navigation bar buttons
uiConfig.setClearNavigationBarNavButtonBackground(true);
// "More" menu style
uiConfig.setMoreMenuStyle(UIConfig.MORE_MENU_DEFAULT);
// Capsule button configuration
uiConfig.setCapsuleConfig(new CapsuleConfig());

// APM data reporting extension information
Map<String, Object> apmExtendInfo = new HashMap<>();
apmExtendInfo.put("key1", "value1");
apmExtendInfo.put("key2", "value2");

// Domains where cookies need to be removed
List<String> needToRemoveCookiesDomains = new ArrayList<>();
needToRemoveCookiesDomains.add("https://aaa.bbb.ccc");

FinAppConfig config = new FinAppConfig.Builder()
        .setSdkKey(BuildConfig.SDK_KEY)   // SDK Key, issued by the platform after successfully adding a cooperative app
        .setSdkSecret(BuildConfig.APP_SECRET) // SDK Secret, issued by the platform after successfully adding a cooperative app
        .setApiUrl(BuildConfig.API_URL)   // Server address
        .setApiPrefix(BuildConfig.API_PREFIX) // Server API request route prefix
        .setDebugMode(BuildConfig.DEBUG) // Whether the app is currently in Debug mode
        .setUiConfig(uiConfig) // UI Configuration
        .setApmExtendInfo(apmExtendInfo) // APM data reporting extension information
        .setEncryptionType(ENCRYPTION_TYPE_SM) // Encryption method, National Cryptography: SM, MD5: MD5
        .setDisableRequestPermissions(true) // Whether to disable runtime permission requests, not disabled by default
    	.setAppletAutoAuthorize(false)	// Whether to enable automatic granting of Mini-Program Scope permissions, not enabled by default
        .setNeedToRemoveCookiesDomains(needToRemoveCookiesDomains) // Domains where cookies need to be removed
        .setDisableTbs(true) // Whether to disable Tbs SDK, not disabled by default
        .setCustomWebViewUserAgent("aaa/111; bbb") // Custom WebView UserAgent
        .setAppletIntervalUpdateLimit(6) // Number of Mini-Programs updated in batches at regular intervals
        .setForegroundServiceConfig(new FinAppConfig.ForegroundServiceConfig(true, R.drawable.ic_launcher, "Mini-Program Running", "")) // Whether to start a foreground service when the Mini-Program runs in the foreground
        .setBindAppletWithMainProcess(true) // Bind Mini-Program with the app process; if the app is killed, whether the Mini-Program closes synchronously, false by default
        .setWebViewMixedContentMode(MIXED_CONTENT_ALWAYS_ALLOW) // Set WebView mixed content mode
        .setAppletText("X Application") // Replace the term "Mini-Program" with "X Application"
        .setEnableApmDataCompression(true) // Whether to compress data during reporting, not compressed by default
        .setDisableGetSuperviseInfo(true) // Whether to disable calling the Mini-Program API for obtaining regulatory information, not disabled by default
        .setUserId("User ID") // Set user ID
        .build();
# 1.6 Are there any special considerations when initializing the SDK?
Answer: The SDK uses a multi-process mechanism, where each Mini-Program runs in an independent process, meaning one Mini-Program corresponds to one process. One important point to note during SDK initialization is that no initialization operations should be performed when creating the Mini-Program process, not even the initialization of the Mini-Program SDK itself.
For example, if the application uses some third-party libraries that require initialization upon startup, then in the Application, these third-party libraries should only be initialized if the current process is the Host-App process. The Mini-Program process does not need to initialize these libraries.
Therefore, before initializing the SDK, it is crucial to determine which process is currently running. If it is a Mini-Program process and there is no need to handle cross-process API calls or register APIs in the Mini-Program process, no action should be taken:
/**
 * The app's {@link android.app.Application}
 */
public class AppletApplication extends MultiDexApplication {

    @Override
    public void onCreate() {
        super.onCreate();
        // Code to check if it is a Mini-Program process should be placed at the beginning
        if (FinAppClient.INSTANCE.isFinAppProcess(this)) {
            return;
        }
        // Other code goes here
        …………………………………………
        …………………………………………
    }
}
# 1.7 How to resolve dependency conflicts during integration?
Answer: Third-party libraries depended on by the Android Mini-Program SDK
// appcompat-v7
implementation "com.android.support:appcompat-v7:23.0.0"

// support-v4
implementation "com.android.support:support-v4:23.0.0"

// Recyclerview
implementation "com.android.support:recyclerview-v7:23.2.0"

// Kotlin
implementation "org.jetbrains.kotlin:kotlin-stdlib:1.3.61"

// Gson
implementation "com.google.code.gson:gson:2.9.0"

// zxing
implementation "com.google.zxing:core:3.3.0"
implementation "com.google.zxing:android-core:3.3.0"

// SdkCore
implementation "com.finogeeks.finochat.sdk:sdkcore:2.15.1"
The SDK dependencies are managed by Gradle. When both the app and the SDK depend on the same library, Gradle will automatically resolve conflicts by using the library with the higher version number.
If the app depends on a library via a JAR package or source code that conflicts with the SDK, the dependency can be excluded using the exclude command.
For example:
implementation('com.finogeeks.lib:finapplet:2.21.1') {
        exclude group: "com.tecent.smtt"
}
Additionally, it is recommended to manage dependencies using Gradle.
# 1.7.1 What to do if there are duplicate classes in zxing:android-core?
The SDK uses the zxing:android-core library. Since the zxing-android-embedded library has a class name conflict with the CameraConfigurationUtils class in android-core, some users may encounter class name conflicts after using the zxing-android-embedded library.
In this case, the dependency can be excluded using the exclude command.
For example:
implementation('com.finogeeks.lib:finapplet:2.21.1') {
        exclude group: "com.google.zxing" , module:"android-core"
}
# 2. Common Issues During Usage
# 2.1 How to launch a Mini-Program?
- If launching a Mini-Program without passing startup parameters, call the
startApplet(context: Context, appId: String)method of theIAppletApiManagerinterface, as shown below:
FinAppClient.INSTANCE.getAppletApiManager().startApplet(context, "appId");
Or
FinAppClient.INSTANCE.getAppletApiManager().startApplet(context, IFinAppletRequest);
- If launching a Mini-Program with startup parameters, call the
startApplet(context: Context, appId: String, startParams: Map<String, String>)method of theIAppletApiManagerinterface, as shown below:
Map<String, String> params = new HashMap<>();
// path is the Mini-Program page path
params.put("path", "/pages/index/index");
// query is the startup parameter, formatted as "key1=value1&key2=value2 ..."
params.put("query", "aaa=test&bbb=123");
FinAppClient.INSTANCE.getAppletApiManager().startApplet(this, "appId", params);
# 2.2 After launching multiple Mini-Programs in the Host-App, why are multiple Mini-Program tasks visible in the Android system's recent task list besides the Host-App?
Answer: This is because the Android Mini-Program SDK uses a multi-process mechanism. The Host-App is one process, and each Mini-Program belongs to an independent process. In the Android system's recent task list, different processes are displayed separately, so multiple opened Mini-Programs will be visible. The mainstream Mini-Programs at present, such as the Android version of WeChat Mini-Program and the Android version of Baidu Smart Mini-Program, are also like this.
# 2.3 Can Mini-Program interfaces be extended? That is, apart from a series of standard interfaces provided inside the SDK, can Mini-Programs call their own provided interfaces? If yes, how to implement it?
Answer: Mini-Program interfaces can be extended. The SDK allows registering custom Mini-Program interfaces. After registration, these custom interfaces are just like the standard interfaces inside the SDK and can be called by Mini-Programs.
The specific implementation steps are as follows:
- Implement a custom Mini-Program interface.
IApideclares two core methods that need to be implemented for Mini-Program interfaces, namelyapis();andinvoke(String event, JSONObject param, ICallback callback);. The specific code is as follows:
/**
 * Mini-Program API interface; APIs implementing corresponding functionalities must implement this interface.
 */
public interface IApi extends ILifecycle {

    /**
     * @return An array of callable API names
     */
    String[] apis();

    /**
     * When an API call is received, this method will be triggered, and specific business logic should be implemented in this method.
     *
     * @param event    Event name, i.e., API name
     * @param param    Parameters
     * @param callback Callback interface
     */
    void invoke(String event, JSONObject param, ICallback callback);
}
To implement a custom interface, you need to create a class and let this class inherit from AbsApi, which is a subclass of IApi, then override the apis() and invoke() methods. apis() returns an array of all callable API names, and by implementing apis(), declare all the APIs that need to be implemented.
invoke() will be triggered when the Mini-Program calls the API. Among the parameters, event is the API name, param corresponds to the parameters of the API, and callback is used to return data to the Mini-Program after executing the calling logic.
For example, we customize a Mini-Program interface to implement a simple page redirection function. The code is as follows:
/**
 * Custom Mini-Program interface, implementing a simple page redirection function
 */
public class ApiOpenPage extends AbsApi {

    private static final String API_NAME_OPEN_PAGE = "openPage";

    private Context mContext;

    public ApiOpenPage(Context context) {
        mContext = context;
    }

    /**
     * @return An array of callable API names
     */
    @Override
    public String[] apis() {
        return new String[]{API_NAME_OPEN_PAGE};
    }

    /**
     * When an API call is received, this method will be triggered, and specific business logic should be implemented in this method.
     *
     * @param event    Event name, i.e., API name
     * @param param    Parameters
     * @param callback Callback interface
     */
    @Override
    public void invoke(String event, JSONObject param, ICallback callback) {
        if (API_NAME_OPEN_PAGE.equals(event)) {
            String url = param.optString("url");
            if (!TextUtils.isEmpty(url)) {
                Intent intent = new Intent();
                intent.setClass(mContext, SecondActivity.class);
                if (!(mContext instanceof Activity)) {
                    intent.addFlags(Intent.FLAG_ACTIVITY_NEW_TASK);
                }
                mContext.startActivity(intent);
                callback.onSuccess(null);
            } else {
                callback.onFail();
            }
        }
    }
}
- Register the custom Mini-Program interface.
Registration is achieved by calling theregisterApimethod of theIExtensionApiManagerinterface. As follows:
FinAppClient.INSTANCE.getExtensionApiManager().registerApi(new ApiOpenPage(context));
If multiple interfaces need to be registered at once, you can call registerApis, passing in a collection of interfaces.
- Add extended interface configuration in the Mini-Program project. After the SDK registers the custom Mini-Program interface, it is also necessary to create a
FinClipConf.jsfile in the root directory of the Mini-Program project and configure the corresponding custom interface inFinClipConf.js. Configuration example is as follows:
module.exports = {
  	extApi:[
    	{
      		name: 'openPage', // Extended interface name
      		params: { // Extended interface parameters, only list required parameters
        		url: '',
        		title: '',
        		description: ''
      		}
    	}
  	]
}
- Call each API in the registered interface within the Mini-Program.
# 2.4 When a Mini-Program loads a webpage, can the webpage call native code?
Answer: Native code can be called from within the webpage of a Mini-Program. JSSDK provides a series of interfaces through which native code can be called from within the webpage.
# 2.5 Can JSSDK interfaces be extended? That is, apart from a series of standard interfaces provided inside the JSSDK, can Mini-Programs call their own provided interfaces within webpages? If yes, how to implement it?
Answer: JSSDK interfaces can be extended. The SDK allows registering custom JSSDK interfaces. After registration, these custom JSSDK interfaces are just like the standard interfaces provided inside the JSSDK and can be called by Mini-Programs within webpages.
The specific implementation steps are as follows:
- Implement a custom JSSDK interface.
This step is the same as implementing a custom Mini-Program interface, by inheritingAbsApiand overriding theapis()andinvoke()methods to implement a custom JSSDK interface. - Register the custom JSSDK interface.
Registration is achieved by calling theregisterApimethod of theIExtensionWebApiManagerinterface. As follows:
FinAppClient.INSTANCE.getExtensionWebApiManager().registerApi(new ApiOpenPage(context));
If multiple interfaces need to be registered at once, you can call registerApis, passing in a collection of interfaces.
For more details, see Register WebView Component API for Mini-Program.
# 2.6 When jumping to other pages of the Host-App in the invoke() method of a custom interface, after performing a series of operations, pressing the system back button to return to the Mini-Program results in returning to the page where the Mini-Program was launched in the Host-App. Why?
Reason:
The jump to other pages of the Host-App is performed using the Context instance in the Host-App, and the Activity has not been pushed into a new task stack.
The Android Mini-Program SDK has a multi-process architecture, with the Mini-Program and Host-App residing in different processes, naturally having different task stacks. When the Mini-Program jumps to a page of the Host-App, the newly opened page is added to the original task stack of the Host-App. When returning from the page, the logic executed pops pages from the original task stack of the Host-App, thus seeing the pages of the Host-App being closed one by one, finally returning to the page where the Mini-Program was launched in the Host-App, without returning to the Mini-Program.
Solution:
Solution 1 (Recommended):
UseICallback'sstartActivityorstartActivityForResultto jump to other pages of the Host-App.This is the recommended solution because it opens the new Host-App Activity in the task stack where the Mini-Program resides, completing the push and pop of Activities within the same task stack, without switching task stacks.
A more important reason is: If you need to start an Activity via
startActivityForResultand get the returned data when the page returns, only by using this solution will theonActivityResultof the custom interface execute, allowing you to obtain the returned data.Example usage of this solution:
@Override
public void invoke(String event, JSONObject param, ICallback callback) {
    Intent intent = new Intent();
    intent.setClass(mContext, SecondActivity.class);
    callback.startActivityForResult(intent, 100);
}
Solution 2 (Not Recommended):
If you must use the Context instance in the Host-App to start an Activity, you need to set the Flags "support multiple task stacks" and "open new task stack" for theIntentthat starts the native page. This way, a new task stack can be opened in the process of the Host-App, and after opening the new task stack, the newly opened pages will be pushed into this new task stack one by one. When finishing all operations on the native pages and returning one by one, the pages will be popped out from this new task stack one by one. When all pages in this new task stack have been popped out, it will return to the task stack of the Mini-Program process.Therefore, in the
invoke()method of the custom interface, if you need to jump to other pages of the native application to perform certain operations and expect to return to the Mini-Program after closing these native pages, it is recommended to add bothIntent.FLAG_ACTIVITY_MULTIPLE_TASKandFLAG_ACTIVITY_NEW_TASKto theIntentobject when performing the jump, as follows:
Intent intent = new Intent();
intent.setClass(context, SecondActivity.class);
intent.addFlags(Intent.FLAG_ACTIVITY_MULTIPLE_TASK);
intent.addFlags(Intent.FLAG_ACTIVITY_NEW_TASK);
context.startActivity(intent); // context is the Context instance in the Host-App
Using this solution, if you start an Activity via startActivityForResult, the onActivityResult of the custom interface will not be called when the page returns, so it is not recommended.
# 2.7 Can native code call JS functions in webpages?
Answer: The SDK supports native code calling JS functions. By calling the callJS method of the IAppletApiManager interface, you can achieve this, as follows:
JSONObject funcParams = new JSONObject();
try {
    funcParams.put("param1", "value1");
    funcParams.put("param2", "value2");
    FinAppClient.INSTANCE.getAppletApiManager().callJS(
            "appId",
            "funcName",
            funcParams.toString(),
            -1,
            new FinCallback<String>() {
                @Override
                public void onSuccess(String result) {
                    Log.d(TAG, "callJS onSuccess : " + result);
                }

                @Override
                public void onError(int code, String error) {
                    Log.d(TAG, "callJS onError : " + code + ", " + error);
                }

                @Override
                public void onProgress(int status, String info) {

                }
            });
} catch (JSONException e) {
    e.printStackTrace();
}
# 2.8 How to set the transition animation for Activities in Mini-Programs?
Answer: You can set the transition animation for Activities in Mini-Programs by calling the setActivityTransitionAnim method of the IAppletApiManager interface, as follows:
FinAppClient.INSTANCE.getAppletApiManager().setActivityTransitionAnim(SlideFromRightToLeftAnim.INSTANCE);
Currently, five types of animations are available for setting:
- NoneAnim: No animation;
- SlideFromLeftToRightAnim: Slide animation - enter from left, exit to right;
- SlideFromRightToLeftAnim: Slide animation - enter from right, exit to left;
- SlideFromTopToBottomAnim: Slide animation - enter from top, exit to bottom;
- SlideFromBottomToTopAnim: Slide animation - enter from bottom, exit to top.
# 2.9 How to share Mini-Programs to platforms supporting Mini-Programs like WeChat?
Answer: To implement the Mini-Program sharing function, the general idea is to first obtain the relevant information needed for sharing the Mini-Program, then convert the obtained information into parameters for the sharing interface, and finally call the sharing interface to share the Mini-Program to the corresponding platform. Specific implementation schemes mainly include two types:
Implement the
shareAppMessagemethod of the Mini-Program abstract business callback interfaceIAppletOpenTypeHandlerand pass theIAppletOpenTypeHandlerinstance into the SDK.When clicking "Forward" in the more menu of the Mini-Program, the
shareAppMessagemethod of theIAppletOpenTypeHandlerinstance will be called. TheshareAppMessagemethod includes parameters such as Mini-Program information and Mini-Program page screenshots. After obtaining the Mini-Program related parameters, you can call third-party sharing SDKs to implement sharing.The
shareAppMessagemethod is as follows:/** * Forward Mini-Program * * @param appInfo Mini-Program information, a JSON string containing Mini-Program ID, Mini-Program name, Mini-Program icon, user ID, forwarded data content, etc. * The format of [appInfo] is as follows: * { * "appTitle": "FinClip Mini-Program", * "appAvatar": "https:\/\/www.finogeeks.club\/statics\/images\/swan_mini\/swan_logo.png", * "appId": "5df36b3f687c5c00013e9fd1", * "appType": "trial", * "userId": "finogeeks", * "params": { * "title": "apt-test-tweet-API test published dynamic!@#¥%……&*(", * "desc": "Your service expert nearby", * "imageUrl": "finfile:\/\/tmp_fc15edd8-2ff6-4c54-9ee9-fe5ee034033d1576550313667.png", * "path": "pages\/tweet\/tweet-detail.html?fcid=%40staff_staff1%3A000000.finogeeks.com&timelineId=db0c2098-031e-41c4-b9c6-87a5bbcf681d&shareId=3dfa2f78-19fc-42fc-b3a9-4779a6dac654", * "appInfo": { * "weixin": { * "path": "\/studio\/pages\/tweet\/tweet-detail", * "query": { * "fcid": "@staff_staff1:000000.finogeeks.com", * "timelineId": "db0c2098-031e-41c4-b9c6-87a5bbcf681d" * } * } * } * } * } * Explanation of fields in [appInfo]: * appId Mini-Program ID * appTitle Mini-Program name * appAvatar Mini-Program avatar * appType Mini-Program type, where trial indicates trial version, temporary indicates temporary version, review indicates review version, release indicates online version, development indicates development version * userId User ID * params Other attached parameters, passed through by the Mini-Program itself * * @param bitmap Mini-Program cover image. If the [appInfo].params.imageUrl field is an HTTP or HTTPS link address, the Mini-Program cover image * takes the image corresponding to [appInfo].params.imageUrl, otherwise, the Mini-Program cover image takes [bitmap]. * @param callback Callback for forwarding Mini-Program results. */ fun shareAppMessage(appInfo: String, bitmap: Bitmap?, callback: IAppletCallback)Set
setAppletOpenTypeHandler(appletOpenTypeHandler: IAppletOpenTypeHandler)by calling the singleton ofFinAppClient. Example as follows:FinAppClient.INSTANCE.setAppletOpenTypeHandler(new MyAppletOpenTypeHandler());Implement through a custom interface. In the
invokemethod of the custom interface, receive the parameters passed by the Mini-Program, then call the third-party sharing SDK to implement Mini-Program sharing.
# 2.10 How to inject your own menu items into the "More" menu?
Answer: The injection of menu items in the "More" menu is achieved by proxying CapsuleHandler. The CapsuleHandler will callback the interface method getRegisteredMoreMenuItems for obtaining injected menu items and the interface method onRegisteredMoreMenuItemClicked for handling clicks on injected menu items to the Host-App, which implements the specific business logic.
The methods getRegisteredMoreMenuItems and onRegisteredMoreMenuItemClicked are as follows:
/**
 * Get registered "More" menu items
 *
 * @param appId Mini-Program ID
 * @return Registered "More" menu items
 */
fun getRegisteredMoreMenuItems(appId: String): List<MoreMenuItem>?

/**
 * Registered "More" menu item clicked
 *
 * @param appId Mini-Program ID
 * @param path Mini-Program page path
 * @param menuItemId ID of the clicked menu item
 * @param appInfo Mini-Program information, a JSON string containing Mini-Program ID, name, icon, user ID, and shared data content.
 * The format of [appInfo] is as follows:
 * {
 *      "appTitle": "FinClip Mini-Program",
 *      "appAvatar": "https:\/\/www.finogeeks.club\/statics\/images\/swan_mini\/swan_logo.png",
 *      "appId": "5df36b3f687c5c00013e9fd1",
 *      "appType": "trial",
 *      "userId": "finogeeks",
 *      "params": {
 *           "title": "apt-test-tweet-API test published dynamic!@#¥%……&*(",
 *           "desc": "Your service expert nearby",
 *           "imageUrl": "finfile:\/\/tmp_fc15edd8-2ff6-4c54-9ee9-fe5ee034033d1576550313667.png",
 *           "path": "pages\/tweet\/tweet-detail.html?fcid=%40staff_staff1%3A000000.finogeeks.com&timelineId=db0c2098-031e-41c4-b9c6-87a5bbcf681d&shareId=3dfa2f78-19fc-42fc-b3a9-4779a6dac654",
 *           "appInfo": {
 *               "weixin": {
 *                   "path": "\/studio\/pages\/tweet\/tweet-detail",
 *                   "query": {
 *                       "fcid": "@staff_staff1:000000.finogeeks.com",
 *                       "timelineId": "db0c2098-031e-41c4-b9c6-87a5bbcf681d"
 *                    }
 *               }
 *           }
 *       }
 * }
 * Explanation of fields in [appInfo]:
 * appId Mini-Program ID
 * appTitle Mini-Program name
 * appAvatar Mini-Program avatar
 * appType Mini-Program type, where trial indicates trial version, temporary indicates temporary version, review indicates review version, release indicates production version, and development indicates development version
 * userId User ID
 * params Other parameters passed through by the Mini-Program itself
 *
 * @param bitmap Mini-Program cover image. If the [appInfo].params.imageUrl field is an HTTP or HTTPS link address, the Mini-Program cover image will be taken from [appInfo].params.imageUrl; otherwise, it will be taken from [bitmap].
 * @param callback Result callback.
 */
fun onRegisteredMoreMenuItemClicked(appId: String, path: String, menuItemId: String, appInfo: String?, bitmap: Bitmap?, callback: IAppletCallback)
Similarly, the CapsuleHandler instance needs to be set by calling the capsuleHandler of FinAppProcessClient.
The implementation examples of the getRegisteredMoreMenuItems and onRegisteredMoreMenuItemClicked methods are as follows:
FinAppProcessClient.capsuleHandler = object : CapsuleHandler() {
                    override fun onMoreButtonClick(
                        context: Context,
                        appId: String,
                        handler: MoreButtonClickHandler
                    ) {
    override fun getRegisteredMoreMenuItems(
        context: Context,
        appId: String
    ): List<MoreMenuItem>? {
        val items: MutableList<MoreMenuItem> = ArrayList()
        val item0 = MoreMenuItem(0, R.drawable.close_light, "Normal Menu", true)
        items.add(item0)
        val item1 = MoreMenuItem(
            "ShareDingDing",
            "DingTalk",
            MoreMenuType.ON_MINI_PROGRAM
        )
        items.add(item1)
        val item2 = MoreMenuItem(
            "WXShareAPPMoments",
            "WeChat Moments",
            MoreMenuType.ON_MINI_PROGRAM,
            true
        )
        items.add(item2)
        val item7 =
            MoreMenuItem("SharePicture", "Share Image", MoreMenuType.COMMON)
        items.add(item7)
        return items
    }

    override fun onRegisteredMoreMenuItemClicked(
        context: Context,
        appId: String,
        path: String,
        menuItemId: String,
        appInfo: String?,
        bitmap: Bitmap?,
        callback: IAppletHandler.IAppletCallback
    ) {
        val content =
            "Mini-Program" + appId + "'s" + path + "page menu" + menuItemId + "clicked, appInfo : " + appInfo + " bitmap : " + bitmap
        Log.d("CapsuleHandler", "content:$content")
        Toast.makeText(context, content, Toast.LENGTH_SHORT).show()
    }
}
# 2.11 How to capture a screenshot of the current Mini-Program page?
Answer: Refer to Capture Mini-Program Page Screenshot
# 2.12 How to hide the "Forward" button in the "More" menu?
Answer: Configure via UI configuration options when initializing the SDK, as follows:
// UI Configuration
FinAppConfig.UIConfig uiConfig = new FinAppConfig.UIConfig();
// Whether to hide the "Forward" button in the "More" menu
uiConfig.setHideForwardMenu(true);
# 2.13 How to hide the "Settings" button in the "More" menu?
Answer: The "Settings" menu displays each Mini-Program's Scope permissions. To hide the "Settings" entry, configure via UI configuration options when initializing the SDK, as follows:
// UI Configuration
FinAppConfig.UIConfig uiConfig = new FinAppConfig.UIConfig();
// Whether to hide the "Settings" button in the "More" menu
uiConfig.setHideSettingMenu(true);
# 2.14 How to hide the "Back to Home" button in the "More" menu?
Answer: Configure via UI configuration options when initializing the SDK, as follows:
// UI Configuration
FinAppConfig.UIConfig uiConfig = new FinAppConfig.UIConfig();
// Whether to hide the "Back to Home" menu entry in the "More" menu
uiConfig.setHideBackHome(true);
Note:
The "Back to Home" button in the "More" menu has been deprecated after version 2.36.1. This configuration option now controls the "Back to Home" button on the Navigation Bar.
# 2.15 How to hide the "Feedback and Complaints" entry in the "More" menu?
Answer: Configure via UI configuration options when initializing the SDK, as follows:
// UI Configuration
FinAppConfig.UIConfig uiConfig = new FinAppConfig.UIConfig();
// Whether to hide "Feedback and Complaints" in the "More" menu
uiConfig.setHideFeedbackAndComplaints(true);
# 2.16 How to display the "Share" button in the "More" menu?
Answer: Configure via UI configuration options when initializing the SDK, as follows:
// UI Configuration
FinAppConfig.UIConfig uiConfig = new FinAppConfig.UIConfig();
// Whether to display "Share" in the "More" menu
// Default value is true (hidden)
uiConfig.setHideShareAppletMenu(false);
# 2.17 How to hide the close button in the Navigation Bar?
Answer: Configure via UI configuration options when initializing the SDK, as follows:
// UI Configuration
FinAppConfig.UIConfig uiConfig = new FinAppConfig.UIConfig();
// Whether to hide the close button in the upper-right corner
uiConfig.setHideNavigationBarCloseButton(true);
# 2.18 When the Navigation Bar is in the default style, how to display the back button on the home page?
Answer: Configure via UI configuration options when initializing the SDK, as follows:
// UI Configuration
FinAppConfig.UIConfig uiConfig = new FinAppConfig.UIConfig();
// Whether to always show the back button when using the default Navigation Bar
uiConfig.setAlwaysShowBackInDefaultNavigationBar(false);
# 2.19 How to configure gray release rules?
Answer: The injection of gray release configuration parameters is achieved through AppletGrayVersionHandler. The AppletGrayVersionHandler will callback the interface method getGrayAppletVersionConfigs to the Host-App, which implements the specific business logic.
The getGrayAppletVersionConfigs method is as follows:
/**
 * Get gray release configuration parameters
 *
 * @param appId Mini-Program ID
 * @return Gray release configuration parameters
 */
fun getGrayAppletVersionConfigs(appId: String): List<GrayAppletVersionConfig>?
Similarly, the AppletGrayVersionHandler instance needs to be set by calling the grayVersionHandler property of IAppletAFinAppClientpiManager.
Example:
FinAppClient.grayVersionHandler = object : AppletGrayVersionHandler() {
    override fun getGrayAppletVersionConfigs(appId: String): List<GrayAppletVersionConfig>? {
        return null
    }
}
Note
Since FinClip Mini-Program does not provide a user system, when creating gray release rules and selecting "Publish to Specified Users," you need to pass the user information from the App to the Mini-Program via custom APIs. Only then can the Mini-Program publish according to specified users (when using custom APIs to pass user IDs, the default rule ID is xUserId).
# 2.20 How to implement a custom Navigation Bar?
Answer: Currently, three Navigation Bar styles are provided:
- Default style (
default); - Custom style retaining only the "More Close" button (
custom); - Custom style hiding all native Navigation Bar elements, including the "More Close" button (
hide).
By default, both page and window in the Mini-Program have their navigationStyle set to default. If developers wish to customize the Navigation Bar style, they can achieve this by configuring the navigationStyle of page or window.
# 2.21 Does it support prohibiting the SDK from actively requesting permissions?
Answer: Yes.
If the Host-App wants to manage all SDK permission requests itself and prevent the SDK from initiating permission requests at runtime, this can be achieved by configuring parameters during SDK initialization, as follows:
FinAppConfig finAppConfig = new FinAppConfig.Builder()
        .setDisableRequestPermissions(true) // Prohibit the SDK from initiating runtime permission requests
        .build();
# 2.22 Does it support automatically granting Scope permissions when requested by the Mini-Program?
Answer: Yes.
Scope permissions can be viewed, enabled, or disabled in the "More" - "Settings" section of the Mini-Program. By default, the first time a Mini-Program requests Scope permissions, a dialog box will appear asking the user for permission. If the SDK wishes to automatically grant Scope permissions without prompting the user, this can be achieved by configuring parameters during SDK initialization, as follows:
FinAppConfig finAppConfig = new FinAppConfig.Builder()
        .setAppletAutoAuthorize(true) // Automatically grant Scope permissions
        .build();
# 2.23 How to adjust the text style of the Navigation Bar title?
Answer: Configure via UI configuration options when initializing the SDK, as follows:
// UI Configuration
FinAppConfig.UIConfig uiConfig = new FinAppConfig.UIConfig();
// Text style of the Navigation Bar title
uiConfig.setNavigationBarTitleTextAppearance(R.style.TextAppearance_AppCompat);
# 2.24 How to center-align the Navigation Bar title?
Answer: Configure via UI configuration options when initializing the SDK, as follows:
// UI Configuration
FinAppConfig.UIConfig uiConfig = new FinAppConfig.UIConfig();
// Gravity of the Navigation Bar title relative to its parent layout
uiConfig.setNavigationBarTitleTextLayoutGravity(Gravity.CENTER);
# 2.25 How to remove the background animation of the Navigation Bar back button when pressed?
Answer: Configure via UI configuration options when initializing the SDK, as follows:
// UI Configuration
FinAppConfig.UIConfig uiConfig = new FinAppConfig.UIConfig();
// Whether to clear the background of the Navigation Bar navigation buttons
uiConfig.setClearNavigationBarNavButtonBackground(true);
# 2.26 Does the Mini-Program support switching between portrait and landscape orientations?
Answer: Yes.
Mini-Programs support landscape mode, portrait mode, and free switching between landscape and portrait modes. The screen rotation settings for Mini-Programs can be globally configured in the window section of the app.json file within the Mini-Program project, or individually configured in each page's .json file.
- Global configuration in
app.json:
{
	"window": {
		"pageOrientation": "auto" // auto: free switching between landscape and portrait, portrait: portrait mode, landscape: landscape mode
	}
}
- Individual configuration in a page’s
.jsonfile:
{
	"pageOrientation": "auto" // auto: free switching between landscape and portrait, portrait: portrait mode, landscape: landscape mode
}
- Page-specific configurations will override identical configurations set in the
windowsection ofapp.json.
# 2.27 How to disable the use of TBS SDK?
Answer: This can be achieved by configuring parameters during SDK initialization, as follows:
FinAppConfig finAppConfig = new FinAppConfig.Builder()
        .setDisableTbs(true) // Set whether to disable the Tbs SDK
        .build();
# 2.28 How to set the number of Mini-Programs updated in batches at regular intervals?
Answer: This can be achieved by configuring parameters during SDK initialization, as follows:
FinAppConfig finAppConfig = new FinAppConfig.Builder()
        .setAppletIntervalUpdateLimit(3) // Set the number of Mini-Programs updated in batches at regular intervals
        .build();
# 2.29 How to set the maximum number of Mini-Programs that can be opened simultaneously?
Answer: This can be achieved by configuring parameters during SDK initialization, as follows:
FinAppConfig finAppConfig = new FinAppConfig.Builder()
        .setMaxRunningApplet(3) // Maximum number of Mini-Programs that can be opened simultaneously
        .build();
# 2.30 Can Mini-Programs control the display and hiding of the "More" button in the top-right corner?
Answer: Yes.
This can be achieved by configuring the navigationBarHideMoreButton property. The navigationBarHideMoreButton property can be globally configured in the window section of the app.json file within the Mini-Program project, or individually configured in each page's .json file.
- Global configuration in
app.json:
{
	"window": {
		"navigationBarHideMoreButton": true // true: hide the "More" button in the top-right corner, false: show the "More" button in the top-right corner, default is false.
	}
}
- Individual configuration in a page’s
.jsonfile:
{
	"navigationBarHideMoreButton": true // true: hide the "More" button in the top-right corner, false: show the "More" button in the top-right corner, default is false.
}
# 2.31 Can Mini-Programs control the display and hiding of the close button in the top-right corner?
Yes. This can be achieved by configuring the navigationBarHideCloseButton property. The navigationBarHideCloseButton property can be globally configured in the window section of the app.json file within the Mini-Program project, or individually configured in each page's .json file.
- Global configuration in
app.json:
{
	"window": {
		"navigationBarHideCloseButton": true // true: hide the close button in the top-right corner, false: show the close button in the top-right corner, default is false.
	}
}
- Individual configuration in a page’s
.jsonfile:
{
	"navigationBarHideCloseButton": true // true: hide the close button in the top-right corner, false: show the close button in the top-right corner, default is false.
}
# 2.32 Is it possible to replace the term "Mini-Program" in the SDK with another name?
Answer: Yes.
This can be achieved through SDK initialization configuration parameters, as follows:
FinAppConfig finAppConfig = new FinAppConfig.Builder()
        .setAppletText("X Application") // Replace the term "Mini-Program" in the SDK with "X Application"
        .build();
# 2.33 During data reporting, will the reported data be compressed?
Answer: By default, the SDK does not compress the reported data during data reporting. If compression needs to be enabled, it can be achieved through SDK initialization configuration parameters, as follows:
FinAppConfig finAppConfig = new FinAppConfig.Builder()
        .setEnableApmDataCompression(true) // Set whether to compress the reported data during data reporting
        .build();
# 2.34 Is it possible to disable the Mini-Program API for obtaining regulatory information?
Answer: Yes.
By default, the SDK allows Mini-Programs to call the API for obtaining regulatory information (getSuperviseInfo). If this needs to be disabled, it can be achieved through SDK initialization configuration parameters, as follows:
FinAppConfig finAppConfig = new FinAppConfig.Builder()
        .setDisableGetSuperviseInfo(true) // Set whether to disable Mini-Programs from calling the API for obtaining regulatory information
        .build();
After disabling, when a Mini-Program calls getSuperviseInfo, it will receive the callback getSuperviseInfo:fail disabled.
# 2.35 Does it support opening trial version Mini-Programs?
Answer: Yes.
The platform supports configuring trial versions and trial members for Mini-Programs. Members with trial permissions can open trial version Mini-Programs.
Steps to use the trial version Mini-Program:
- Upload the Mini-Program on the platform and configure the trial version for the Mini-Program. Refer to Enterprise Operation Guide - 4.4 Debugging for configuration instructions.
- Pass the user ID during SDK initialization:
val config = FinAppConfig.Builder()
    .setUserId("User ID")
    .build()
Only when the passed user ID is in the member list configured for the Mini-Program can the trial version Mini-Program be opened; otherwise, a prompt saying "No trial permission" will appear when trying to open the Mini-Program.
- Open the Mini-Program by calling the interface provided by the SDK, as follows:
/**
 * Launch Mini-Program
 *
 * @param context Context
 * @param startAppletDecryptRequest Request body
 */
fun startApplet(context: Context, startAppletDecryptRequest: StartAppletDecryptRequest)`
The structure of StartAppletDecryptRequest is as follows:
/**
 * Launch Mini-Program request entity class
 *
 * @param info Encrypted information of the Mini-Program
 */
data class StartAppletDecryptRequest(val info: String)
The info field of StartAppletDecryptRequest represents the encrypted information of the Mini-Program, corresponding to the info field in the QR code of the trial version Mini-Program. Therefore, when opening the trial version Mini-Program, pass the value of the info field from the QR code of the trial version Mini-Program into the info field of StartAppletDecryptRequest.
For example, given the following content of a trial version Mini-Program QR code:
https://finchat-mop.finogeeks.club/mop/scattered-page/#/sdktip?type=scanOpen&info=SFODj9IW1ENO8OA0El8P79aMuxB1DJvfKenZd7hrnemVCNcJ+Uj9PzkRkf/Pu5nMz0cGjj0Ne4fcchBRCmJO+As0XFqMrOclsqrXaogsaUPq2jJKCCao03vI8rkHilrWxSDdzopz1ifJCgFC9d6v29m9jU29wTxlHsQUtKsk/wz0BROa+aDGWh0rKvUEPgo8mB+40/zZFNsRZ0PjsQsi7GdLg8p4igKyRYtRgOxUq37wgDU4Ymn/yeXvOv7KrzUT&codeType=trial
The value of the info field should be:
SFODj9IW1ENO8OA0El8P79aMuxB1DJvfKenZd7hrnemVCNcJ+Uj9PzkRkf/Pu5nMz0cGjj0Ne4fcchBRCmJO+As0XFqMrOclsqrXaogsaUPq2jJKCCao03vI8rkHilrWxSDdzopz1ifJCgFC9d6v29m9jU29wTxlHsQUtKsk/wz0BROa+aDGWh0rKvUEPgo8mB+40/zZFNsRZ0PjsQsi7GdLg8p4igKyRYtRgOxUq37wgDU4Ymn/yeXvOv7KrzUT
# 2.36 How to implement third-party login in Mini-Programs?
# 2.36.1 Integrate the FinClip Mini-Program SDK (FinTech Mini-Program SDK)
Developers first need to integrate the FinClip Mini-Program SDK. For integration guidelines, refer to FinClip Mini-Program Open Platform Android Integration Document. The open platform already has detailed Android integration documentation, so it will not be repeated here.
# 2.36.2 Customize Mini-Program interfaces to implement authorized login
To allow Mini-Programs to access data outside the APP, custom Mini-Program interfaces need to be registered. For specific instructions on custom interfaces, refer to FinClip Mini-Program Open Platform - Custom Mini-Program Interfaces.
Note
The parameters in this example are determined by developers during actual development. This example is for demonstration purposes only.
- Custom authorization login
logininterface
Since this example requires displaying an authorization Dialog during login, which requires obtaining an Activity instance, we need to register this API in the Mini-Program process to conveniently obtain the Activity instance displaying the Mini-Program.
public class LoginApi extends AbsApi {

    // Definition code omitted

    private void showAuthDialog(ICallback iCallback) {
        new AlertDialog.Builder(activity)
                .setTitle("Authorization Login")
                .setMessage("Do you authorize this Mini-Program to access your user information?")
                .setCancelable(false)
                .setPositiveButton("Confirm", (dialog, which) -> authLoginOnMainProcess(iCallback))
                .setNegativeButton("Cancel", (dialog, which) -> iCallback.onFail())
                .show();
    }

    /**
     * Since user information is generally stored only in the main process, it cannot be directly accessed in the Mini-Program process.
     * Therefore, the `callInMainProcess` method must be used to make cross-process calls. After obtaining the information in the main process, it is then passed back to the Mini-Program process.
     */
    private void authLoginOnMainProcess(ICallback iCallback) {
       // Cross-process call code omitted
    }

}
For more information on cross-process API calls, see the document: Mini-Program Process Calls Main Process
Register custom API in the Mini-Program process
if (FinAppClient.INSTANCE.isFinAppProcess(this)) {
    // Mini-Program process
    initFinClipOnAppletProcess();
} else {
    // Main process initialization code omitted
}
/**
 * Register the Mini-Program in the Mini-Program process
 */
private void initFinClipOnAppletProcess() {
    FinAppProcessClient.INSTANCE.setCallback(new FinAppProcessClient.Callback() {
        @Override
        public List<IApi> getRegisterExtensionApis(@NotNull Activity activity) {
            List<IApi> extensionApis = new ArrayList<>();
            extensionApis.add(new LoginApi(activity));
            return extensionApis;
        }

        @Override
        public List<IApi> getRegisterExtensionWebApis(@NotNull Activity activity) {
            return null;
        }
    });
}
At this point, the entire process of the Mini-Program obtaining the user token from the APP via a custom API has been completed.
Note
If the product requirements do not require displaying a user authorization prompt Dialog, it is recommended to register the custom API in the main process, thereby eliminating the above cross-process call process.
# 2.36.3 Customize Mini-Program interfaces to implement obtaining user information
The parameters in this example are determined by developers during actual development. This example is for demonstration purposes only.
Customize the getUserProfile interface to obtain user information
public class ProfileApi extends AbsApi {

	// Definition code omitted

    /**
     * In this example, ProfileApi is directly registered in the extended API of the main process.
     * Therefore, this API runs in the main process and can directly access data.
     */
    private void getUserProfile(JSONObject jsonObject, ICallback iCallback) {
        // Code for obtaining user information omitted
    }

}
Register api in the main process
FinCallback<Object> initCallback = new FinCallback<Object>() {
    @Override
    public void onSuccess(Object result) {
        // Register extended Api, the Api registered here will execute in the main process
        FinAppClient.INSTANCE
                .getExtensionApiManager()
                .registerApi(new ProfileApi());
    }

    @Override
    public void onError(int code, String error) {

    }

    @Override
    public void onProgress(int status, String error) {

    }
};
FinAppClient.INSTANCE.init(this, finAppConfig, initCallback);
So far, the entire process of Mini-Program obtaining user information from the APP through a custom Api has been completed.
# 2.36.4 Custom Mini-Program Interface to Check if User Token Has Expired
The parameters in this example are defined by developers during actual development; this example is for demonstration purposes only.
Custom checkSession interface to verify user token
public class AppletSessionApi extends AbsApi {

	// Code definition omitted

    private void checkSession(JSONObject jsonObject, ICallback iCallback) {
       // Checking process code omitted
    }

}
Register api in the main process
FinCallback<Object> initCallback = new FinCallback<Object>() {
    @Override
    public void onSuccess(Object result) {
            // Register extended Api, the Api registered here will execute in the main process
            FinAppClient.INSTANCE
                    .getExtensionApiManager()
                    .registerApi(new ProfileApi());
            FinAppClient.INSTANCE
                    .getExtensionApiManager()
                    .registerApi(new AppletSessionApi());
    }

    @Override
    public void onError(int code, String error) {

    }

    @Override
    public void onProgress(int status, String error) {

    }
};
FinAppClient.INSTANCE.init(this, finAppConfig, initCallback);
So far, the entire process of Mini-Program checking the user token from the APP through a custom Api has been completed.
# 2.37 Does it support WebRTC?
Yes.
# 2.37.1 Using WebRTC in H5 Loaded by Mini-Programs
If you are using WebRTC directly in an H5 loaded by a Mini-Program, please refer to WebRTC Common Issues.
# 2.37.2 Using WebRTC in Mini-Programs
If you are using WebRTC in Mini-Programs, you need to integrate SDK version 2.35.0-alpha20211023v01 or higher. Specific usage instructions are as follows:
# 2.37.2.1 FinClip Android SDK Versions Supporting WebRTC
- Core SDK: 2.35.0-alpha20211023v01
- Extension SDK: 2.35.0-alpha20211023v01
# 2.37.2.2 API Documentation
# 2.37.3 Which Libraries Are Dependent?
- google-webrtc:1.0.32006
# 2.37.4 Incremental Increase in App Size After Integrating SDK
- Original size of the google-webrtc library:
armeabi-v7a : 4.4 MB(.so library) + 0.9MB(jar file) = 5.3MB
arm64-v8a: 7.1MB(.so library) + 0.9MB(jar file) = 8MB
- After integrating the SDK, the app size can increase by up to 6.2MB.
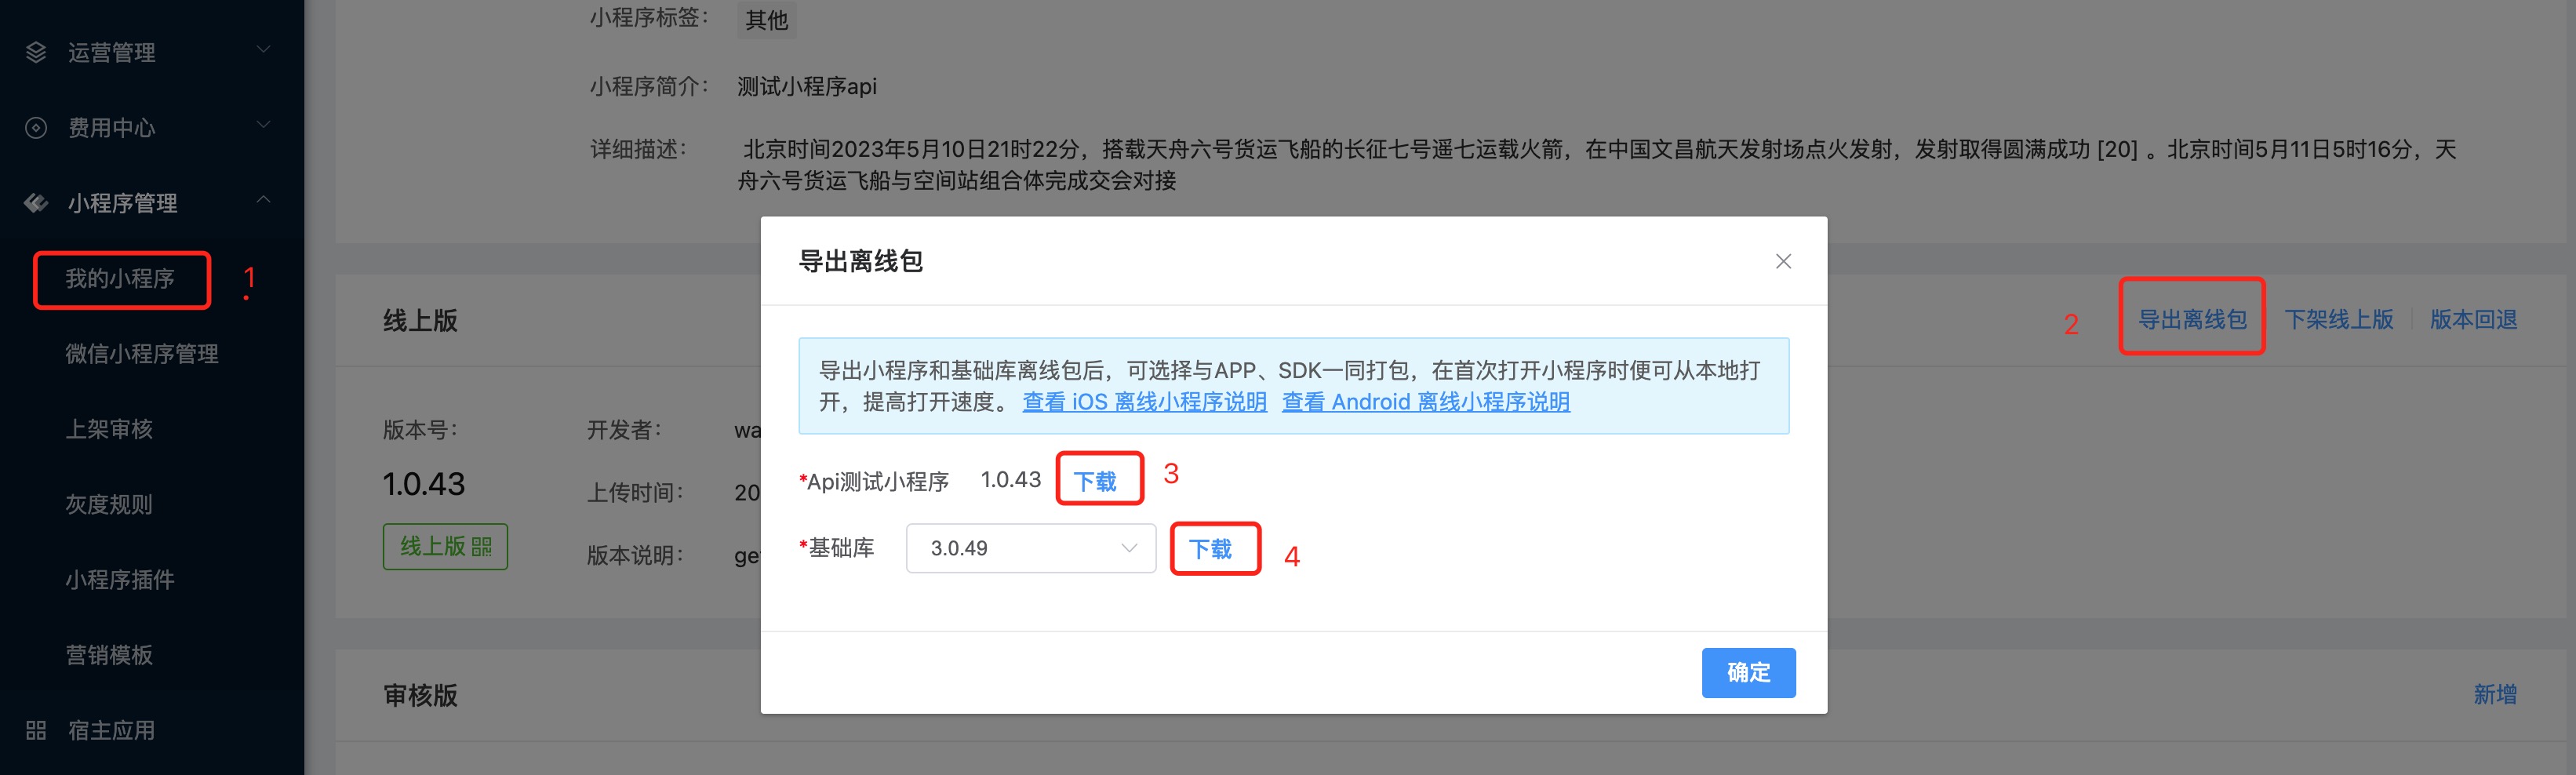
# 2.38 Does it Support Offline Mini-Programs? Use Local Mini-Programs to Improve First Load Speed
Starting from version 2.35.1, the SDK supports specifying the paths of offline Mini-Program packages and offline Base Library packages when opening Mini-Programs. This allows the Mini-Program to be opened directly using the offline package, speeding up the loading process. Subsequently, the Mini-Program can still fetch updates normally from the backend.
To obtain the offline Mini-Program package and offline Base Library package, see the image below:
Interface Definition
  /**
     * Launch Mini-Program
     *
     * @param context Context
     * @param apiServer Server address of the App Market where the Mini-Program resides
     * @param appId Mini-Program ID
     * @param startParams Parameters carried when launching the Mini-Program
     * @param offlineLibraryPath Path to the offline Base Library
     * @param offlineAppletPath Path to the local Mini-Program package
     */
    fun startApplet(context: Context, apiServer: String, appId: String, startParams: FinAppInfo.StartParams? = null, offlineLibraryPath: String, offlineAppletPath: String)
Invocation Example
  FinAppClient.appletApiManager.startApplet(this, "https://api.finclip.com",
                    "617bb42f530fb30001509b27", null,
                    "$filesDir/framework-2.11.4-alpha20211101v01.zip", "$filesDir/subpackage-jump-test-1.1.1.zip")
# 2.39 Does the Mini-Program Support Customizing More Panels?
Answer: Yes.
By implementing the CapsuleHandler capsule operation delegate and overriding the onMoreButtonClick() method, you can display/hide a custom more panel.
- Pass a CapsuleHandler instance by calling the
setCapsuleHandler(capsuleHandler: CapsuleHandler)method of FinAppProcessClient. Implement the logic to display/hide the custom more panel within theonMoreButtonClick()method, as shown below:
FinAppProcessClient.INSTANCE.setCapsuleHandler(new CapsuleHandler() {
    @Override
    public void onMoreButtonClick(@NotNull Context context, @NotNull String appId, @NotNull MoreButtonClickHandler handler) {
        // Implement the logic to display/hide the custom more panel.
        // If you do not need a custom more panel, call handler.changeDefaultMoreMenuVisibility() to display/hide the default more panel.
    }
});
Note
The methods of the CapsuleHandler class execute in the Mini-Program's process.
- Use the methods provided by the
MoreMenuHelperclass to implement the functionality of the SDK's default menu items. Method definitions are as follows:
/**
 * Trigger the forward action, consistent with the behavior of the SDK's default "Forward" menu item. Handle the forwarding logic within the proxy method shareAppMessage().
 */
fun invokeForwardMenuAction(context: Context)

/**
 * Feedback and Complaints
 */
fun goToFeedbackPage(context: Context)

/**
 * Open the About page
 */
fun goToAboutPage(context: Context, appId: String)

/**
 * Open the Settings page
 */
fun goToSettingPage(context: Context, appId: String, appTitle: String)

/**
 * Enable or disable Mini-Program debugging (vConsole)
 *
 * @param enableAppletDebug true to enable, false to disable
 */
fun setEnableAppletDebug(context: Context, enableAppletDebug: Boolean)

/**
 * Check whether Mini-Program debugging (vConsole) is enabled or disabled
 */
fun isEnableAppletDebug(context: Context): Boolean

/**
 * Update the Mini-Program's favorite status
 *
 * @param favorite true to favorite, false to unfavorite
 */
fun updateAppletFavoriteState(
   context: Context,
   favorite: Boolean,
   callback: FinCallback<Any?>
)

/**
 * Get the current Mini-Program's favorite status
 *
 * @return Returns null if the status cannot be retrieved
 */
fun isAppletFavorite(context: Context): Boolean?

/**
 * Get menu data of type [MoreMenuType.ON_MINI_PROGRAM]
 *
 * @param callback Parameter field descriptions can be found in the proxy method onRegisteredMoreMenuItemClicked()
 */
fun getMiniProgramTypeMenuData(
    context: Context,
    menuId: String?,
    callback: (appId: String, path: String, menuItemId: String, appInfo: String?, bitmap: Bitmap?) -> Unit
)

/**
 * Check if the Mini-Program implements custom menu functionality.
 * The onShareAppMessage event is affected by whether the Mini-Program calls the showShareMenu/hideShareMenu API.
 * If the Mini-Program calls showShareMenu and then this method is called to check, regardless of whether the Mini-Program implements the onShareAppMessage event, the corresponding value for this event will be true.
 * If the Mini-Program calls hideShareMenu and then this method is called to check, regardless of whether the Mini-Program implements the onShareAppMessage event, the corresponding value for this event will be false.
 *
 * @param callback result JSONArray elements are {"eventName":"Mini-Program event name","menuId":"icon ID","value":"whether the event is implemented"}
 */
fun checkMenus(
    context: Context,
    menuIds: List<String>,
    callback: (result: JSONArray) -> Unit
)
Note
The MoreMenuHelper class must be used in the Mini-Program's process.
Example:
public class App extends Application {

    private final Handler handler = new Handler();

    private static final String CUSTOM_MENU_ID = "customMenu";

    @Override
    public void onCreate() {
        super.onCreate();

        if (!FinAppClient.INSTANCE.isFinAppProcess(this)) {
            initFinClipOnMainProcess(); // Main process
        } else {
            initFinClipOnAppletProcess(); // Mini-Program process
        }
    }

    private void initFinClipOnMainProcess() {
        // Initialization configuration...

        FinCallback<Object> callback = new FinCallback<Object>() {
            @Override
            public void onSuccess(Object result) { // SDK initialization successful
                setCapsuleHandler(); // If the Mini-Program needs to open in single-process mode, it must be set in the main process.
                setAppletHandler();
            }

            @Override
            public void onError(int code, String error) { // SDK initialization failed
                Toast.makeText(App.this, "SDK initialization failed", Toast.LENGTH_SHORT).show();
            }

            @Override
            public void onProgress(int status, String error) {
            }
        };

        // Initialize FinClip SDK
        FinAppClient.INSTANCE.init(this, config, callback);
    }

    private void initFinClipOnAppletProcess() {
        setCapsuleHandler(); // If the Mini-Program needs to open in multi-process mode, it must be set in the Mini-Program process.
    }

    /**
     * Set capsule operation delegate
     */
    private void setCapsuleHandler() {
        FinAppProcessClient.INSTANCE.setCapsuleHandler(new CapsuleHandler() {

            /**
             * Mini-Program capsule "more" button clicked
             *

Translated content continues...
```markdown
             * @param context Mini-Program Context
             * @param appId Mini-Program ID
             */
            @Override
            public void onMoreButtonClick(@NotNull final Context context, @NotNull final String appId, @NotNull MoreButtonClickHandler handler) {
                // Note: This is the process where the Mini-Program resides

                // Display custom "More" panel logic. If you do not need a custom "More" panel, call handler.changeDefaultMoreMenuVisibility() to show/hide the default "More" panel.

                // For sharing configuration, refer to: [Development]->[API]->[Custom Menu]->[Sharing Configuration]
                ArrayList<String> menuIds = new ArrayList<>();
                menuIds.add("WXShareAPPFriends"); // Menu configuration information provided in the Mini-Program's onShareAppMessage method
                menuIds.add("WXShareAPPMoments"); // Menu configuration information provided in the Mini-Program's onShareAppMessage method
                menuIds.add(CUSTOM_MENU_ID); // Menu configuration information provided in the Mini-Program's onCustomMenuButtonHandler method
                MoreMenuHelper.checkMenus(context, menuIds, new Function1<JSONArray, Unit>() {
                    @Override
                    public Unit invoke(JSONArray result) {
                        // Note: This is the Mini-Program process
                        boolean forwardMenuEnable = false; // Whether the forward menu is enabled
                        boolean customMenuEnable = false; // Whether the custom menu is enabled
                        // Iterate to get button availability status
                        for (int i = 0; i < result.length(); i++) {
                        JSONObject jsonObject = (JSONObject) result.opt(i);
                        if (jsonObject != null) {
                            String eventName = jsonObject.optString("eventName");
                            if (eventName.equals("onShareAppMessage")) { // Icon ID is WXShareAPPFriends or WXShareAPPMoments
                                boolean value = jsonObject.optBoolean("value");
                                if (value) {
                                    forwardMenuEnable = true;
                                }
                            }
                            if (eventName.equals("onCustomMenuButtonHandler")) { // Icon ID is customMenu
                                boolean value = jsonObject.optBoolean("value");
                                if (value) {
                                    customMenuEnable = true;
                                }
                            }
                        }
                    }
                        showMenuDialog(context, appId, forwardMenuEnable, customMenuEnable);
                        return null;
                    }
                });
            }
        });
    }

    private void showMenuDialog(final Context context, final String appId, boolean forwardMenuEnable, boolean customMenuEnable) {
        String enableAppletDebug;
        if (MoreMenuHelper.isEnableAppletDebug(context)) {
            enableAppletDebug = "Disable Debugging";
        } else {
            enableAppletDebug = "Enable Debugging";
        }

        new MenuDialog(context)
            // Set the menu button state based on method parameters, omitted here...
            .setListener(new BottomSheetListener() {
                /**
                 * Menu button click event
                 */
                @Override
                public void onSheetItemSelected(MenuItem item) {
                    int itemId = item.getItemId();
                    if (itemId == R.id.about) {
                        // About page
                        MoreMenuHelper.goToAboutPage(context, appId);
                    } else if (itemId == R.id.setting) {
                        // Settings page
                        String appTitle = "";
                        FinAppInfo appInfo = FinAppProcessClient.INSTANCE.getAppletProcessApiManager().getAppletInfo();
                        if (appInfo != null) {
                            appTitle = appInfo.getAppTitle();
                        }
                        MoreMenuHelper.goToSettingPage(context, appId, appTitle);
                    } else if (itemId == R.id.feedback) {
                        // Feedback and Complaints
                        MoreMenuHelper.goToFeedbackPage(context);
                    } else if (itemId == R.id.forward) {
                        // Trigger forwarding action, consistent with the SDK's default "Forward" menu behavior, requires handling forwarding logic within the proxy method shareAppMessage()
                        // Reference: [Mini-Program SDK]->[Android]->[Android Common Issues]->[How to set the number of Mini-Programs that can be opened simultaneously?]
                        MoreMenuHelper.invokeForwardMenuAction(context);
                    } else if (itemId == R.id.customMenu) { // This menu requires Mini-Program information
                        // Get menu data of type [MoreMenuType.ON_MINI_PROGRAM]
                        // Parameter field description, refer to the proxy method onRegisteredMoreMenuItemClicked():
                        // Reference: [Mini-Program SDK]->[Android]->[Android Common Issues]->[How to inject your own menu items into the "More" menu?]
                        MoreMenuHelper.getMiniProgramTypeMenuData(context, CUSTOM_MENU_ID, new Function5<String, String, String, String, Bitmap, Unit>() {
                            @Override
                            public Unit invoke(String appId, String path, String menuItemId, String appInfo, Bitmap bitmap) {
                                // Note: This is the Mini-Program process
                                // Custom menu business logic...
                                return null;
                            }
                        });
                    } else {
                        // Enable or disable Mini-Program debugging (vConsole)
                        MoreMenuHelper.setEnableAppletDebug(context, !MoreMenuHelper.isEnableAppletDebug(context));
                    }
                }
            })
            .show();
    }

    private void setAppletHandler() {
        FinAppClient.INSTANCE.getAppletApiManager().setAppletHandler(new IAppletHandler() {
            /**
             * Forward Mini-Program
             *
             * @param appInfo Mini-Program information, a JSON string containing Mini-Program ID, name, icon, user ID, forwarded data content, etc.
             * @param bitmap Mini-Program cover image. If the [appInfo].params.imageUrl field is an HTTP/HTTPS link, the Mini-Program cover image will be taken from [appInfo].params.imageUrl; otherwise, it will be taken from [bitmap].
             * @param callback Callback for Mini-Program forwarding results.
             *
             * Reference: [Mini-Program SDK]->[Android]->[Android Common Issues]->[How to share Mini-Programs to platforms like WeChat that support Mini-Programs?]
             */
            @Override
            public void shareAppMessage(@NotNull String appInfo, @Nullable Bitmap bitmap, @NotNull final IAppletCallback callback) {
                handler.post(new Runnable() {
                    @Override
                    public void run() {
                        // Forward/Share...
                        callback.onSuccess(null);
                    }
                });
            }
        });
    }
}
# 2.40 Can Mini-Programs run as single-task?
Answer: Yes.
By default, when starting a Mini-Program, the SDK runs it in multi-task mode. The most intuitive manifestation is that in the system's recent tasks list, the Host-App and Mini-Program are displayed as separate tasks. The SDK allows setting the Mini-Program to run in single-task mode, meaning that in the system's recent tasks list, the Host-App and Mini-Program are displayed under the same task. The setting method is as follows:
When calling the Mini-Program launch interface, set the isSingleTask field value of the IFinAppletRequest object to true.
IFinAppletRequest:
/**
 * Identifier for whether to open the Mini-Program via a single-task stack
 */
internal var isSingleTask: Boolean = false

/**
 * Set whether to open the Mini-Program via a single-task stack
 */
fun setSingleTask(isSingleTask: Boolean): IFinAppletRequest {
    this.isSingleTask = isSingleTask
    return this
}
Example:
FinAppClient.INSTANCE.getAppletApiManager().startApplet(this, IFinAppletRequest.Companion.fromAppId("Mini-Program ID").setSingleTask(true), null);
# 2.41 How to use J2V8 to load Mini-Programs?
The SDK supports using J2V8 to load Mini-Programs. The method to enable J2V8 is as follows:
Add the jitpack repository to the outermost build.gradle file of the Android project:
allprojects {
    repositories {
        ... other repositories ...
        maven { url "https://jitpack.io" }
      	... other repositories ...
    }
}
Add the following dependencies to the build.gradle file of the Android App module:
// j2v8
implementation 'com.eclipsesource.j2v8:j2v8:6.2.1@aar'
// j2v8-debugger
// If you want to debug J2V8 through Chrome DevTools, you must depend on j2v8-debugger; otherwise, you can omit it.
implementation('com.github.AlexTrotsenko:j2v8-debugger:0.2.3') {
    exclude group: 'com.eclipsesource.j2v8'
    exclude group: 'com.android.support'
}
If j2v8-debugger is included and the APP project compilation reports the following error:
Manifest merger failed : uses-sdk:minSdkVersion 19 cannot be smaller than version 23 declared in library [com.github.AlexTrotsenko:j2v8-debugger:0.2.3]
xxx/j2v8-debugger-0.2.3/AndroidManifest.xml as the library might be using APIs not available in 19
	Suggestion: use a compatible library with a minSdk of at most 19,
		or increase this project's minSdk version to at least 23,
		or use tools:overrideLibrary="com.alexii.j2v8debugger" to force usage (may lead to runtime failures)
Then add the following code to the AndroidManifest.xml file of the App module:
<uses-sdk tools:overrideLibrary="com.alexii.j2v8debugger" />Add J2V8 obfuscation rules to the App module as follows:
# J2V8
-keep class com.eclipsesource.v8.** {*;}
# 2.42 Does the FinClip SDK support setting language? How to set it?
Starting from FinClip Android SDK version 2.40.0-alpha20230106v02, the SDK supports setting the language type. The language type affects the language of text in public UI components (such as the "More" panel, About, Settings, Feedback, etc.) within the SDK. Currently, only Simplified Chinese and English are supported. Setting other languages will display the default value, Simplified Chinese.
How to set it? In FinAppConfig, there is a locale configuration item. Set this value during initialization.
Example code:
val config = FinAppConfig.Builder()
            .setLocale(Locale.SIMPLIFIED_CHINESE)
            .build()
# 2.43 How to set the maximum number of Mini-Programs that can run simultaneously?
Android Mini-Programs use a multi-process approach to run, with each Mini-Program being a new process. When a Mini-Program is closed via the capsule button, its process is merely pushed to the background. A maximum of 5 Mini-Programs can run simultaneously. The maximum number of concurrently running Mini-Programs can be set via the initialization configuration item.
Note
The range is 1-5. Setting values <=0 or >5 will not take effect.
# 2.44 How to set up a foreground service to keep the app running?
When a Mini-Program is opened and the app goes into the background, the app may be killed by the system. You can configure the app to start a foreground service to ensure it keeps running without being killed by the system.
### 2.45 How to set the Mini-Program process to close when the main process closes?
By default, when the app's main process closes, the Mini-Program can still run independently. You can configure it so that when the app process is closed or killed, the Mini-Program process is also closed.

:::: tabs
::: tab "Kotlin"

```kotlin
val config = FinAppConfig.Builder()
    .setBindAppletWithMainProcess(true) // When the main process closes, the Mini-Program process also closes
    .setKillAppletProcessNotice("The APP has been closed, and the Mini-Program cannot be used independently. Please reopen the APP to use the Mini-Program.")
    .build()

FinAppClient.init(application, config, object : FinCallback<Any?> {})
:::
::::
# 2.46 How to internationalize the SDK?
Answer: The SDK already supports internationalization and currently offers two languages: Chinese and English. If you need the SDK to support other languages, follow these steps:
First, confirm which SDKs you have integrated. For example, if you are integrating the core SDK [
finapplet]:implementation 'com.finogeeks.lib:finapplet:2.42.4-dev20231107v07'Locate the core SDK [
finapplet].aarfile in your project, as well as all English resource files, as shown in the image below: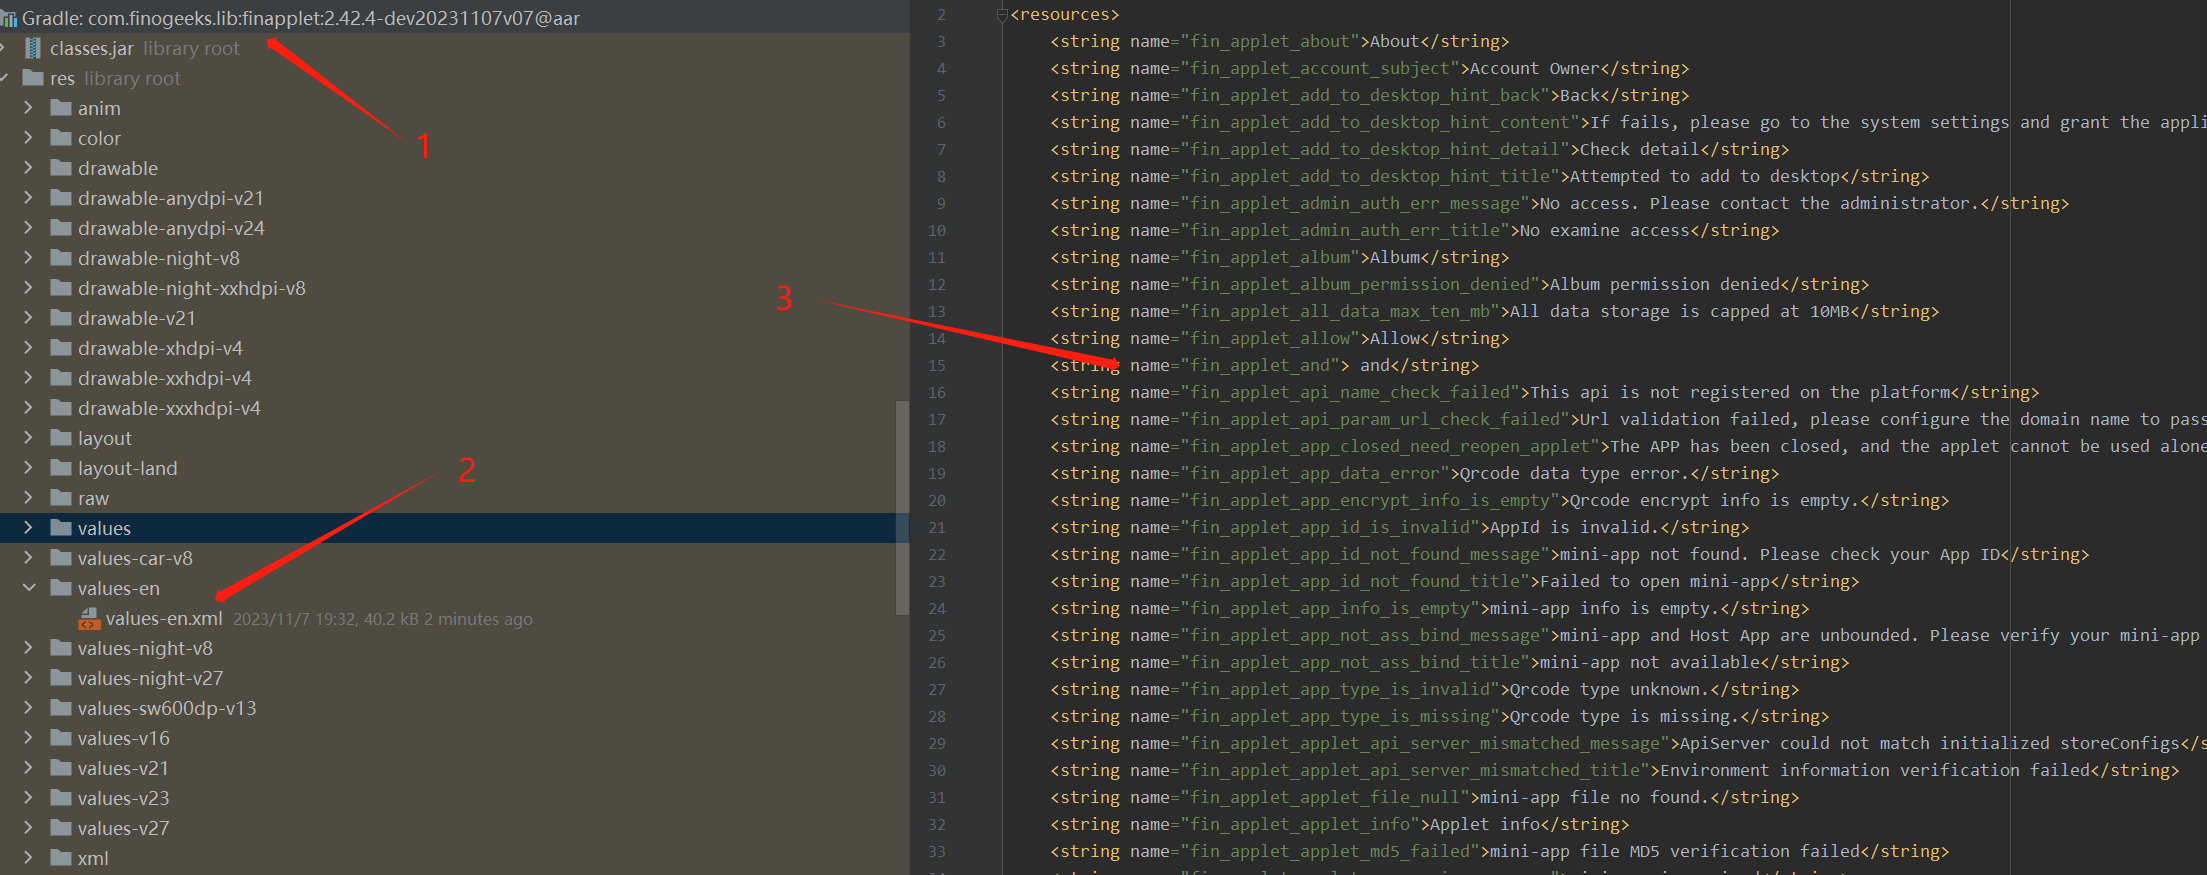
Copy the text from the English resource file [
values-en] into the corresponding folder in your project where you want to implement internationalization. Then, keeping the key unchanged, translate the English text into the language you need for internationalization.Place the translated text into the directory corresponding to the target language (directory names are specified by Android official guidelines; refer to: https://juejin.cn/post/7115376916281950244).
Note:
When translating the term "Mini-Program," you can decide what to translate it into (some customers may customize it into something else, such as "Quick App," etc.).
Retain placeholders in the text; removing them might cause crashes.
Do not omit keys even if the text is the same for different keys.
Not all SDKs will have English resource files. If there is no English resource file [
values-en], internationalization is unnecessary.If adding internationalized resources causes compilation errors, try adding the following configuration to the
app/build.gradlefile:android { // Other existing configurations lintOptions { checkReleaseBuilds false abortOnError false } }
# 2.47 How to customize the Picker province-city-district data source?
Answer: Starting from version 2.43.1, the Host-App can customize the Picker province-city-district data source.
When initializing the SDK, pass in the desired data source. Example code:
val config = FinAppConfig.Builder()
	.setPickerRegionPath(file)
    .build()

FinAppClient.init(application, config, callback)
Here, file is the custom data source file object, supporting JSON format data. Refer to: example.json (opens new window)
# 3. Debugging
# 3.1 What tools should be used to debug Mini-Programs during development?
Answer: The Android Mini-Program SDK uses Tencent's TBS browsing service (X5 kernel), and the debugging tool is TBS Studio. TBS Studio allows you to debug Mini-Programs just like debugging web pages in Chrome.
Note
Starting from version 2.33.3, the SDK has replaced the X5 kernel with the system WebView.
# 3.2 Why does TBS Studio fail to start debugging, always prompting that the current target App cannot be debugged using TBS? Ensure that the current target App's WebView is based on TBS and that previous steps were executed successfully.
Answer: This issue usually occurs because the current device has a 64-bit processor and the application is not running in 32-bit mode. Versions of the TBS SDK prior to 43903 do not provide 64-bit .so dynamic libraries. If the application runs in 64-bit mode on a 64-bit processor device, the TBS SDK initialization will fail, and the X5 kernel will not be enabled.
To enable the X5 kernel on a 64-bit processor device, make the following settings in the defaultConfig section of the current Android project's build.gradle file to run the application in 32-bit mode:
ndk {
	// Set supported SO library architectures
	abiFilters "armeabi", 'armeabi-v7a'
}
If an error occurs after configuring, resolve it by adding the following configuration to the project's gradle.properties file:
Android.useDeprecatedNdk=true;
# 3.3 Why does the Mini-Program keep showing a blank screen when loading web pages on some low-version systems but not on high-version systems?
Answer: This situation generally arises because browsers on low-version systems are also outdated and cannot recognize newer syntax features. For example, some browser versions were released before ES6 was finalized and published. If new ES6 features are used in coding and the browser hasn't been updated, opening the webpage in the browser will result in the browser failing to recognize the ES6 code, causing errors.
For such issues, we generally recommend:
- Use syntax with good compatibility when coding.
- If it's unavoidable to use some new syntax features, consider introducing syntax conversion tools like babel-polyfill, which automatically convert new syntax into older versions, allowing you to use new syntax without worrying about environment compatibility.
# 3.4 How to enable vConsole for debugging Mini-Programs?
If you need to use vConsole to debug Mini-Programs, there are multiple ways to enable Debug mode:
- When initializing the SDK, set the configuration item
setAppletDebugModetoFinAppConfig.AppletDebugMode.appletDebugModeEnable. - For non-release versions (e.g., trial, review, development, preview) and when
setEnableAppletDebugisappletDebugModeUndefined, you can enable Debug mode via the "Open Debug" option in the more menu. - Mini-Programs can call the API (
ft.setEnableDebug) to enable Debug mode.
If you need to debug Mini-Programs, there are multiple ways to enable vconsole, allowing you to see logs within the Mini-Program.
The effect after toggling vconsole is shown in the figure below:
The functions of each enumeration value of appletDebugMode:
| appletDebugMode | Description |
|---|---|
| appletDebugModeUndefined | Default value, final effect consistent with WeChat's vConsole control. Non-release versions will display the "Open Debug" button in the more menu. |
| appletDebugModeEnable | Force all Mini-Programs (all versions) to enable vconsole, and it cannot be turned off via setEnableDebug or the debug menu in the more menu. |
| appletDebugModeDisable | Do not enable vconsole; Mini-Programs can call setEnableDebug to enable it. |
| appletDebugModeForbidden | Force all Mini-Programs (all versions) to disable vconsole, and it cannot be turned on via setEnableDebug or the debug menu in the more menu. |
| appletDebugModeForbiddenRelease | Force all release versions of Mini-Programs to disable vconsole; other versions behave like appletDebugModeUndefined. |
Note
- The Mini-Program's debug mode is persistently stored. That is, after calling
ft.setEnableDebugto enable vConsole, the next time you open the same Mini-Program, vConsole will also be enabled. - The debug mode is consistent across the same Mini-Program. For example, enabling vConsole in the trial version via
ft.setEnableDebugwill also enable vConsole when opening the formal version with the same Mini-Program ID. - If
appletDebugModeis set toappletDebugModeEnableorappletDebugModeForbidden, theft.setEnableDebuginterface will not take effect.
Finally, it is recommended to set appletDebugMode to appletDebugModeEnable during the app development phase; then change it to appletDebugModeDisable when submitting the app for review.
Setting it to appletDebugModeDisable and not hiding the debug button in the more menu means that the formal version of the Mini-Program will not show the "Open Debug" and "Close Debug" buttons, but vconsole can still be enabled via the API (ft.setEnableDebug).
Non-formal versions of the Mini-Program can enable vconsole through "Open Debug" and ft.setEnableDebug.
# 3.5 How to view the Android SDK version number and Base Library version number?
Answer: There are several ways: from the Mini-Program vConsole, from the app's build.gradle file, and from the logs.
- If the Mini-Program has vConsole enabled, you can see the SDK version number and Base Library version number from the vConsole. After opening vConsole, the first few lines of the Log tab show the Base Library version number; the System tab’s userAgent shows the SDK version number.
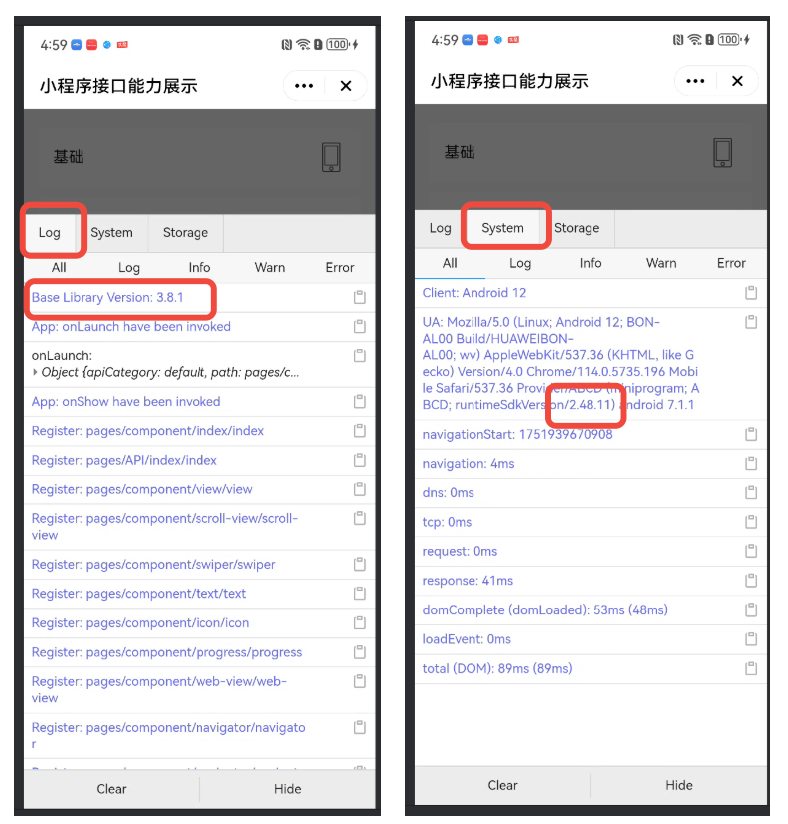
View the SDK version number from the app's
build.gradlefile.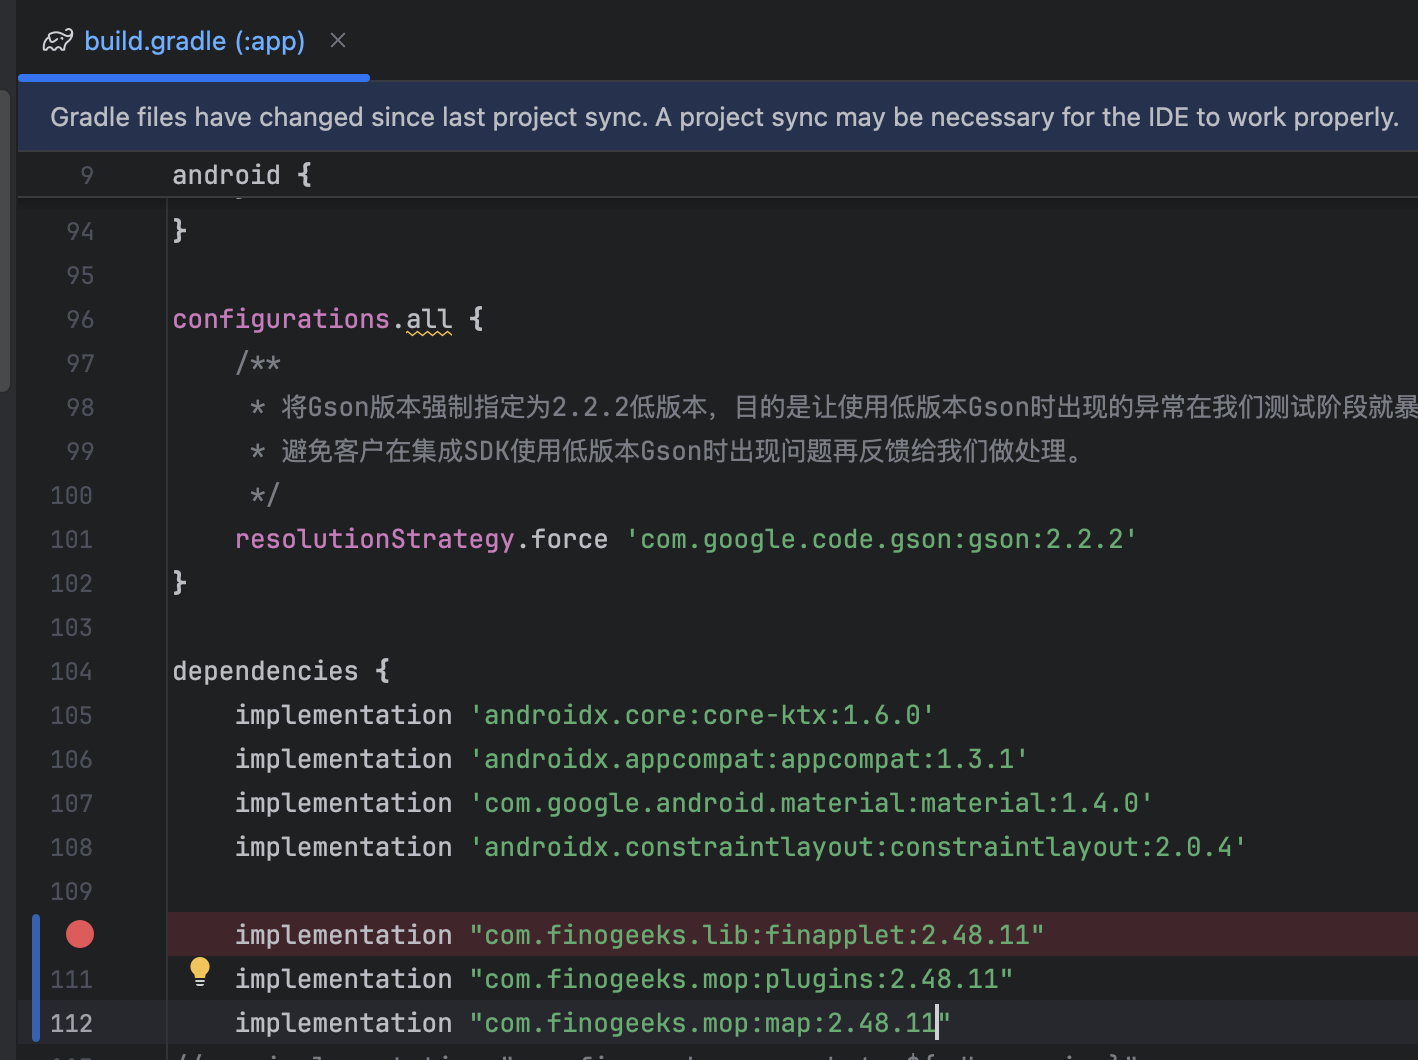
Check the SDK version number and Base Library version number from the logs in the Android app console.