这篇文章主要介绍了微信小程序联网请求的轮播图的相关资料,需要的朋友可以参考下
微信小程序的轮播图和Android的轮播图一点不一样 ,这里我们看一下我们需要用到的控件介绍

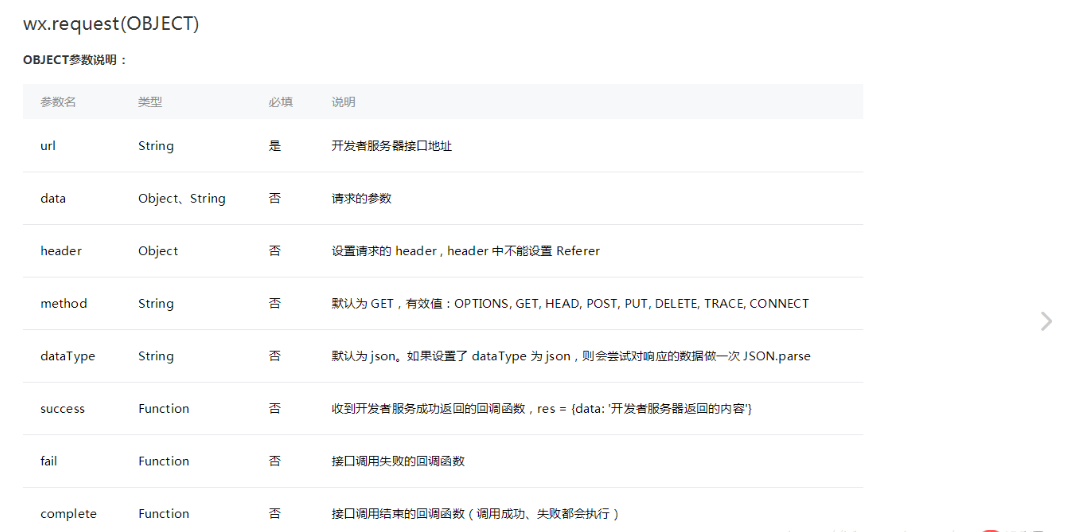
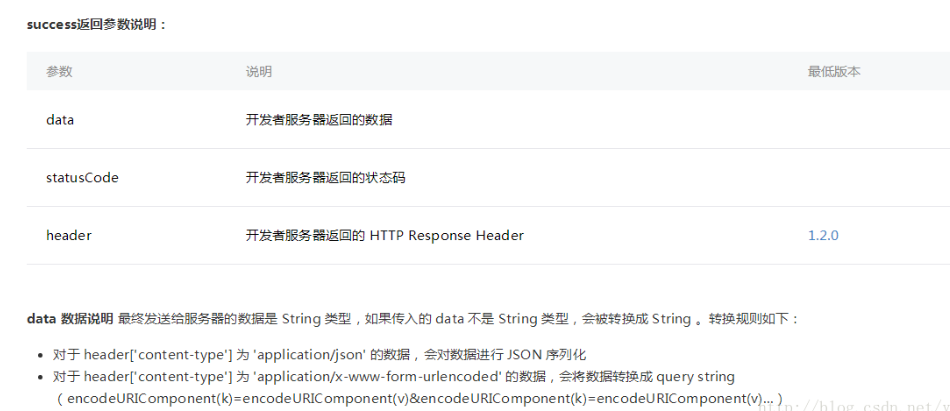
这里我们用到了swiper这个组件,上边的图片已经把这个组件的属性 都列出来了 我们用的时候直接用就可以了 接下来,再看一下网络请求的API,这里我们用到的是GET 请求,我们开一下微信小程序官方给我们的API
接下来就是开启我们小程序轮播图之旅了,附上一张效果图
首先,我们看一下我们的index.wxml文件
1 2 3 4 5 6 7 8 9 | <view>
<swiper class="swiper_box" indicator-dots="{{indicatorDots}}" vertical="{{vertical}}" autoplay="{{autoplay}}" interval="{{interval}}" duration="{{duration}}" bindchange="swiperchange">
<block wx:for="{{images}}">
<swiper-item>
<image src="{{item.picurl}}" class="slide-image" />
</swiper-item>
</block>
</swiper>
</view>
|
index.js文件
1 2 3 4 5 6 7 8 9 10 11 12 13 14 15 16 17 18 19 20 21 22 23 24 25 26 27 28 29 30 31 32 33 34 35 36 37 38 39 40 41 42 43 44 45 46 47 48 49 | var app = getApp()
Page({
data: {
indicatorDots: true,
vertical: false,
autoplay: true,
interval: 3000,
duration: 1000,
},
onLoad: function (options) {
var that = this
app.getUserInfo(function (userInfo) {
that.setData({
userInfo: userInfo
})
})
wx.request({
url: 'http://huanqiuxiaozhen.com/wemall/slider/list',
method: 'GET',
data: {},
header: {
'Accept': 'application/json'
},
success: function (res) {
console.log('11111' + res),
that.setData({
images: res.data
})
}
})
}
})
|
index.wxss 这里就是简单的控制了一下显示的样式
1 2 3 4 5 6 7 8 9 | .swiper_box {
width: 100%;
}
swiper-item image {
width: 100%;
display: inline-block;
overflow: hidden;
}
|
以上就是微信小程序之关于联网请求的轮播图详解的详细内容。
版权声明:本文内容由网络用户投稿,版权归原作者所有,本站不拥有其著作权,亦不承担相应法律责任。如果您发现本站中有涉嫌抄袭或描述失实的内容,请联系我们jiasou666@gmail.com 处理,核实后本网站将在24小时内删除侵权内容。