
# Desktop Usage Guide
# 1. API Description
# 1. API Style
The SDK's APIs are designed in C language style, providing external DLL/SO files for invocation. Therefore, when using higher-level programming languages to call these APIs, attention must be paid to the differences and details inherent in the idiomatic practices of different languages.
# 2. Basic Concepts
The SDK has two important objects: the Server Object and the Mini-Program Object. The Server Object is distinguished by appstore, while the Mini-Program Object is distinguished by appid. Typically, when an API needs to use/modify the corresponding object, these two values are used as parameters. For example:
// Operate the Mini-Program Object: close the specified Mini-Program
finclip_close_applet(const char* appid);

// Read the content of the Server Object: start the Mini-Program with the specified appid
finclip_start_applet(const char* appstore, const char* appid);
# 3. Callback Functions
Some API parameters include callback functions. For example:
finclip_register_api(FinClipApiType type,
                     const char* apis,
                     void* (const char* event, const char* param, void* input, int callbackid),
                     void* input);
void* input
Note that APIs containing callback functions usually have a void* input parameter. This parameter will be passed back as-is when the callback is triggered and is unrelated to specific business logic. A common practice is to pass this/self or similar context into this parameter to ensure it can be used within the callback function.
# 4. Return Values
APIs typically have two types of return values: integer error codes or pointers.
- For functions returning error codes, refer to
finclip_api_error.hfor corresponding error information. - For functions returning pointers, please note the destruction method; manual control over destruction is required.
# 5. Other Considerations
When calling APIs with callback functions, be cautious of garbage collection issues in higher-level languages. If the callback is triggered after being garbage collected, it may cause the SDK to crash.
# 2. Custom APIs
Custom APIs are used for communication between the Host-App and Mini-Programs/embedded WebView pages. Common scenarios include:
- The Host-App provides interfaces for Mini-Programs/embedded WebViews to call.
- The embedded WebView provides interfaces for the Host-App to call.
# 1. Host-App Provides Interfaces for Mini-Programs/Embedded WebViews
Use finclip_register_api to implement custom APIs:
void WebApiExample(const char* event, const char* param, void* input,
                   int callbackid) {
    FinClipParams* res = finclip_create_params();
    finclip_params_set(res, "result", "ok");
    finclip_callback_success(callbackid, res);
    finclip_destory_params(res);
}

finclip_register_api(kWebView, "test", WebApiExample, this);
Call the API within the Mini-Program to get the result returned by the Host-App:
wx.test({});
# 2. Embedded WebView Provides Interfaces for Host-App
The WebView page registers the corresponding event:
window.ft.onNativeAPIHandler('test', cb)
The Host-App calls the API to get the result:
finclip_invoke_api(0, appid, "test", params, callback, input);
# 3. Lifecycle Callbacks
Mini-Programs define 7 lifecycle events. You can listen to the corresponding events as needed.
// Supported callback types
enum LifecycleType {
  kLifecycleStarted = 1,   // Mini-Program started
  kLifecycleClosed = 2,    // Mini-Program closed
  kLifecycleHide = 3,      // Mini-Program window hidden
  kLifecycleShow = 4,      // Mini-Program window shown
  kLifecycleDomReady = 5,  // Mini-Program first-screen rendering completed
  kLifecycleCrashed = 6,   // Mini-Program crashed
  kLifecycleError = 7,     // Mini-Program startup error
};

// Define the lifecycle handler function
void LifecycleHandle(LifecycleType type, const char* appid, void* input) {
    // Note: Threading issues need to be handled here, such as:
    // 1. Locking global variables
    // 2. If this handler needs to handle the UI, it may need to be dispatched to the UI thread depending on the UI framework
    // ...
}

// Register the lifecycle callback
finclip_register_lifecycle(appid, kLifecycleClosed, LifecycleHandle, window)
# 4. custom_event
The custom_event is used for the Host-App to send messages to the Mini-Program.
First, listen to the onCustomEvent event within the Mini-Program:
const callback = (res) => {
    console.log(res)
}
wx.onCustomEvent(callback)
The Host-App calls finclip_send_custom_event to send the event:
finclip_send_custom_event(app_id, params);
# 5. Embedding Mode
Currently, embedding mode is only supported on Windows. Support for Mac and Linux is under development.
# 5.1 Embedding a Window
To embed a Mini-Program into your window, first obtain the window handle, denoted as hwnd.
We provide two APIs to complete window embedding.
  finclip_start_applet_embed(appstore, appid, params, hwnd); // Embed the Mini-Program into the specified window upon startup
  finclip_embed_applet(appid, hwnd); // Embed an already started Mini-Program into the specified window
# 5.2 Handling Scaling Events
When your window changes size, you need to listen for window change events and notify the Mini-Program process of the new width and height.
finclip_set_position(appid, left, top, width, height);
# 5.3 Closing Handling
There are two scenarios for exit:
- The Host-App window closes first. In this case, you need to call
finclip_close_appletto notify the FinClip process to exit, or use other methods to terminate the process. - The FinClip process closes first. In this case, you need to handle the message sent by FinClip.
  // Scenario 1: Host-App window closes first. You need to notify the Mini-Program to exit in the window close event.
  finclip_close_applet(appid); // Notify the Mini-Program to close

  // Scenario 2: Mini-Program closes first. You need to close the Host-App window in the Mini-Program's closed lifecycle event.
  void LifecycleHandle(LifecycleType type, const char* appid, void* input) {
    if (type == kLifecycleClosed) {
      window.close();
    }
}
# 6. Debug Mode
# 6.1 Debugger Introduction
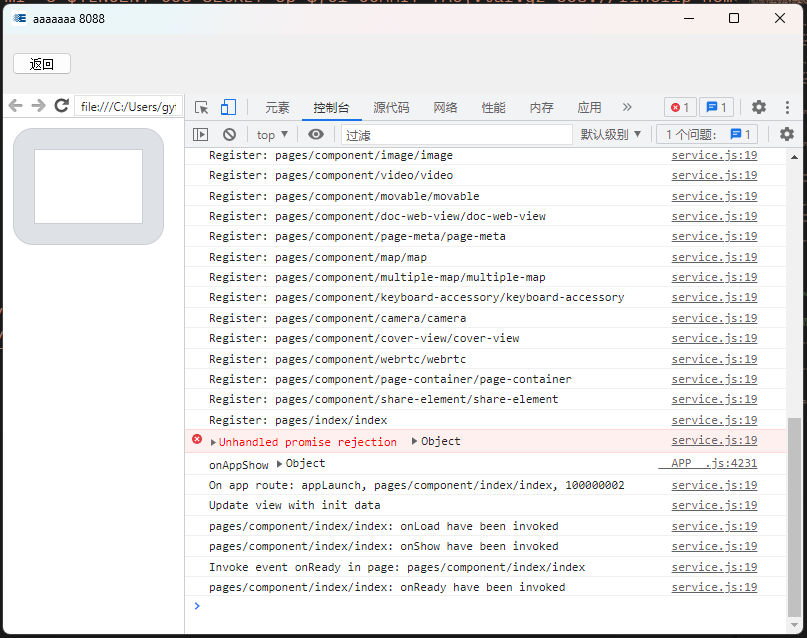
Debug mode is primarily intended for Mini-Program developers. Through the debugger interface, developers can perform operations such as calling Mini-Program APIs and observing Mini-Program logs, making it easier to locate issues.
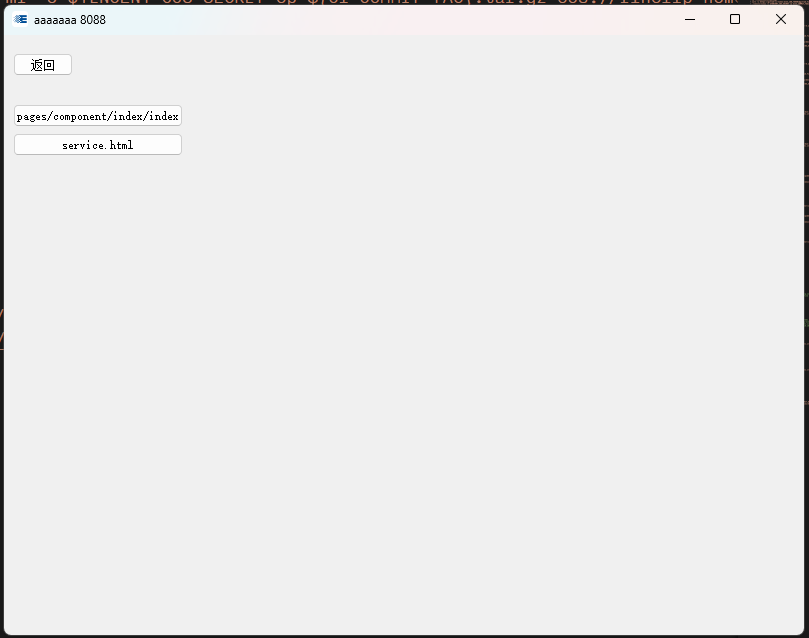
When entering the debugger window, you can see a list of pages for the currently running Mini-Program.
The service.html page is similar to the vConsole interface, where you can execute Mini-Program APIs. The other pages correspond to the pages already opened by the Mini-Program.
console.log Output Location
When you call console.log in your Mini-Program code to print variables, the output may appear in the service.html page or in the corresponding Mini-Program page.
# 6.2 How to Enable Debug Mode
Debug mode can be enabled in two ways: configuring startup parameters or setting environment variables. Supported starting from SDK version 1.6.5.
- Configuring Startup Parameters
By configuring the startup parameter remote_debug when starting the Mini-Program, you can control whether debug mode is enabled for each Mini-Program individually. This step needs to be handled during SDK integration.
Before starting the Mini-Program using the API:
finclip_start_applet_params(const char* appstore, const char* appid, FinclipParams* params);
Add the startup parameter to the params:
finclip_params_set(params, "remote_debug", "1");
This will enable debug mode for that Mini-Program.
- Setting Environment Variables
By setting the environment variable FINCLIP_DEBUG to 1, you can enable debug mode for all Mini-Programs (supports Windows/Linux).
How to Set Environment Variables
Windows
- Open the Run dialog with the shortcut
Win + R.
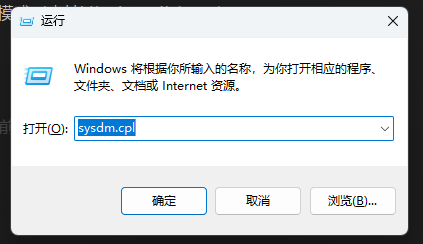
- Enter
sysdm.cplin the Run dialog to open the System Properties window. - In the System Properties window, switch to the "Advanced" tab and click the "Environment Variables" button at the bottom.
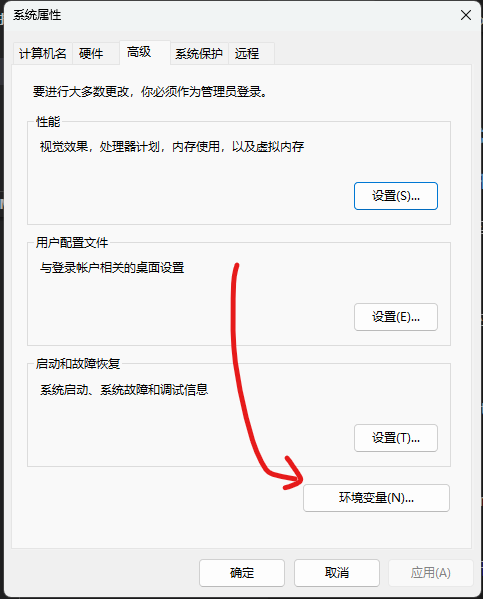
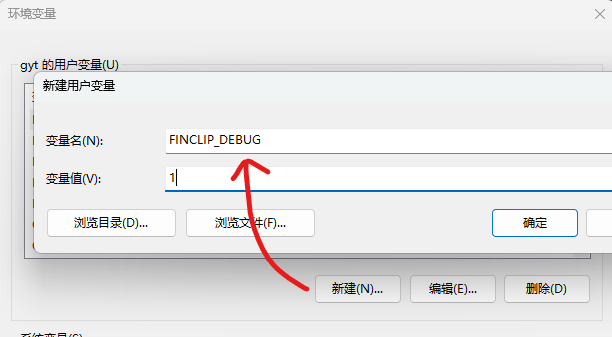
- Click "New", enter the variable name
FINCLIP_DEBUGand value1to add it successfully.
Linux
Enter export FINCLIP_DEBUG=1 in the terminal to configure the environment variable. Note that this configuration is only effective for the current terminal session.
# 6.3 Differences After Enabling Debug Mode
- After enabling debug mode, the SDK's log files will output Debug-level logs, which are more detailed than the normal Info-level logs.
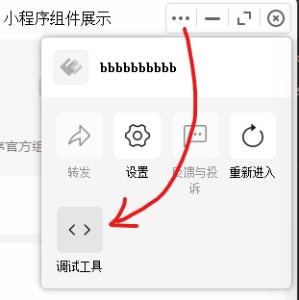
- After enabling debug mode, you can access the Mini-Program's debug interface via the more menu in the upper right corner (as shown in the image).
# 6.4 Usage Scenarios
Recommended practices for enabling debug mode in different usage scenarios:
- SDK Integrators
SDK integrators can conveniently enable debug mode during the development phase by adding the remote_debug parameter when starting the Mini-Program. This method can also be exposed to Mini-Program developers or testers for their use.
- Mini-Program Developers or Testers
For personnel developing or testing Mini-Programs within an already integrated application:
- If the SDK integrator provides a way to set the
remote_debugstartup parameter, it is recommended to use that method. - If the
remote_debugparameter cannot be configured, then use the environment variable method to enable debug mode.
- End Users
If end users report issues that are difficult to reproduce and need to be troubleshooted in the user's environment, enable debug mode by setting the environment variable.